Мультиварки VITEK VT-4220 SR - инструкция пользователя по применению, эксплуатации и установке на русском языке. Мы надеемся, она поможет вам решить возникшие у вас вопросы при эксплуатации техники.
Если остались вопросы, задайте их в комментариях после инструкции.
"Загружаем инструкцию", означает, что нужно подождать пока файл загрузится и можно будет его читать онлайн. Некоторые инструкции очень большие и время их появления зависит от вашей скорости интернета.


5
ENGLISH
keep it for at least two hours at room tem-
perature before switching on.
–
Unpack the unit, remove any stickers and
package materials that can prevent multi-
cooker operation.
–
Place the multicooker on a flat, heat-resistant
surface away from all kitchen heat sources
(such as gas cooker, electric cooker or cook-
ing unit).
–
Place the multicooker keeping at least a
20 cm gap between the multicooker body and
the wall and a 30-40 cm gap above the unit.
–
Do not place the multicooker too close to
objects that can be damaged by the released
steam of high temperature.
Attention! Do not place the unit near bath
tubs, kitchen sinks or other containers filled
with water.
–
Open the lid (4) by pressing the button (5).
–
Wash all removable parts with a soft sponge and
a neutral detergent: bowl (11), steam cooking
basket (21), soup ladle (22), spatula (23), mea-
suring cup (24) and cups with lids (25). Then
rinse them under running water and dry.
–
Remove the protection screen (13) by pulling
the handles on the upper part of the screen.
Wash the screen with warm water and neutral
detergent, rinse and dry it thoroughly. Insert
the lower part of the protection screen into the
notch on the lid (4) and press the upper part of
the screen until the lock clicks.
–
Clean the unit body with a damp cloth and
then wipe it dry.
SAFETY LOCK
Attention! For safety reasons the unit will be
switched to the lock mode automatically if
you do not press the control panel buttons
for 1 minute.
The control panel will be disabled,
the display will glow red and go out in 5 seconds.
The unit remains locked even if unplugged. If
the control panel buttons are disabled after
you plugged the unit in, unlock it.
To unlock the unit, pass your finger smoothly
from the «TIME» button (18) to the «DELAYED
START» button (16).
CURRENT TIME SET TING
–
Insert the power cord connector into the con-
nection socket (8) and the power cord plug
into the mains socket. Switch the safety lock
off if it is enabled.
–
Press and hold down the «TIME» button (18),
time indications will start flashing on the dis-
play (3).
–
Touch the «+» button (17) to set the time in
hours and touch the «-» button (17) to set the
time in minutes.
–
Press any button on the control panel (2)
except the «+/-» buttons (17).
Note:
•
The built-in battery ensures that the display
back-up power supply system works, so the
current time is shown on the display even if
the unit is unplugged.
•
If the back-up power system does not work,
apply to an authorized service center for
replacing the battery.
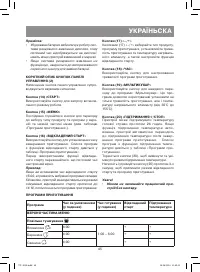
SHORT DESCRIPTION OF THE CONTROL
PANEL (2)
Pressing of the control panel buttons is accom-
panied by a sound signal.
“START” Button (14)
Press this button to start the set operation mode.
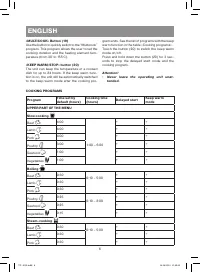
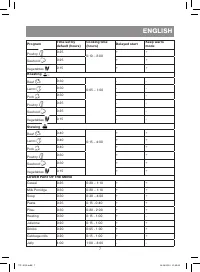
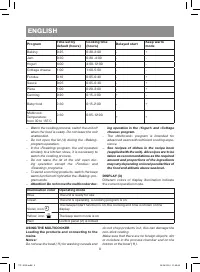
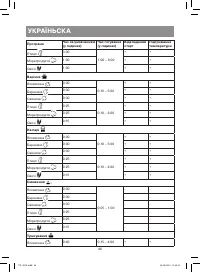
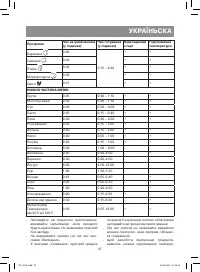
«MENU» Button (15)
Consequently press the button to switch to
selecting the product type and the program in
the upper and lower parts of the menu (see table
«Cooking programs»).
«DELAYED START» button (16)
Use this button to set the cooking end time. See
the list of programs with available delayed start
function in the table «Cooking programs».
Before using the delayed start function, make
sure that the current time is set properly.
Example
:
If you set the delayed start time for 15:00, and the
duration of the selected program is 50 minutes,
the unit will stay in delayed start mode until 14:10
and then the cooking process will start.
«-/+» buttons (17)
Use the «-/+» buttons (17) to select the prod-
uct type and the cooking program and to set the
cooking duration, the heating element tempera-
ture and the delayed start function.
«TIME» button (18)
Use this button to set the cooking program dura-
tion.
VT-4220.indd 5
16.06.2014 11:40:08
Содержание
- 23 При готовке продуктов на пару
- 24 Не заменяйте чашу другой ёмкостью.; ПЕРЕД ПЕРВЫМ ИСПОЛЬЗОВАНИЕМ
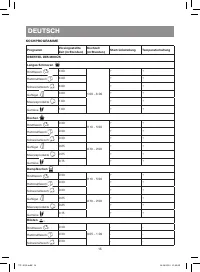
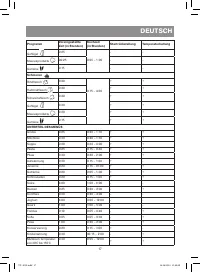
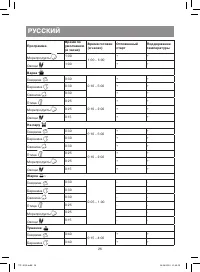
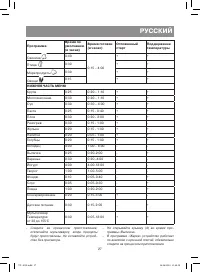
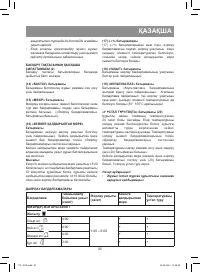
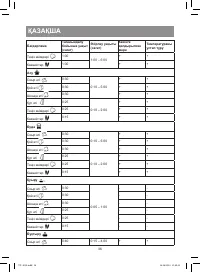
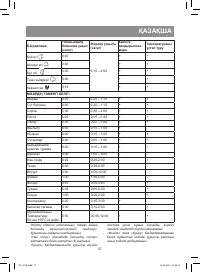
- 25 Пример; ПРОГРАММЫ ПРИГОТОВЛЕНИЯ; Программа; ВЕРХНЯЯ ЧАСТЬ МЕНЮ; Говядина
- 28 Цвет подсветки; ледите за тем, чтобы объём ингредиентов вме-
- 29 Если программа приготовления
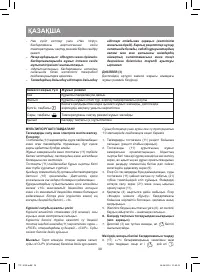
- 30 Примечание; Программа «Фондю»; нажмите; ЧИСТКА И УХОД
- 31 ХРАНЕНИЕ; характеристики
- 52 RUS


