Мультиварки VITEK VT-4206 R - инструкция пользователя по применению, эксплуатации и установке на русском языке. Мы надеемся, она поможет вам решить возникшие у вас вопросы при эксплуатации техники.
Если остались вопросы, задайте их в комментариях после инструкции.
"Загружаем инструкцию", означает, что нужно подождать пока файл загрузится и можно будет его читать онлайн. Некоторые инструкции очень большие и время их появления зависит от вашей скорости интернета.


6
ENGLISH
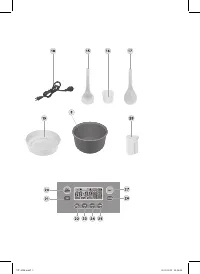
3. If you steam food, insert the basket (19) with prod-
ucts and pour water in the bowl (3) so that boiling
water doesn’t reach the bottom of the basket (19).
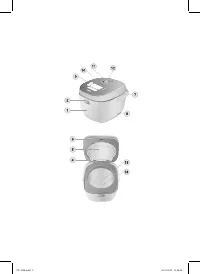
4. Close the lid (6) of the multicooker until click.
5. Insert the power cord into the connector (8), insert
the power plug (18) into the socket.
6. To choose an automatic cooking program, press the
“MENU” button (26) repeatedly till the necessary
program appears on the display the indicator of the
chosen program will start blinking.
7. Cooking time in different programs is set by default,
but it can vary within the set range. Press the “Timer”
button (25) to change cooking time, then set the
time with the “HOURS” (23) и “MINUTES” (24) but-
tons (see Table
2).
8. Press the “START” button (27) to start cooking.
Note:
If an emergency power cutoff happens during cooking,
the unit keeps the cooking program settings for 40
minutes. If the power gets normal within 40 minutes
after the cutoff, the unit will continue operating
automatically. If the emergency power cutoff lasts more
than 40 minutes, preset the unit again.
9. Watch the food during cooking, if necessary stir the
products with a plastic soup ladle (15) or spatula
(17), intended for using with non-stick coating.
Attention! To avoid burns by hot steam and oil be
very careful when opening the multicooker lid (6),
be very careful, don’t bend over the unit and don’t
place your hands above the bowl (3)!
Don’t use metal objects which can scratch the bowl
(3) or make cracks.
Do not open the lid (6) during baking.
10. When the cooking is over you will hear 5 sound sig-
nals, and the unit will be switched to the keep warm
mode, operation time in this mode will be shown on
the display starting from “0:00”.
Note: Despite the unit keeps the ready dish warm for
24 hours, it is not recommended to leave the food in this
mode for too long, because this may lead to changing
of taste and color of the products.
Do not use the keep warm function for heating up the
products.
After steam cooking do not remove the food with bare
hands, use kitchen tools.
11. To switch the selected mode off press the “STOP/
Keep warm” button (20).
Control panel buttons (10)
Every pressing of the control panel buttons (10) is
accompanied by a short sound signal.
“STOP/Keep warm” button (20)
After the cooking ends the unit will be switched to the
keep warm mode automatically. You can activate the
keep warm function by yourself. To do this, press the
“STOP/Keep warm” button (20) once, operation time
in this mode will be shown on the display starting from
“0:00”. The ready dish can be kept warm up to 24 hours.
To stop the keep warm mode press “STOP/Keep warm”
button (20) again.
Note: This function is not intended for heating up the
products.
“RICE” Button (21)
By pressing this button you can select necessary mode
of rice cooking: “Glutinous rice”, “Fluffy rice” and
“Brown rice”.
Cooking rice
•
Measure the required amount of rice with a measur-
ing cup. Rinse the rice with running water. Rinse till
the water is clear.
•
Put the rice into a bowl. Pour the necessary amount
of cold water into the bowl till the required mark on
the CUP scale which corresponds to the number of
measuring cups. You can add water to your taste.
Add salt and spices to your taste. Close the lid.
•
Select the necessary mode to cook rice (“Glutinous
rice”, “Fluffy rice” or “Brown rice”) pressing the
“RICE” button (21).
•
You can set the rice cooking time in each mode.
•
Press the “TIMER” button (25), “TIMER” indication
will appear on the display.
•
Using the “MINUTES” button (24) set the cook-
ing time.
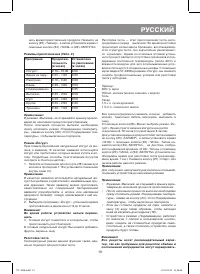
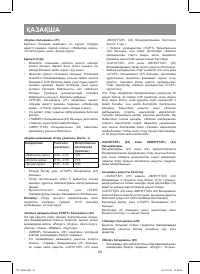
Time of cooking in “RICE” mode (Table 1)
Program
Duration
(hours)
Set by default
(hours)
“Glutinous rice” 0:20 – 0:30
0:20
“Fluffy rice”
0:15 – 0:30
0:15
“Brown rice”
0:25 – 0:40
0:30
•
•
Press the “START” button (27) to start cooking.
•
After cooking is finished you will hear 5 sound sig-
nals, the unit will be switched to keep warm mode.
•
To switch the multicooker off press the “STOP/Keep
warm” button (20).
Note: After cooking is finished, do not open the lid,
leave the rice for 10-15 minutes to soak.
“Delayed START” Button (22)
You can preset the cooking end time. This function
is available in the following modes: “Yogurt”, “Rice”,
“Steaming”, “Porridge”, “Soup”, “Cereal”, “Stewing”.
•
Select one of the modes indicated above by press-
ing the “MENU” button (26).
VT-4206.indd 6
30.05.2013 15:26:05


