
Мультиметры BENNING MM 3 044029 - инструкция пользователя по применению, эксплуатации и установке на русском языке. Мы надеемся, она поможет вам решить возникшие у вас вопросы при эксплуатации техники.
Если остались вопросы, задайте их в комментариях после инструкции.
"Загружаем инструкцию", означает, что нужно подождать пока файл загрузится и можно будет его читать онлайн. Некоторые инструкции очень большие и время их появления зависит от вашей скорости интернета.


05/ 2020
BENNING MM 3
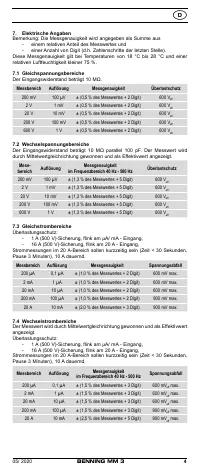
17
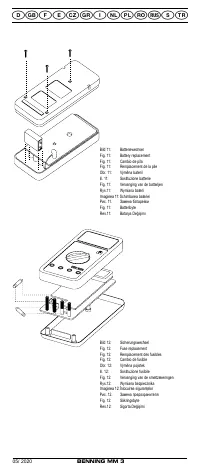
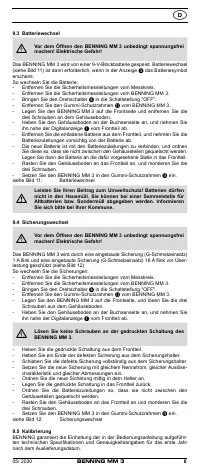
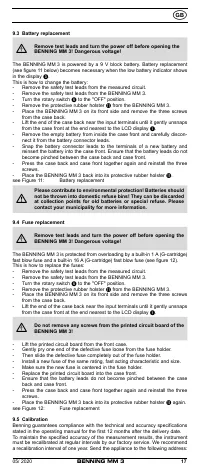
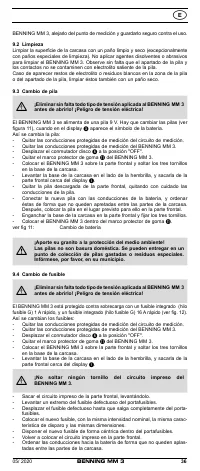
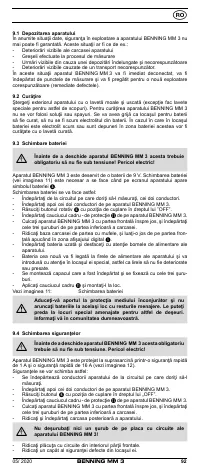
9.3 Battery replacement
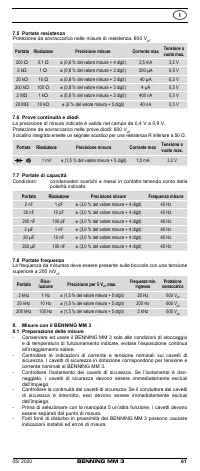
Remove test leads and turn the power off before opening the
BENNING MM 3! Dangerous voltage!
The BENNING MM 3 is powered by a 9 V block battery. Battery replacement
(see figure 11 below) becomes necessary when the low battery indicator shows
in the display
.
This is how to change the battery:
- Remove the safety test leads from the measured circuit.
- Remove the safety test leads from the BENNING MM 3.
- Turn the rotary switch
to the "OFF" position.
- Remove the protective rubber holster
from the BENNING MM 3.
- Place the BENNING MM 3 on its front side and remove the three screws
from the case back.
- Lift the end of the case back near the input terminals until it gently unsnaps
from the case front at the end nearest to the LCD display
.
- Remove the empty battery from inside the case front and carefully discon-
nect it from the battery connector leads.
- Snap the battery connector leads to the terminals of a new battery and
reinsert the battery into the case front. Ensure that the battery leads do not
become pinched between the case back and case front.
- Press the case back and case front together again and reinstall the three
screws.
- Place the BENNING MM 3 back into its protective rubber holster
.
see Figure 11:
Battery replacement
Please contribute to environmental protection! Batteries should
not be thrown into domestic refuse bins! They can be discarded
at collection points for old batteries or special refuse. Please
contact your municipality for more information.
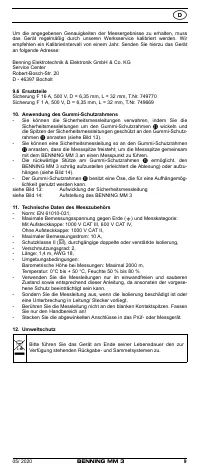
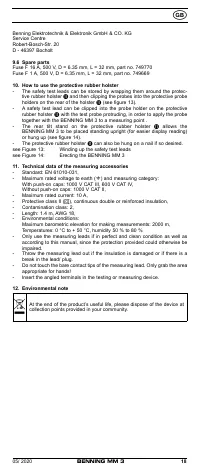
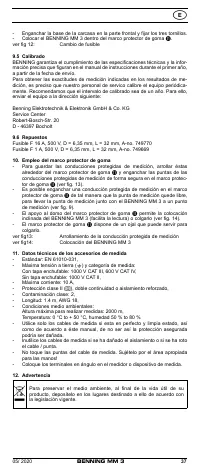
9.4 Fuse replacement
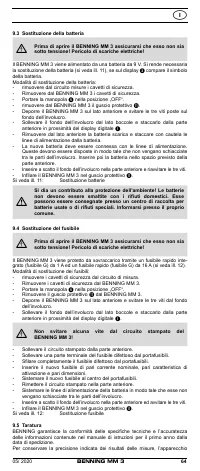
Remove test leads and turn the power off before opening the
BENNING MM 3! Dangerous voltage!
The BENNING MM 3 is protected from overloading by a built-in 1 A (G-cartridge)
fast blow fuse and a built-in 16 A (G-cartridge) fast blow fuse (see figure 12).
This is how to replace the fuses:
- Remove the safety test leads from the measured circuit.
- Remove the safety test leads from the BENNING MM 3.
- Turn the rotary switch
to the "OFF" position.
- Remove the protective rubber holster
from the BENNING MM 3.
- Place the BENNING MM 3 on its front side and remove the three screws
from the case back.
- Lift the end of the case back near the input terminals until it gently unsnaps
from the case front at the end nearest to the LCD display
.
Do not remove any screws from the printed circuit board of the
BENNING MM 3!
- Lift the printed circuit board from the front case.
- Gently pry one end of the defective fuse loose from the fuse holder.
- Then slide the defective fuse completely out of the fuse holder.
- Install a new fuse of the same rating, fast acting characteristic and size.
- Make sure the new fuse is centered in the fuse holder.
- Replace the printed circuit board into the case front.
- Ensure that the battery leads do not become pinched between the case
back and case front.
- Press the case back and case front together again and reinstall the three
screws.
- Place the BENNING MM 3 back into its protective rubber holster
again.
see Figure 12:
Fuse replacement
9.5 Calibration
Benning guarantees compliance with the technical and accuracy specifications
stated in the operating manual for the first 12 months after the delivery date.
To maintain the specified accuracy of the measurement results, the instrument
must be recalibrated at regular intervals by our factory service. We recommend
a recalibration interval of one year. Send the appliance to the following address:


