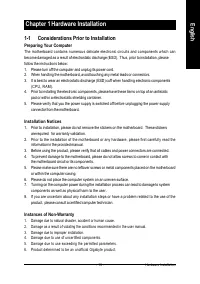
Материнские платы GIGABYTE GA 8AENXP DW - инструкция пользователя по применению, эксплуатации и установке на русском языке. Мы надеемся, она поможет вам решить возникшие у вас вопросы при эксплуатации техники.
Если остались вопросы, задайте их в комментариях после инструкции.
"Загружаем инструкцию", означает, что нужно подождать пока файл загрузится и можно будет его читать онлайн. Некоторые инструкции очень большие и время их появления зависит от вашей скорости интернета.


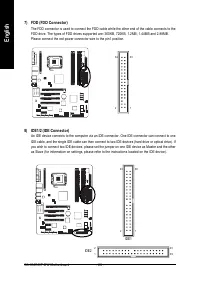
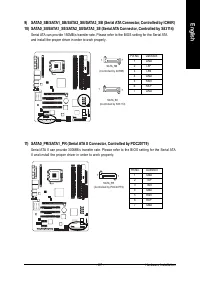
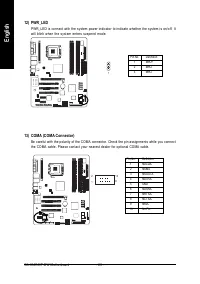
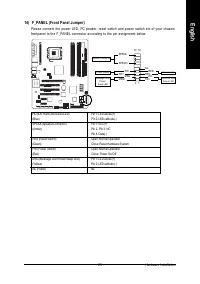


GA-8AENXP-DW Motherboard
- 76 -
English
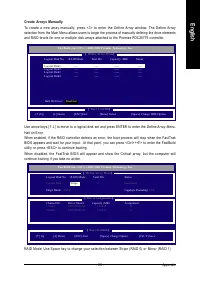
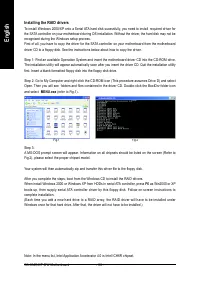
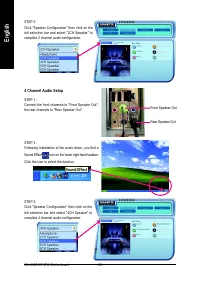
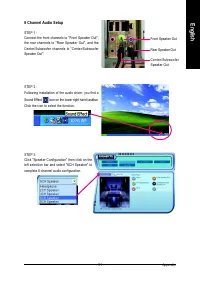
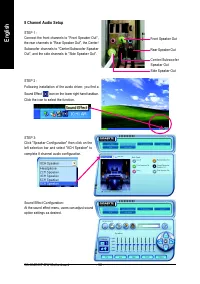
Please follow the steps below to construct a complete RAID array:
1) Have ready your hard drives for RAID construction.
Note: To achieve best performance, it is recommended that the hard drives used are of similar make
and storage capacity.
2) Please attach the hard drive connectors to their appropriate location on the motherboard ie. IDE, SCSI,
or SATA.
3) Enter the motherboard BIOS and locate RAID setup (Please refer to the section on Integrated Peripherals).
4) Enter RAID setup in the BIOS and select the RAID type (For instance, enter Ctrl + I to select Intel RAID;
Ctrl + S to select Silicon Image).
5) Complete driver installation.
6) Complete RAID utility installation.
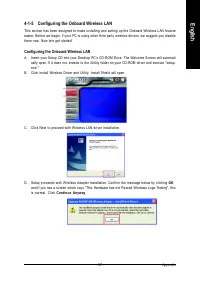
More information on steps 4 and 5 is provided. (For more detailed setup information, please visit "Support\
Motherboard\ Technology Guide section" on our website at http:\\www.gigabyte.com.tw to read or download
the information you need.) Sections below introduce the steps to configure Intel and Promise RAID BIOS
.
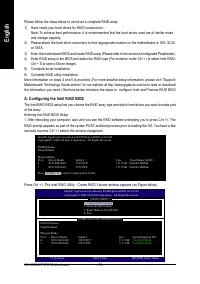
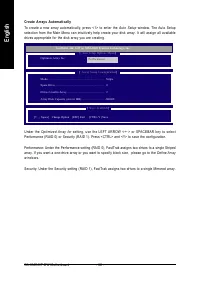
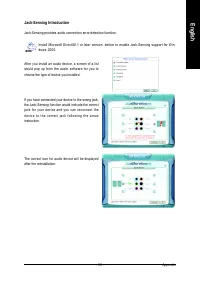
A. Configuring the Intel RAID BIOS
The Intel RAID BIOS setup lets you choose the RAID array type and which hard drives you want to make part
of the array.
Entering the RAID BIOS Setup
1. After rebooting your computer, wait until you see the RAID software prompting you to press Ctrl + I. The
RAID prompt appears as part of the system POST and boot process prior to loading the OS. You have a few
seconds to press Ctrl + I before the window disappears.
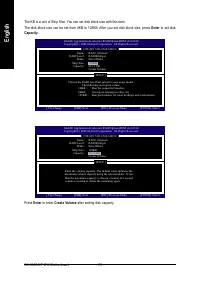
Press Ctrl + I. The Intel RAID Utility - Create RAID Volume window appears (as Figure below).
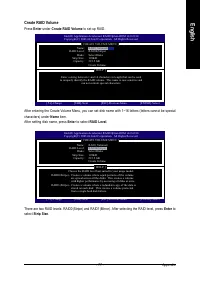
Intel(R) Application Accelerator RAID Option ROM v4.0.6180
Copyright(C) 2003-04 Intel Corporation. All Rights Reversed.
RAID Volumes :
None Defined.
Physical Disks :
Port
Driver Model
Serial #
Size
Type/Status(Vol ID)
0
ST3120026AS
3JT354CP
111.7GB Non-RAID Disk
1
ST3120026AS
3JT329JX
111.7GB Non-RAID Disk
Press
<CTRL - I>
to enter Configuration Utility
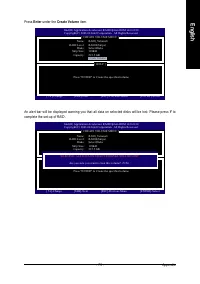
Intel(R) Application Accelerator RAID Option ROM v4.0.6180
Copyright(C) 2003-04 Intel Corporation. All Rights Reversed.
[ MAIN MENU ]
1. Create RAID Volume
2. Delete RAID Volume
3. Reset Disks to Non-RAID
4. Exit
[ DISK/VOLUME INFORMATION ]
RAID Volumes :
None Defined.
Physical Disks :
Port
Driver Model
Serial #
Size
Type/Status(Vol ID)
0
ST3120026AS
3JT354CP
111.7GB
Non-RAID Disk
1
ST3120026AS
3JT329JX
111.7GB
Non-RAID Disk
[
]-Select
[ESC]-Exit
[ENTER]-Select Menu


