Материнские платы GIGABYTE GA 785GMT USB3 rev1 - инструкция пользователя по применению, эксплуатации и установке на русском языке. Мы надеемся, она поможет вам решить возникшие у вас вопросы при эксплуатации техники.
Если остались вопросы, задайте их в комментариях после инструкции.
"Загружаем инструкцию", означает, что нужно подождать пока файл загрузится и можно будет его читать онлайн. Некоторые инструкции очень большие и время их появления зависит от вашей скорости интернета.


MG20XU/MG20/MG16X U/MG16/MG12X U/MG12 Руководство пользователя
3
The above warning is located on the rear of the unit.
L’avertissement ci-dessus est situé à l’arrière de l’appareil.
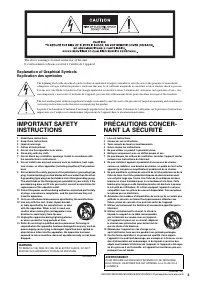
Explanation of Graphical Symbols
Explication des symboles
The lightning flas h with arrowhead symbol within an equilateral triangle is intended to alert the user to the presence of uninsulated
«dangerous voltage» within the product’s enclosure that may be of s ufficient magnitude to constitute a risk of electric shock to pe rsons.
L’é clair avec une flèche à l’intérieur d’un triangle équilatéral est destiné à attirer l’attention de l’utilisateur sur la prése nce d’une « ten-
sion dangereuse » non isolée à l’intérieur de l’appareil, pouvant ê tre s uffisamment élevée pour cons tituer un risque d’électrocution.
The exclama tion point within a n equilateral triangle is inte nded to alert the user to the pres ence of important operating and maintenance
(servicing) instructions in the litera ture a ccompanying the product.
Le point d’exclamation à l’intérieur d’un triangle équilatéral est des tiné à a ttirer l’attention de l’utilisateur sur la présence d’instructions
importantes s ur l’emploi ou la maintenance (réparation) de l’appareil dans la documentation fournie.
IMPORTANT SAFETY
INSTRUCTIONS
1
Read these instructions.
2
Keep these instructions.
3
H eed all warnings.
4
Follow all instructions.
5
D o not use this apparatus near water.
6
C lean only with dry cloth.
7
D o not block any ventilation openings. Install in accordance with
the manufacturer’s instructions.
8
D o not install near any heat sources such as radiators, heat regis-
ters, stoves, or other apparatus (including amplifiers) that produce
heat.
9
D o not defeat the safety purpose of the polarized or grounding-type
plug. A polarized plug has two blades with one wider than the other.
A grounding type plug has two blades and a third grounding prong.
The wide blade or the third prong are provided for your safety. If the
provided plug does not fit into your outlet, consult an electrician for
replacement of the obsolete outlet.
10 Protect the power cord from being walked on or pinched particularly
at plugs, convenience receptacles, and the point where they exit
from the apparatus.
11 Only use attachments/accessories specified by the manufacturer.
12 U se only with the cart, stand, tripod, bracket,
or table specified by the manufacturer, or sold
with the apparatus. When a cart is used, use
caution when moving the cart/apparatus com-
bination to avoid injury from tip-over.
13 U nplug this apparatus during lightning storms
or when unused for long periods of time.
14 Refer all servicing to qualified service personnel. Servicing is
required when the apparatus has been damaged in any way, such as
power-supply cord or plug is damaged, liquid has been spilled or
objects have fallen into the apparatus, the apparatus has been
exposed to rain or moisture, does not operate normally, or has been
dropped.
( UL6 0065_ 03)
PRÉCAUTIONS CONCER-
NANT LA SÉCURITÉ
1
Lire ces instructions.
2
Conserver ces instructions.
3
Tenir compte de tous les avertissements.
4
S uivre toutes les instructions.
5
Ne pas utiliser ce produit à proximité d’eau.
6
Nettoyer uniquement avec un chiffon propre et sec.
7
Ne pas bloquer les orifices de ventilation. Installer l’appareil confor-
mément aux instructions du fabricant.
8
Ne pas installer l’appareil à proximité d’une source de chaleur
comme un radiateur, une bouche de chaleur, un poêle ou tout autre
appareil (y compris un amplificateur) produisant de la chaleur.
9
Ne pas modifier le système de sécurité de la fiche polarisée ou de la
fiche de terre. Une fiche polarisée dispose de deux broches dont
une est plus large que l’autre. U ne fiche de terre dispose de deux
broches et d’une troisième pour le raccordement à la terre . Cette
broche plus large ou cette troisième broche est destinée à assurer
la sécurité de l’utilisateur. S i la fiche équipant l’appareil n’est pas
compatible avec les prises de courant disponibles, faire remplacer
les prises par un électricien.
10 Acheminer les cordons d’alimentation de sorte qu’ils ne soient pas
piétinés ni coincés, en faisant tout spécialement attention aux
fiches, prises de courant et au point de sortie de l’appareil.
11 Utiliser exclusivement les fixations et accessoires spécifiés par le
fabricant.
12 Utiliser exclusivement le chariot, le stand, le
trépied, le support ou la table recommandés
par le fabricant ou vendus avec cet appareil.
S i l’appareil est posé sur un chariot, déplacer
le chariot avec précaution pour éviter tout ris-
que de chute et de blessure.
13 Débrancher l’appareil en cas d’orage ou lor-
squ’il doit rester hors service pendant une période prolongée.
14 Confier toute réparation à un personnel qualifié. Faire réparer
l’appareil s’il a subi tout dommage, par exemple si la fiche ou le cor-
don d’alimentation est endommagé, si du liquide a coulé ou des
objets sont tombés à l’intérieur de l’appareil, si l’appareil a été expo-
sé à la pluie ou à de l’humidité, si l’appareil ne fonctionne pas nor-
malement ou est tombé.
( UL60 065_ 03)
WARNING
TO REDUC E THE RISK OF FIRE OR ELEC TRIC SHOCK , D O NOT
EX POSE THIS A PPARATUS TO RA IN OR MOISTURE .
AVERTISSEMENT
POUR RÉ DUIRE LES RIS QU ES D’INCENDIE OU DE DÉCHAR GE
ÉLEC TRIQUE, N’EXPOSEZ PAS CET APPAREIL À LA PLUIE OU À
L’HUMIDITÉ.
Содержание
- 6 Эксплуатация и обслуживание; Разъемы; Информация; Об этом руководстве; Номер модели
- 7 Содержание; Шаг 5. Использование встроенных
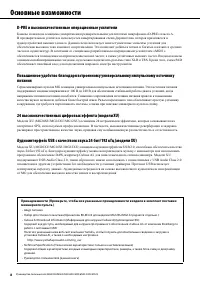
- 8 Основные возможности; D-PRE и высококачественные операционные усилители
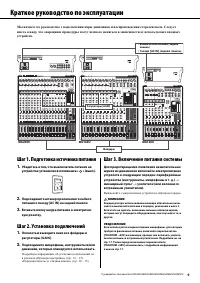
- 9 Краткое руководство по эксплуатации; Шаг 1. Подготовка источника питания; микшерный пульт
- 10 Шаг 4. Подача звука на динамики; каждого используемого канала.; ) на индикаторе уровня лишь; используемого канала.; Настройка тембра и уровня
- 11 Использование реверберации и задержки
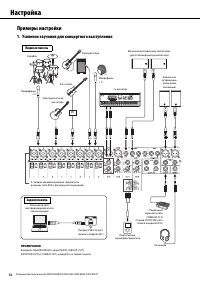
- 12 Настройка; Примеры настройки; Усиление звучания для концертного выступления; Лицевая панель; Задняя панель
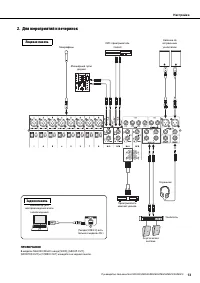
- 13 Для мероприятий и вечеринок
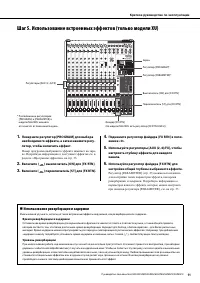
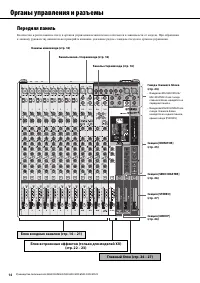
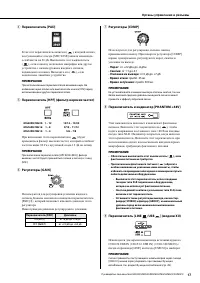
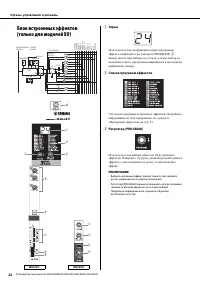
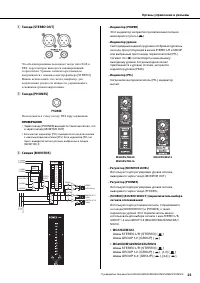
- 14 Органы управления и разъемы; Передняя панель; Блок встроенных эффектов (только для моделей XU)
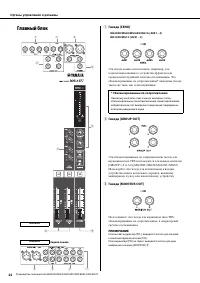
- 15 Главный блок
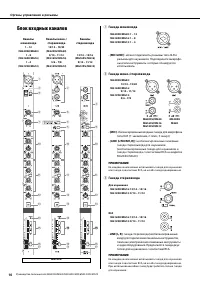
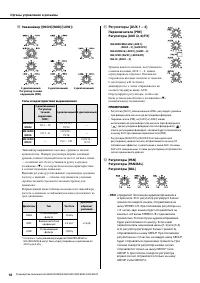
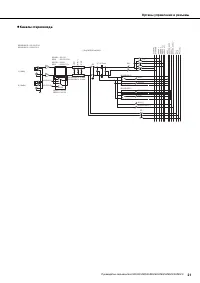
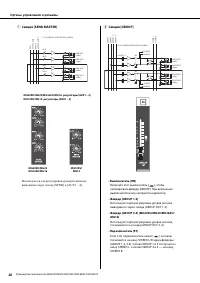
- 16 Блок входных каналов; Гнезда моновхода; Гнезда стереовхода
- 19 Переключатель назначения шины; Фейдеры каналов
- 20 Каналы моновхода
- 22 Блок встроенных эффектов; Экран
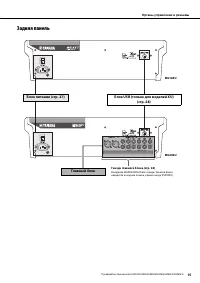
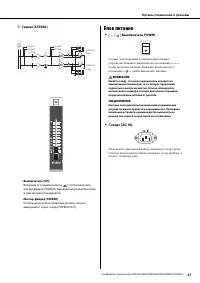
- 27 Блок питания
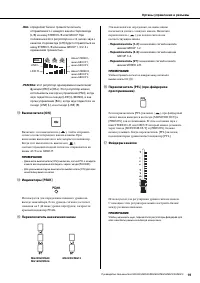
- 28 Функция ослабления
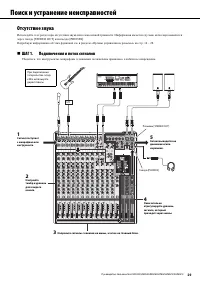
- 29 Поиск и устранение неисправностей; Отсутствие звука; ШАГ 1. Подключения и поток сигналов
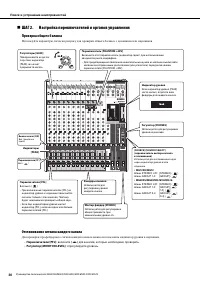
- 30 ШАГ 2. Настройка переключателей и органов управления; Проверка общего баланса
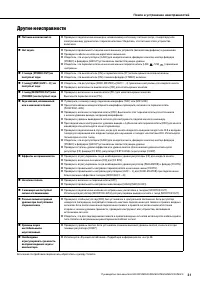
- 31 Другие неисправности
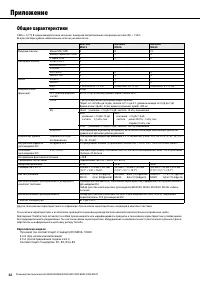
- 32 Приложение; Общие характеристики
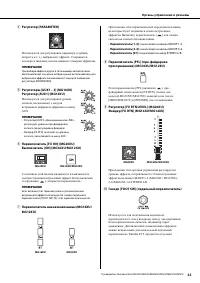
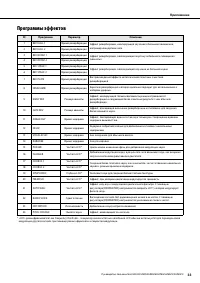
- 33 Программы эффектов
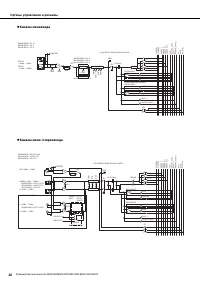
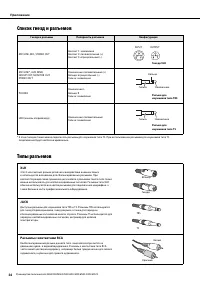
- 34 Список гнезд и разъемов
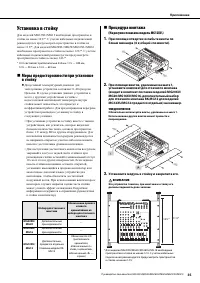
- 35 Установка в стойку; Меры предосторожности при установке; Процедура монтажа; При помощи отвертки ослабьте винты по; Установите модуль в стойку и закрепите его.
- 36 Предметный указатель


