Магнитолы Pioneer FH-X360UB - инструкция пользователя по применению, эксплуатации и установке на русском языке. Мы надеемся, она поможет вам решить возникшие у вас вопросы при эксплуатации техники.
Если остались вопросы, задайте их в комментариях после инструкции.
"Загружаем инструкцию", означает, что нужно подождать пока файл загрузится и можно будет его читать онлайн. Некоторые инструкции очень большие и время их появления зависит от вашей скорости интернета.


1
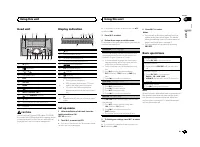
Press
M.C.
to display the setting mode.
2
Press
M.C.
to select the segment of the clock
display you wish to set.
Hour
—
Minute
3
Turn
M.C.
to adjust the clock.
12H/24H
(time notation)
1
Press
M.C.
to select the desired setting.
12H
(12-hour clock)
—
24H
(24-hour clock)
AUTO PI
(auto PI seek)
The unit can automatically search for a different
station with the same programming, even during
preset recall.
1
Press
M.C.
to turn Auto PI seek on or off.
AUX
(auxiliary input)
Activate this setting when using an auxiliary de-
vice connected to this unit.
1
Press
M.C.
to turn
AUX
on or off.
DIMMER
(dimmer)
1
Press
M.C.
to turn the dimmer on or off.
!
You can also change the dimmer setting by
pressing and holding
/
DIMMER
.
MUTE MODE
(mute mode)
Sound from this system is automatically muted or
attenuated when a signal from equipment with a
mute function is received.
1
Press
M.C.
to display the setting mode.
2
Turn
M.C.
to select the desired setting.
!
MUTE
–
Muting
!
20dB ATT
–
Attenuation (
20dB ATT
has a
stronger effect than
10dB ATT
)
!
10dB ATT
–
Attenuation
PW SAVE
(power saving)
Switching this function on enables you to reduce
the consumption of battery power.
!
Turning on the source is the only operation al-
lowed when this function is on.
1
Press
M.C.
to turn the power save on or off.
About MIXTRAX
MIXTRAX technology is used to insert a variety
of sound effects in between songs, allowing you
to experience your music as a nonstop mix com-
plete with visual effects.
Notes
!
Depending on the file/song, sound effects
may not be available.
!
Turn MIXTRAX off if the visual effects it pro-
duces have adverse effects on driving. Refer
to
Operations using the MIXTRAX button
MIXTRAX menu
1
Press M.C. to display the main menu.
2
Turn M.C. to change the menu option
and press to select MIXTRAX.
3
Turn M.C. to select the MIXTRAX func-
tion.
Once selected, the following MIXTRAX functions
can be adjusted. The function is enabled when
MIXTRAX is on.
SHORT MODE
(short playback mode)
You can select the length of the playback time.
1
Press
M.C.
to display the setting mode.
2
Turn
M.C.
to select the desired setting.
1.0 MIN
(1.0 minute)
—
1.5 MIN
(1.5 minutes)
—
2.0 MIN
(2.0 minutes)
—
2.5 MIN
(2.5 minutes)
—
3.0 MIN
(3.0 minutes)
—
OFF
(off)
MIX PATTERN
(mix pattern)
The MIXTRAX special effects display changes with
changes in the audio level.
1
Press
M.C.
to display the setting mode.
2
Turn
M.C.
to select the desired setting.
!
SOUND LEVEL
–
The mix pattern changes
according to the sound level.
!
LOW PASS
–
The mix pattern changes ac-
cording to the bass level.
!
RANDOM
–
The mix pattern changes ran-
domly according to the sound level mode
and low pass mode.
DISP FX
(display effect)
The MIXTRAX special effects display can be turned
on or off.
1
Press
M.C.
to select the desired setting.
ON
(MIXTRAX special effects display)
—
OFF
(normal display)
CUT IN FX
(manual cut-in effect)
You can turn on or off the MIXTRAX sound effects
while manually changing tracks.
1
Press
M.C.
to select the desired setting.
ON
(on)
—
OFF
(off)
Initial menu
1
Press and hold SRC/OFF until the unit
turns off.
2
Press and hold SRC/OFF until the main
menu appears in the display.
3
Turn M.C. to change the menu option
and press to select INITIAL.
4
Turn M.C. to select the initial menu func-
tion.
Once selected, the following initial menu func-
tions can be adjusted.
FM STEP
(FM tuning step)
1
Press
M.C.
to select the FM tuning step.
100
(100 kHz)
—
50
(50 kHz)
SP-P/O MODE
(rear output and preout setting)
The rear speaker leads output and the RCA output
of this unit can be used to connect a full-range
speaker or subwoofer. Select a suitable option for
your connection.
1
Press
M.C.
to display the setting mode.
2
Turn
M.C.
to select the desired setting.
!
REAR/SUB.W
–
Select when there is a full-
range speaker connected to the rear speak-
er leads output and there is a subwoofer
connected to the RCA output.
!
SUB.W/SUB.W
–
Select when there is a
subwoofer connected directly to the rear
speaker leads output without any auxiliary
amp and there is a subwoofer connected
to the RCA output.
!
REAR/REAR
–
Select when there is a full-
range speaker connected to the rear speak-
er leads output and the RCA output.
If there is a full-range speaker connected to
the rear speaker leads output and the RCA
output is not used, you may select either
REAR/SUB.W
or
REAR/REAR
.
System menu
1
Press and hold SRC/OFF until the unit
turns off.
2
Press and hold SRC/OFF until the main
menu appears in the display.
3
Turn M.C. to change the menu option
and press to select SYSTEM.
English
Using this unit
7
Section
Using this unit
En
02
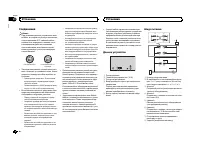
Содержание
- 17 Основное устройство; ВНИМАНИЕ; USB; Индикация на дисплее; SET UP; YES; Использование данного устройства
- 18 Радиоприемник; Основные операции; SEEK; AF; AF; FREQUENCY; Использование функций; Список; PTY; Настройка функций
- 19 FUNCTION; запоминающие устройства; Подключение по протоколу; Android; Функции кнопки
- 20 Регулировки параметров звука; AUDIO
- 22 Меню системы; PW SAVE; Информация о; Меню
- 23 Стартовое меню; Меню систе
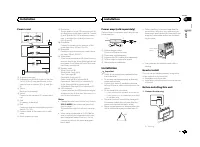
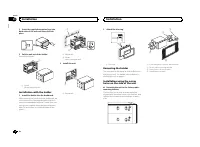
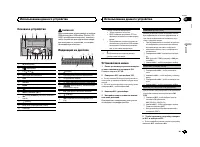
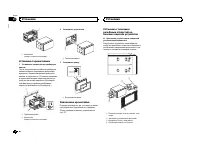
- 24 Соединения; Важно; Данное устройство; Установка
- 25 настройка выхода заднего канала и; Усилитель мощности; RCA; Порядок установки
- 26 Перед установкой данного устройства
- 27 Общие; Дополнительная информация
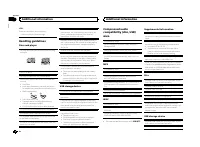
- 28 Диски и проигрыватель; компакт
- 29 WAV; USB MTP; Pioneer; Диск
- 30 Серийный номер
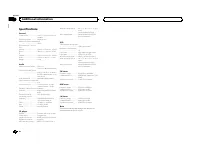
- 31 Технические характеристики


