Магнитолы Pioneer FH-X360UB - инструкция пользователя по применению, эксплуатации и установке на русском языке. Мы надеемся, она поможет вам решить возникшие у вас вопросы при эксплуатации техники.
Если остались вопросы, задайте их в комментариях после инструкции.
"Загружаем инструкцию", означает, что нужно подождать пока файл загрузится и можно будет его читать онлайн. Некоторые инструкции очень большие и время их появления зависит от вашей скорости интернета.


S.RTRV
(sound retriever)
Automatically enhances compressed audio and
restores rich sound.
1
Press
M.C.
to select the desired setting.
1
—
2
—
OFF
(off)
1
is effective for low compression rates, and
2
is effective for high compression rates.
Audio adjustments
1
Press M.C. to display the main menu.
2
Turn M.C. to change the menu option
and press to select AUDIO.
3
Turn M.C. to select the audio function.
Once selected, the following audio functions
can be adjusted.
!
FADER
is not available when
SUB.W/SUB.W
is selected in
SP-P/O MODE
. For details, refer
to
!
SUB.W
and
SUB.W CTRL
are not available
when
REAR/REAR
is selected in
SP-P/O MODE
. For details, refer to
!
SUB.W CTRL
is not available when
SUB.W
is
selected in
OFF
. For details, refer to
!
SLA
is not available when FM is selected as
the source.
FADER
(fader adjustment)
1
Press
M.C.
to display the setting mode.
2
Turn
M.C.
to adjust the front/rear speaker bal-
ance.
BALANCE
(balance adjustment)
1
Press
M.C.
to display the setting mode.
2
Turn
M.C.
to adjust the left/right speaker bal-
ance.
EQ SETTING
(equalizer recall)
1
Press
M.C.
to display the setting mode.
2
Turn
M.C.
to select the equalizer.
POWERFUL
—
NATURAL
—
VOCAL
—
CUS-
TOM1
—
CUSTOM2
—
FLAT
—
SUPER BASS
The equalizer band and equalizer level can be
customized when
CUSTOM1
or
CUSTOM2
is
selected.
If selecting
CUSTOM1
or
CUSTOM2
, complete
the procedures outlined below. If selecting
other options, press
M.C.
to return to the pre-
vious display.
!
CUSTOM1
can be set separately for each
source.
!
CUSTOM2
is a shared setting used in com-
mon for all sources.
3
Press
M.C.
to display the setting mode.
4
Press
M.C.
to cycle between the following:
Equalizer band
—
Equalizer level
5
Turn
M.C.
to select the desired setting.
Equalizer band:
80HZ
—
250HZ
—
800HZ
—
2.5KHZ
—
8KHZ
Equalizer level:
+6
to
–
6
!
You can also switch the equalizer by pressing
repeatedly.
LOUDNESS
(loudness)
Loudness compensates for deficiencies in the low-
frequency and high-frequency ranges at low vol-
ume.
1
Press
M.C.
to select the desired setting.
OFF
(off)
—
LOW
(low)
—
MID
(mid)
—
HI
(high)
SUB.W
(subwoofer on/off setting)
This unit is equipped with a subwoofer output
which can be turned on or off.
1
Press
M.C.
to select the desired setting.
NOR
(normal phase)
—
REV
(reverse phase)
—
OFF
(subwoofer off)
SUB.W CTRL
(subwoofer adjustment)
Only frequencies lower than those in the selected
range are outputted from the subwoofer.
1
Press
M.C.
to display the setting mode.
2
Press
M.C.
to cycle between the following:
Cut-off frequency
—
Output level
—
Slope level
Rates that can be adjusted will flash.
3
Turn
M.C.
to select the desired setting.
Cut-off frequency:
50HZ
—
63HZ
—
80HZ
—
100HZ
—
125HZ
—
160HZ
—
200HZ
Output level:
–
24
to
+6
Slope level:
–
12
—
–
24
BASS BOOST
(bass boost)
1
Press
M.C.
to display the setting mode.
2
Turn
M.C.
to select a desired level.
0
to
+6
is displayed as the level is increased or
decreased.
HPF SETTING
(high pass filter adjustment)
Use this function when wanting to listen only to
high-frequency sounds. Only frequencies higher
than the high-pass filter (HPF) cutoff are output
from the speakers.
1
Press
M.C.
to display the setting mode.
2
Press
M.C.
to cycle between the following:
Cut-off frequency
—
Slope level
3
Turn
M.C.
to select the desired setting.
Cut-off frequency:
OFF
—
50HZ
—
63HZ
—
80HZ
—
100HZ
—
125HZ
—
160HZ
—
200HZ
Slope level:
–
12
—
–
24
SLA
(source level adjustment)
This function prevents the volume from changing
too dramatically when the source switches.
!
Settings are based on the FM volume level,
which remains unchanged.
!
The MW/LW volume level can also be adjusted
with this function.
1
Press
M.C.
to display the setting mode.
2
Turn
M.C.
to adjust the source volume.
Adjustment range:
+4
to
–
4
System menu
Important
PW SAVE
(power saving) is canceled if the ve-
hicle battery is disconnected and will need to be
turned back on once the battery is reconnected.
When
PW SAVE
(power saving) is off, depend-
ing on connection methods, the unit may con-
tinue to draw power from the battery if your
vehicle
’
s ignition doesn
’
t have an ACC (acces-
sory) position.
1
Press M.C. to display the main menu.
2
Turn M.C. to change the menu option
and press to select SYSTEM.
3
Turn M.C. to select the system menu
function.
Once selected, the following system menu func-
tions can be adjusted.
LANGUAGE
(multi-language)
1
Press
M.C.
to select the desired setting.
РУС
(Russian)
—
TUR
(Turkish)
—
ENG
(Eng-
lish)
CLOCK SET
(setting the clock)
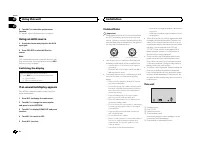
Using this unit
6
Section
Using this unit
En
02
Содержание
- 17 Основное устройство; ВНИМАНИЕ; USB; Индикация на дисплее; SET UP; YES; Использование данного устройства
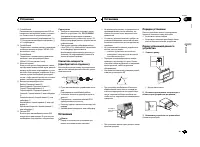
- 18 Радиоприемник; Основные операции; SEEK; AF; AF; FREQUENCY; Использование функций; Список; PTY; Настройка функций
- 19 FUNCTION; запоминающие устройства; Подключение по протоколу; Android; Функции кнопки
- 20 Регулировки параметров звука; AUDIO
- 22 Меню системы; PW SAVE; Информация о; Меню
- 23 Стартовое меню; Меню систе
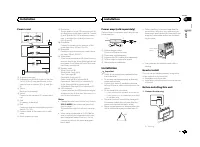
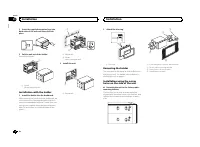
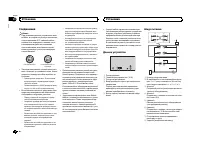
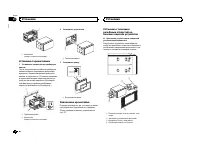
- 24 Соединения; Важно; Данное устройство; Установка
- 25 настройка выхода заднего канала и; Усилитель мощности; RCA; Порядок установки
- 26 Перед установкой данного устройства
- 27 Общие; Дополнительная информация
- 28 Диски и проигрыватель; компакт
- 29 WAV; USB MTP; Pioneer; Диск
- 30 Серийный номер
- 31 Технические характеристики


