Кофеварка Siemens TK 52001 - инструкция пользователя по применению, эксплуатации и установке на русском языке. Мы надеемся, она поможет вам решить возникшие у вас вопросы при эксплуатации техники.
Если остались вопросы, задайте их в комментариях после инструкции.
"Загружаем инструкцию", означает, что нужно подождать пока файл загрузится и можно будет его читать онлайн. Некоторые инструкции очень большие и время их появления зависит от вашей скорости интернета.


13
13
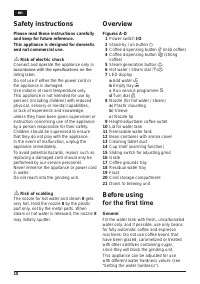
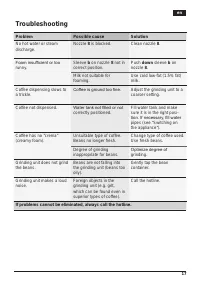
Using coffee beans
This fully automatic espresso/coffee
machine grinds beans freshly for each
brew. If possible, use only beans for fully
automatic coffee and espresso machines.
Deep-freeze or store in a cool place in
sealed, airtight containers. Coffee beans
can be ground while frozen.
Important: Fill the water tank with fresh
water every day. The tank must always
contain suficient water for operating the
appliance. Do not allow it to become empty.
Tip: Pre-warm cups, especially small, thick
espresso cups, by placing on the cup shelf
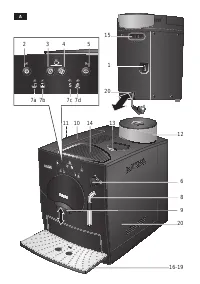
14 or rinsing with hot water.
The appliance must be ready for use.
● Place the prewarmed cup(s) under the
coffee outlet 9.
● Press
5
or
K
to select the desired
coffee strength. The coffee is brewed and
dispensed into the cup(s).
● Coffee delivery stops automatically when
the selected quantity has been dispensed
(factory setting approx. 125 ml).
i
The brewing process can be terminated
at any time by pressing the coffee
dispensing button
5
or
K
.
Extra coffee
It is possible to dispense the same amount
of coffee a second time.
● Just press the coffee dispensing button
5
or
K
within 3 seconds after brewing is
complete.
Note: The second cup is brewed using the
previously ground coffee.
Changing volume
dispensed
It is possible to change the factory setting
(approx. 125 ml) for the volume of mild or
strong coffee to be dispensed.
● Press and hold the coffee dispensing
button
5
or
K
until the desired volume of
coffee has been delivered (range approx.
30 – 220 ml).
i
The volume can be changed again at
any time. To restore the factory setting of
approximately 125 ml, simply reset the
appliance.
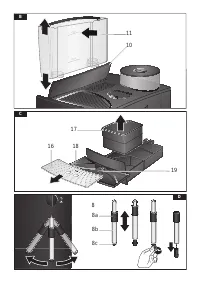
Reset: Switch the appliance to stand-by
and remove the trays 17 and 18. Press
and hold the dispensing buttons
5
and
K
simultaneously for at least 5 seconds. The
LEDs 7a, b, c and d (
H
,
I
,
S
,
J
) light up
briely. Replace the trays
17 and 18 and
press the stand-by button
a
to switch the
appliance on again.
Preparing hot water
The appliance must be ready for use.
This function allows water to be heated for
a cup of tea, for example.
!
Risk of burns
The nozzle gets very hot. Do not touch the
metal par ts!.
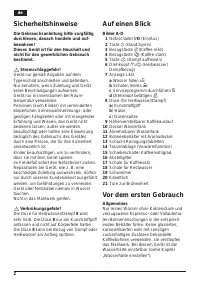
● Place an appropriate cup under the
nozzle 8.
● Push the sleeve on the nozzle
8 all the
way down.
● Turn the dial
6 to
g
/
h
.
!
Risk of scalding
When the dial is set to
g
/
h
, the nozzle
may sputter a little. Do not touch the nozzle
8 or point it at anyone.
● End the process by turning the dial
6
back to O.
en
en


