
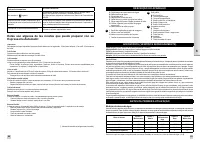
Кофемашина Krups EA 829810 - инструкция пользователя по применению, эксплуатации и установке на русском языке. Мы надеемся, она поможет вам решить возникшие у вас вопросы при эксплуатации техники.
Если остались вопросы, задайте их в комментариях после инструкции.
"Загружаем инструкцию", означает, что нужно подождать пока файл загрузится и можно будет его читать онлайн. Некоторые инструкции очень большие и время их появления зависит от вашей скорости интернета.


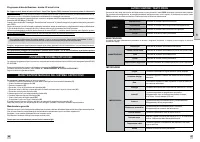


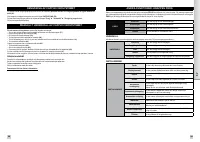


Two-cup function
Your appliance enables you to prepare two coffee or espresso recipes for the following three preparations: espresso/strong
espresso/coffee. This function is not available for long coffee drinks. The appliance will automatically run two complete coffee
preparation cycles one after the other. You should therefore ensure that you place the second cup beneath the coffee outlet
immediately the first cycle has finished.
You have prepared your appliance. The drinks selection menu has appeared
(16).
Place a cup under the coffee outlet. You can lower or raise the coffee outlet to suit the size of your cup
(17).
Select your drink and confirm by pressing quickly twice on the confirmation button.
A message will indicate that you have requested two cups.
The appliance will automatically run two complete coffee preparation cycles.
PREPARING HOT WATER
Install the steam nozzle on the machine. Select the hot water recipe from the drinks selection menu. A message invites you to
place a container beneath the steam nozzle. You can start hot water production by pressing the confirmation button.
To interrupt the hot water function, simply press any button.
If the nozzle is obstructed, unblock it with the needle provided.
The maximum quantity of water per cycle is limited to 300 ml.
PREPARING A CAPPUCCINO
We recommend that you use very fresh, very cold pasteurised or UHT milk, recently opened. Unpasteurised milk does
not produce the best results.
Preparing and installing a milk jug
The milk jug is composed of a plastic container, a lid (including a cassette) and a flexible pipe connecting it to the machine's drinks
outlet. Before the first use, carefully clean the different elements.
Pour milk into the jug (at least 150 ml)
(18).
Put the lid on the jug by screwing it down with light pressure
(19).
Lift the locking
lever
(20).
Install the milk jug on the machine by connecting it to the steam outlet
(21)
, then lowering the locking lever
(22).
Insert
the flexible pipe into the intended opening in the cassette
(23)
then place the other end beneath the magnetic drink outlet
(24).
Ensure that the system's lid button is in the cappuccino position
(25).
Making a cappuccino
While the screen is displaying the drinks selection menu, give a short press (< 3 seconds) on the machine's cappuccino button
(26).
A pre-heating phase takes place, then the milk is frothed, and finally the espresso is poured. Your drink is ready
(27).
you can interrupt the cycle by pressing OK.
nb the cycle does not stop immediately.
A message appears on the screen telling you to clean the system. We recommend you to carry this out, referring to the
paragraphs
CAPPUCCINO SYSTEM RINSING and/or MANUAL MAINTENANCE OF THE CAPPUCCINO SYSTEM.
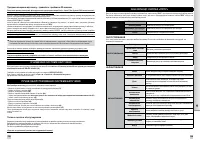
CAPPUCCINO SETTINGS
The machine enables you to set the quantities of milk and coffee according to your desires for a perfectly personalised
cappuccino.
You can alter these settings via the
Cappuccino Settings
menu.
While the screen is displaying the drinks selection menu, give a long press (> 3 seconds) on the machine's
cappuccino
button.
1.
Select
Standard
for the factory settings
2.
Select
New
to personalise your recipe. The following stages take place:
a.
Pre-heating of the machine
b.
Milk frothing phase:
press
OK
when the volume of milk required is reached.
c.
Coffee phase:
press
OK
when the volume of coffee required is reached.
The machine will indicate that the new volumes have been recorded for the next cappuccinos.
NB MILK FROTHING PRODUCTION DOES NOT STOP IMMEDIATELY
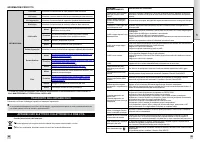
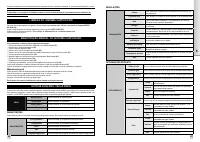
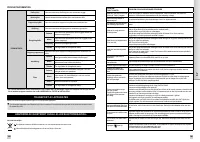
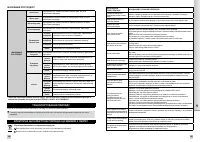
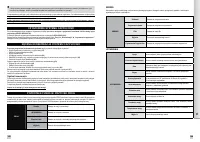
MAINTAINING YOUR APPLIANCE
Warning! To comply with the guarantee conditions, it is essential to carry out the cleaning or descaling cycle when the
appliance requests it. Carefully follow the instructions given on the screen.
You can continue to use the appliance but it is
recommended that you carry it out as soon as possible.
Emptying the used coffee collector, the coffee drawer and the drip collector tray
Remove the cappuccino system
(28).
If the message is displayed, remove, empty and clean the drip collector tray
(29).
Remove, empty and clean the used coffee collector
(30).
Remove the coffee drawer
(31).
The drip collector tray is equipped with floats to indicate when it needs emptying
(32).
Once you have removed the used coffee collector, you must empty it completely to avoid any later overflow.
The warning message does not disappear if the used coffee collector is not pushed firmly into place or is incorrectly installed.
While the message is displayed, it is not possible to prepare an espresso or a coffee. The used coffee collector has a
capacity of nine coffees.
Circuit rinsing: see page 3
Cappuccino system rinsing
You can rinse the system after producing a cappuccino. This is even possible if there is still milk in the milk jug. It is important to
carry out this rinsing cycle after each cappuccino produced.
The milk jug must be in place as described in the paragraph
PREPARING A CAPPUCCINO.
Turn the cappuccino system's lid button to the position
CLEAN (33).
While the screen is displaying the drinks selection menu, press the machine's
CLEAN
button
(34).
Simply follow the on-screen
prompts to start the rinsing cycle. At the end of the cycle, turn the cappuccino system button to the
CAPPUCCINO
position before
starting a new recipe.
IMPORTANT:
It is recommended that you carry out this rinsing operation before returning the milk jug (if it still contains milk) to the
refrigerator following preparation of the last cappuccino. After each rinsing operation, it is recommended that you clean the
different pieces of the system under running tap water
(see paragraph Manual maintenance of milk jug).
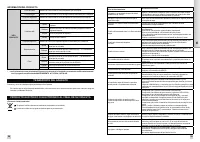
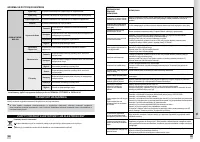
Coffee circuit cleaning programme - total duration: around 20 minutes
You should run the cleaning programme at the end of around 360 preparations of espresso or coffee.
The appliance will warn you by periodically displaying a message when it is time to carry out cleaning.
To carry out a cleaning programme, you will require a container with a capacity of at least 0.6 L and a KRUPS XS 3000 cleaning
tablet.
If you unplug your machine during the cleaning cycle, or if there is a power failure, the cleaning programme will continue
from the current phase when the power is returned. It will not be possible to cancel this operation.
This is essential to ensure that the water circuit has been correctly rinsed. In this case, a new cleaning tablet may be
necessary. Ensure that the cleaning programme has been completed to avoid any risk of poisoning.
The cleaning cycle is an intermittent cycle. Do not put your hands beneath the coffee outlets during the cycle.
When the message “Cleaning necessary” is displayed, you can start the automatic cleaning programme by pressing the
PROG
button.
Carefully follow the instructions given on the screen.
The automatic cleaning programme is divided into three parts: the cleaning cycle itself, then two rinsing cycles. This programme
takes approximately 20 minutes. You can start cleaning at any time by pressing
PROG
to display the menus then selecting
MAINTENANCE ► OK ► COFFEE CLEANING.
Only use KRUPS cleaning tablets (XS 3000). We accept no responsibility for damage caused by the use of tablets of other
brands.
You can obtain cleaning tablets from the KRUPS After-Sales Service.
25
EN
24


