
Кофемашина Krups EA 829810 - инструкция пользователя по применению, эксплуатации и установке на русском языке. Мы надеемся, она поможет вам решить возникшие у вас вопросы при эксплуатации техники.
Если остались вопросы, задайте их в комментариях после инструкции.
"Загружаем инструкцию", означает, что нужно подождать пока файл загрузится и можно будет его читать онлайн. Некоторые инструкции очень большие и время их появления зависит от вашей скорости интернета.


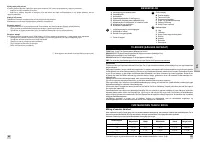

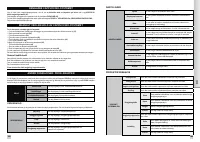


Preparing the appliance
Remove and fill the water tank
(7).
Press firmly to replace it and close the lid
(8).
Remove the lid of the coffee container and add coffee beans. Replace the lid
(9-10).
Do not fill the tanks with hot water, milk or any other liquid.
If the water tank is missing or not completely full (beneath
the “min” level) while the appliance is switched on, the message “Fill tank” will appear and it will be temporarily impossible
to make any coffee or espresso.
Claris - Aqua Filter System F 088 cartridge (sold separately)
For the best flavours and to make sure your appliance lasts as long as possible, we recommend you only use the Claris - Aqua
Filter System cartridge, sold separately.
(3):
Mechanism to memorise the month the cartridge was fitted and when it should be changed (after 2 months maximum).
Your appliance will let you know when you should replace your Claris - Aqua Filter System cartridge by displaying a message.
Filter installation (Claris - Aqua Filter System cartridge)
Note:
To correctly prime your cartridge, ensure that you follow the installation procedure each time you change the cartridge.
First time use:
Choose the
“YES”
option in the
“Filter”
function, then follow the on-screen prompts.
Installing the cartridge in the machine: screw the filter into the base of the water tank, using the handle provided
(4).
Insert the steam nozzle
(5).
Place a 0.6 L container beneath the steam nozzle
(6).
Later installation or when replacing a filter:
Select the
“Filter”
menu by pressing
PROG: “Maintenance” - OK - “Filter”- OK
- “Insert” (or change) - OK -
and follow the on-screen prompts.
Automatic rinsing
When first using your machine,
you may choose to
activate automatic rinsing
. To do this, choose the
“YES”
option on the
“Auto rinse”
menu. Rinsing will take place each time you turn on the machine.
To modify this at a later stage,
you can select automatic rinsing by pressing
PROG – Settings - Auto rinse.
DURING RINSING OPERATIONS, HOT WATER COMES FROM THE NOZZLES. BE CAREFUL NOT TO SCALD YOURSELF.
NEVER PUT GROUND COFFEE IN THE COFFEE CONTAINER
Use of coffee beans that are oily, caramelised or flavoured is not recommended for this machine. This type of bean may damage
the machine.
Make sure that no foreign bodies such as small stones among the coffee beans enter the coffee container. Any damage due to
foreign bodies having entered the coffee container is not covered by the guarantee. Do not put water in the coffee bean container.
To avoid staining your worktop or scalding yourself with used water, ensure you attach the drip collector tray.
Check the water tank is clean.
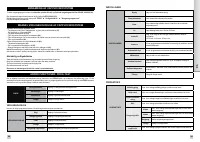
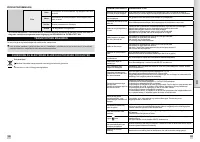
First use/setting the machine
The rotating button enables you to select a function or increase/reduce values. Pressing this button confirms your choice.
Switch the appliance on by pressing the “On/Off” button
(11).
Follow the on-screen prompts in the “Language choice” menu.
Select a language using the rotating button. The selected language will be highlighted
(12-13).
Confirm by pressing the confirmation button
(14).
On the first use, the appliance will ask you to set a number of parameters. If you unplug your appliance, you will have to reset
some of these parameters.
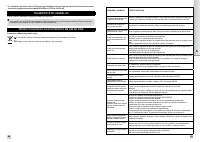
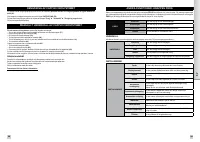
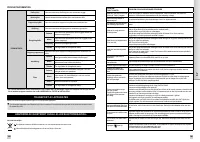
The appliance will ask you to set:
Language
Volume unit
Date
Clock
Auto-off
Auto-on
Water hardness
Automatic rinsing
Filter
You can select the language of your choice from those presented.
You can set the unit of measurement to ml or oz.
It is up to you to set the date.
You can select the display of a 12 or 24-hour clock.
You can select the length of time after which your appliance will switch off automatically.
You can automatically start pre-heating of your appliance at a selected time.
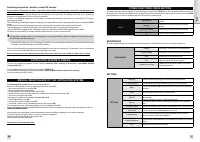
You must set the hardness of your water between 0 and 4. See the section “Measuring the
water hardness”.
You can set rinsing to take place each time the machine is switched on.
You must indicate whether or not a filter is present (Claris - Aqua Filter System cartridge).
On the first use, the appliance may ask to be refilled. Simply follow the on-screen prompts.
Circuit rinsing
Coffee circuit rinsing:
You can start rinsing at any time by pressing
PROG
to display the menus then selecting
MAINTENANCE ► OK ► RINSING
► OK.
Steam circuit rinsing:
Install the steam nozzle
(5)
then place a container beneath the steam nozzle. Select the
hot water
recipe on the screen and
confirm. The cycle will stop automatically after the volume of water indicated on the screen has been flowed through.
It is a good idea to carry out one or more rinses of the two circuits when the appliance has not been used for a number of
days.
DURING RINSING OPERATIONS, HOT WATER COMES FROM THE NOZZLES. BE CAREFUL NOT TO SCALD YOURSELF.
Preparing the grinder
You can adjust the strength of your coffee by setting the grinding fineness of the coffee beans.
The finer the coffee is ground, the stronger and creamier the coffee will be.
Set the degree of grinding fineness by turning the button “Grinding fineness setting”.
Turning towards the left means finer grinding. Turning towards the right means coarser grinding -
(15).
YOU MUST ONLY CHANGE THE SETTING DURING GRINDING.
NEVER FORCE THE GRINDING FINENESS SETTING BUTTON.
PREPARATION OF AN ESPRESSO AND A COFFEE
YOUR APPLIANCE HAS BEEN DESIGNED TO WORK EXCLUSIVELY WITH COFFEE BEANS.
When preparing your first coffee, after a long period of absence or following cleaning or descaling, a little steam and
hot water will issue from the steam nozzle (self-priming).
Splashing or scalding may occur if the coffee outlet is set too high for the size of your cups.
Preparing an espresso
The quantity of water required for an espresso is between 20 and 70 ml.
Press the button, wait for pre-heating to end and, if you wish, carry out a rinsing operation.
The drinks selection menu appears
(16).
Place a cup under the coffee outlet. You can lower or raise the coffee outlet to suit the size of your cup
(17).
Select your drink with the rotating button and confirm by pressing the confirmation button.
You can set the volume of water at any time with the rotating button.
To stop coffee running into the cup, either press a button or reduce the volume with the rotating button.
Preparing a coffee
The quantity of water required for a coffee is between 80 and 160 ml.
Preparing a long coffee
The quantity of water required for a long coffee is between 120 and 240 ml. The appliance automatically carries out a double
cycle, so do not remove your cup before preparation is finished.
After grinding, the ground coffee is moistened with a little water. A few moments later, the percolation process begins.
You can adjust the temperature of your coffee.
DO NOT REMOVE THE TANK BEFORE THE END OF THE CYCLE (around 15 seconds after the coffee has finished
pouring).
23
EN
22


