Хлебопечки Saturn ST-EC0125 - инструкция пользователя по применению, эксплуатации и установке на русском языке. Мы надеемся, она поможет вам решить возникшие у вас вопросы при эксплуатации техники.
Если остались вопросы, задайте их в комментариях после инструкции.
"Загружаем инструкцию", означает, что нужно подождать пока файл загрузится и можно будет его читать онлайн. Некоторые инструкции очень большие и время их появления зависит от вашей скорости интернета.

6
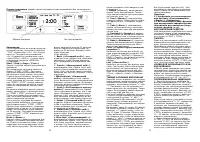
delay program. You can see the dot
flashed and
LCD
will count down to
show the remaining time. You will get
fresh bread at 7:00 in the morning, if
you don’t want to take out the bread
immediately, the keeping warm time of
1hour starts.
Note: 1.This button is not applicable
for the programs Ultra fast, Jam and
Bake.
2. For time delayed baking, do not
use any easily perishable ingredi-
ents such as eggs, fresh milk, fruits,
onions, etc.
。
KEEP WARM
Bread can be automatically kept warm
for 60 minutes after baking. If you
would like to take the bread out, switch
the program off with the
START/STOP
button.
MEMORY
If the power supply has been broken off
during the course of bread making, the
process of bread making will be contin-
ued automatically within 10 minutes,
even without pressing Start/stop button.
If the break time exceeds 10 minutes
the memory cannot be kept and the
bread maker must be restarted
,
But if
the dough is no further than the knead-
ing phase when the power supply
breaks off, you can press the
“
START/STOP”
straight to continue the
program from the beginning .
ENVIRONMENT
The machine may work well in a wide
range of temperatures, but there could
be a difference in loaf size between a
very warm room and a very cold room.
We suggest the room temperature
should be between 15
℃
and 34
℃
.
WARNING DISPLAY
:
1
、
If the display shows “
HHH
” after the
program has been started, the tempera-
ture inside is still too
high
(
accompanied by 5 beep sounds
)
.
Then the program has to be stopped.
Open the lid and let the machine cool
down for 10 to 20 minutes.
2
、
If the display shows
“
LLL
”
after
pressing the START/STOP button ( ex-
cept the programs BAKE), it means the
temperature inside is too
low
(
accompanied by 5 beep sounds
)
,
stop sound by pressing the START/STOP
button, open the lid and let the machine
rest for 10 to 20 minutes to return to
room temperature.
3. If the display shows “
EE0
” after you
have pressed
START/STOP,
the tem-
perature sensor is disconnected please
check the sensor carefully by Authorized
expert.
For the first use
1
、
Please check if all parts and accesso-
ries are complete and free of damage .
2
、
Clean all the parts according to the
latter section
“
Cleaning and Mainte-
nance
”
3
、
set the bread maker in baking mode
and bake empty for about 10 minutes.
After cooling it down clean once more.
4
、
Dry all parts thoroughly and assem-
bly them, so the appliance is ready for
using.
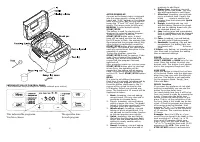
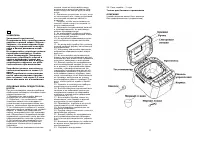
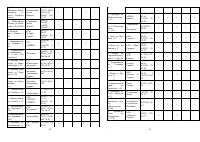
How to make bread
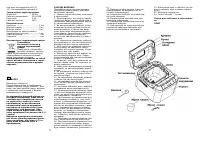
1. Place the pan in position and turn it
clockwise until it clicks in correct posi-
tion. Insert the kneading blade onto the
drive shaft. It is recommended to fill
holes with heat-resisting margarine pri-
or to placing the kneaders, this avoids
the dough to stick below the kneaders
and the kneaders could be removed
from bread easily.
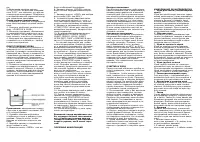
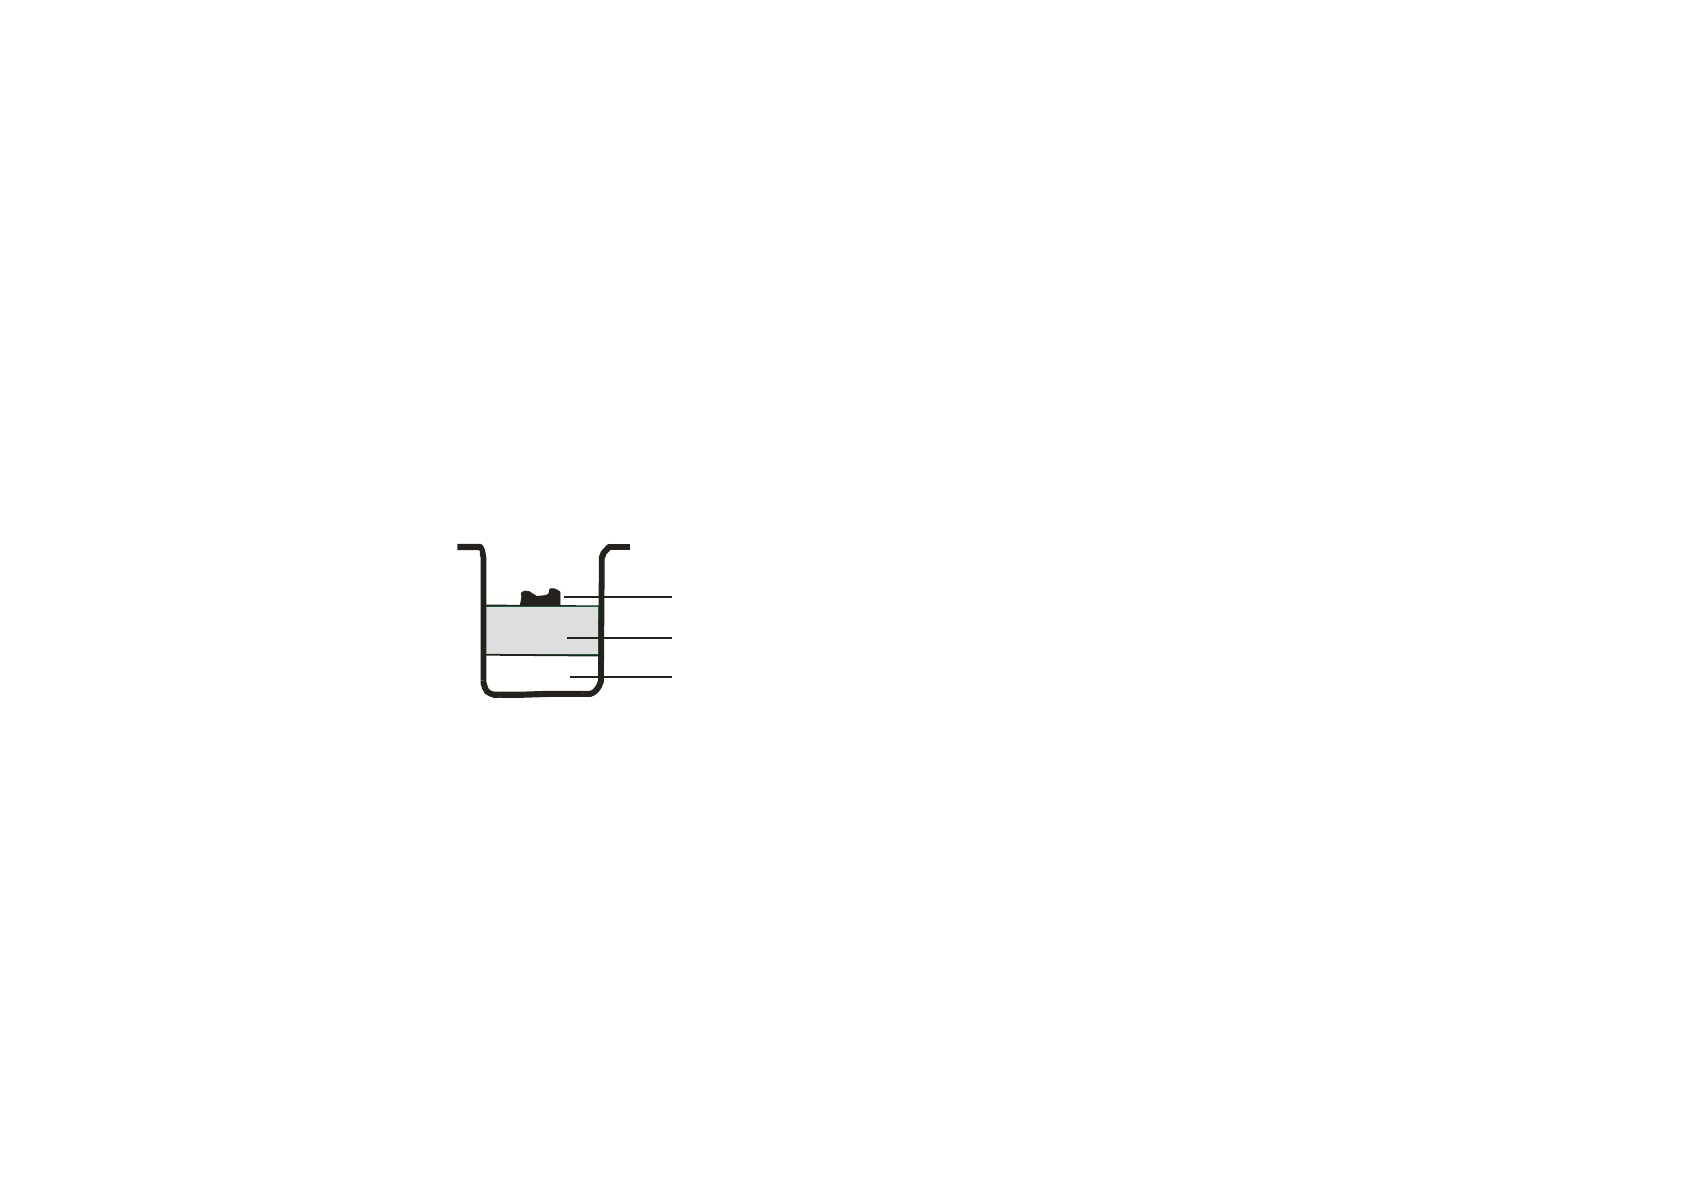
2. Place ingredients into the bread pan.
Please keep to the order mentioned in
the recipe.
Usually the water or liquid substance
should be put firstly, then add sugar,
salt and flour, always add yeast or bak-
ing powder as the last ingredient.
Note: the maximum quantities of the
flour and yeast which may be used refer
to the recipe.
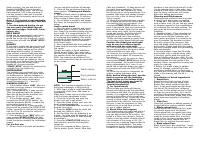
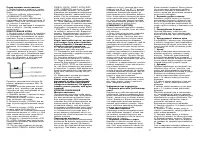
水 或 液体
干 的 配 料
酵 母 或 苏 打
Ye a st o r so d a
Dr y ing red ie nts
Wa te r o r liq uid
NOTE
: The maximum quantity of flour
and yeast separately is 490g and 6g.
3. With finger make a small indentation
on one side of the flour. Add yeast to
indentation,
Make sure it does not come into contact
with the liquid ingredients or salt.
4. Close the lid gently and plug the
power cord into a wall outlet.
5. Press the Menu button until your de-
sired program is selected.
6. Press the
COLOR
button to select the
desired crust color.
7. Press the
LOAF
button to select the
desired size (650g or 800g ).
8. Set the delay time by pressing
+
or
-
button. This step may be skipped if you
want the bread maker to start working
immediately.
9. Press the
START/STOP
button to
start working, and the working light
comes on.
10.For the program of Basic, French,
Whole wheat, Quick, Sweet, Ultra fast,
7
Cake and Sandwich, 10 beep sound will
be heard during operation. This is to
prompt you to add ingredients. Open
the lid and put in some ingredients. It is
possible that steam will escape through
the vent slits in the lid during baking.
This is normal.
11. Once the process has been complet-
ed 10 beeps sound will be heard, and
the working light will extinguish. You
can press
START/STOP
button for ap-
prox. 2 seconds to stop the process and
take out the bread. Open the Lid and
while using oven mitts, firmly grasp the
bread pan handle. Turn the pan anti-
clockwise and gently pull the pan
straight up and out of the machine.
12.Use non-stick spatula to gently loos-
en the sides of the bread from the pan.
Caution: the Bread pan and bread
may be very hot! Always handle
with care and use oven mitts.
13. Turn bread pan upside down onto a
clean cooking surface and gently shake
until bread falls out onto rack.
14. Remove the bread carefully from the
pan and cool for about 20 minutes be-
fore slicing.
15. If you are out of the room or have
not pressed
START/STOP
button at the
end of operation, the bread will be kept
warm automatically for 1 hour, if you
would like to take the bread out, switch
the program off with the START/STOP
button.
16. When do not use or completely op-
eration, unplug the power cord.
Note: Before slicing the loaf, use the
hook to remove out the kneading
blade hidden on the bottom of loaf.
The loaf is hot, never use hand to
remove the kneading blade.
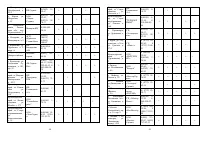
Special introduction
1
、
For Quick breads
Quick breads are made with baking
powder and baking soda that activated
by moisture and heat. For perfect quick
breads, it is suggested that all liquids be
placed in the bottom of the bread pan,
dry ingredients on top. During the initial
mixing of quick bread
,
batters and dry
ingredients may collect in the corners of
the pan, it may be necessary to help
machine mix to avoid flour clumps. If
so, use a rubber spatula.
2
、
About Ultra fast program
The bread maker can bake loaf within 1
hour with ultra fast program. This set-
ting can bake bread in 58 minutes
,
the
bread is a little more dense in texture.
Please noted ingredient of water should
be hot water in the range of 48—50
℃
,
you must use a cooking thermometer to
measure the temperature. The water
temperature is very critical to the per-
formance of baking. If the water tem-
perature is too low the bread will not be
rise to expected size; if the water tem-
perature is too high it will kill the yeast
prior to rising, which also will largely
affect the baking performance.
Cleaning and Maintenance
Disconnect the machine from the power
and let it cool down prior to cleaning.
1. Bread pan: Rub inside and outside
with a damp cloth. Do not use any sharp
or abrasive agents for the consideration
of protecting the non-stick coating. The
pan must be dried completely prior to
installing.
2. Kneading blade: If the kneading bar
is difficult to remove from the axle, in
such an event fill the Container with
warm water and allow it to soak for ap-
prox.30minutes.The kneader can then
be easily removed for cleaning. Also
wipe the blade carefully with a cotton
damp cloth, Please note both the bread
pan and kneading blade are dishwashing
safe components.
3.Lid and window: clean the lid inside
and outside with a slightly damp cloth.
4.Housing: gently wipe the outer sur-
face of housing with a wet cloth. Do not
use any abrasive cleaner to clean as this
would degrade the high polish of the
surface. Never immerse the housing into
water for cleaning.
5.Before the bread maker is packed
away for storage, ensure that it has
completely cooled down, is clean and
dry, and put the spoon and the kneading
blade in the drawer, and the lid is
closed.
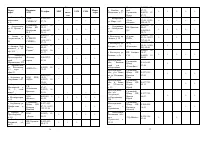
Introduction of bread ingredients
1.
Bread flour
Bread flour has high content of high
gluten (so it can be also called high-
gluten flour which contains high pro-
tein), it has good elastic and can keep
the size of the bread from collapsing
after rise. As the gluten content is high-
er than the common flour, so it can be
used for making bread with large size
and better inner fiber. Bread flour is the
most important ingredient of making
bread.
2.
Plain flour
Flour that contains no baking powder, it
is applicable for making extouch bread.
3.
Whole-wheat flour
Whole-wheat flour is ground from grain.
It contains wheat skin and gluten.
Whole-wheat flour is heavier and more
nutrient than common flour. The bread
made by whole-wheat flour is usually
small in size. So many recipes usually
combine the whole -wheat flour or
bread flour to achieve the best result.
4.
Black wheat flour
Black wheat flour, also named as
“
rough
flour”, it is a kind of high fiber flour, and

