
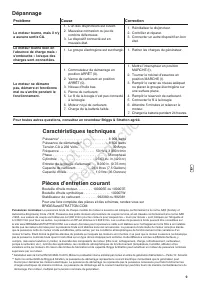
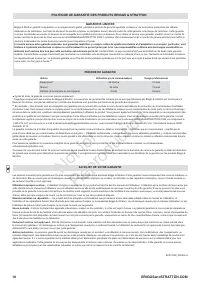
Генераторы Briggs&Stratton Elite 8500 EA 030722 - инструкция пользователя по применению, эксплуатации и установке на русском языке. Мы надеемся, она поможет вам решить возникшие у вас вопросы при эксплуатации техники.
Если остались вопросы, задайте их в комментариях после инструкции.
"Загружаем инструкцию", означает, что нужно подождать пока файл загрузится и можно будет его читать онлайн. Некоторые инструкции очень большие и время их появления зависит от вашей скорости интернета.


Not for
Reproduction
5
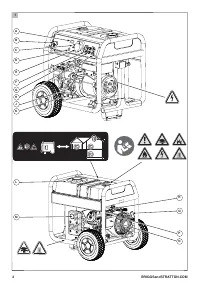
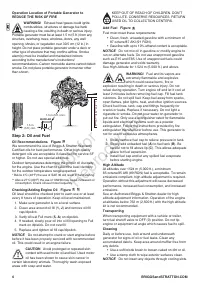
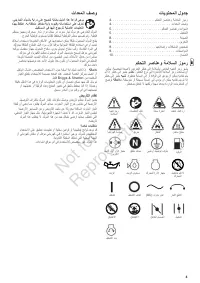
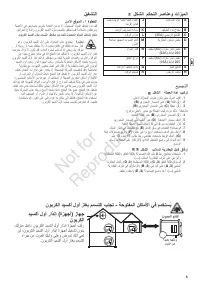
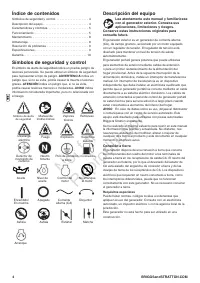
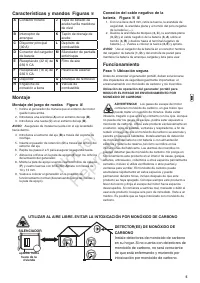
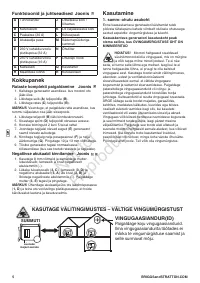
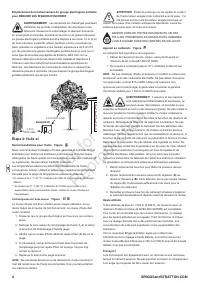
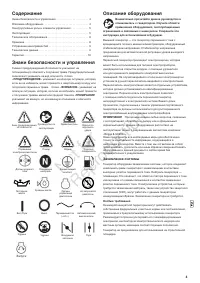
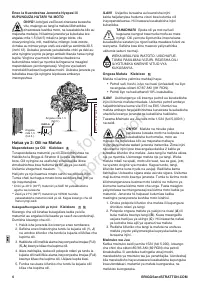
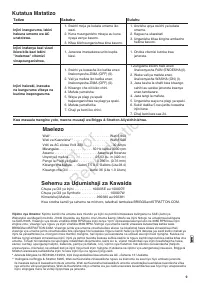
Install carbon monoxide alarms
inside your home. Without working
carbon monoxide alarms, you will
not realize you are getting sick
and dying from carbon monoxide.
CARBON MONOXIDE ALARM(S)
USE OUTDOORS - AVOID CARBON MONOXIDE POISONING
point away
from home
MUFFLER
MUFFLER
point away
from home
USE OUTDOORS - AVOID CARBON MONOXIDE POISONING
CARBON MONOXIDE
ALARM(S)
Install carbon monoxide alarms
inside your home. Without working
carbon monoxide alarms, you will not
realize you are getting sick and dying
from carbon monoxide poisoning.
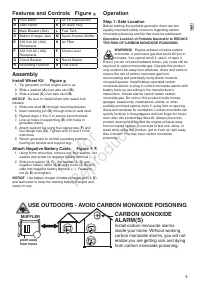
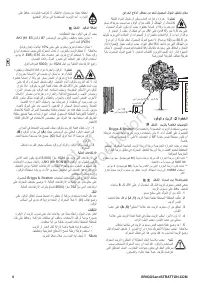
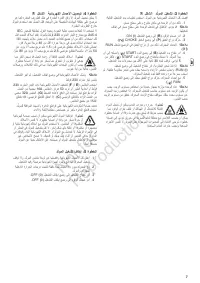
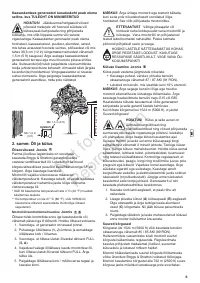
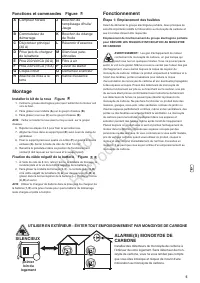
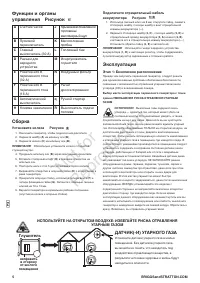
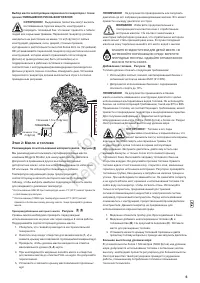
Features and Controls Figure
1
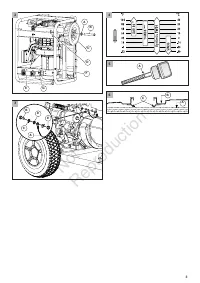
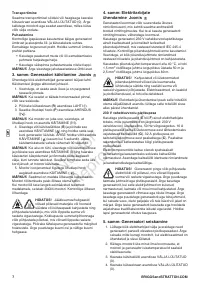
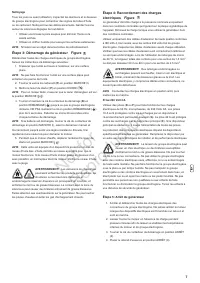
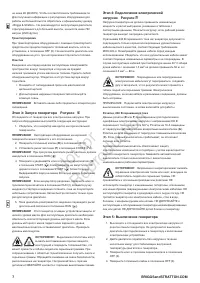
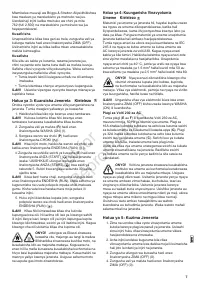
Assembly
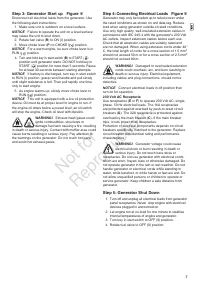
Install Wheel Kit Figure
2
1. Tip generator so that engine end is up.
2. Slide a washer (
A
) over axle stud (
B
).
3. Slide a wheel (
C
) over axle stud (
B
).
NOTICE
Be sure to install wheel with raised hub
inboard.
4. Slide axle stud (
B
) through mounting bracket.
5. Insert retaining pin (
D
) through hole on axle stud.
6. Repeat steps 2 thru 5 to secure second wheel.
7. Line up holes in support leg (
E
) with holes in
generator frame.
8. Attach support leg using four capscrews (
F
) and
four flange nuts (
G
). Tighten with 10 and 13 mm
wrenches.
9. Return generator to normal operating position
(resting on wheels and support leg).
Attach Negative Battery Cable Figure
1
1. Using 8 mm wrenches, remove nut, lock washer, flat
washer and screw on negative battery terminal (—).
2. Slide lock washer (
3, C
) , flat washer (
3, D
) and
negative battery cable (
3, A
) over screw (
3, B
) and
slide into negative battery terminal (—). Reattach
nut (
3, E
) and tighten.
NOTICE
Use battery charger in battery charger jack (
1, D
)
and wall outlet to keep the starting battery charged and
ready for use.
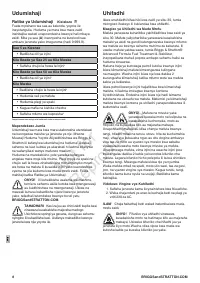
Operation
Step 1: Safe Location
Before starting the portable generator there are two
equally important safety concerns regarding carbon
monoxide poisoning and fire that must be addressed.
Operation Location of Portable Generator to REDUCE
THE RISK OF CARBON MONOXIDE POISONING
WARNING!
Engine exhaust contains carbon
monoxide, a poisonous gas that could kill you in
minutes. You cannot smell it, see it, or taste it.
Even if you do not smell exhaust fumes, you could still be
exposed to carbon monoxide gas. Operate this product
only outdoors far away from windows, doors and vents to
reduce the risk of carbon monoxide gas from
accumulating and potentially being drawn towards
occupied spaces. Install battery-operated carbon
monoxide alarms or plug-in carbon monoxide alarms with
battery back-up according to the manufacturer’s
instructions. Smoke alarms cannot detect carbon
monoxide gas. Do not run this product inside homes,
garages, basements, crawlspaces, sheds, or other
partially-enclosed spaces even if using fans or opening
doors and windows for ventilation. Carbon monoxide can
quickly build up in these spaces and can linger for hours,
even after this product has shut off. Always place this
product downwind and point the engine exhaust away
from occupied spaces. If you start to feel sick, dizzy, or
weak while using this product, get to fresh air right away.
See a doctor. You may have carbon monoxide
poisoning.
A
Hour Meter
J
Oil Fill Cap/Dipstick
B
Start Switch
K
Oil Drain Plug
C
Main Breaker (30A)
L
Fuel Tank
D
Battery Charger Jack
M
Spark Arrester Muffler
E
230 Volt AC (32A)
Receptacle
N
Air Filter
F
230 Volt AC (16A)
Receptacle
P
Choke Lever
G
Circuit Breaker
Q
Recoil Starter
H
Grounding Fastener
R
Fuel Valve
3


