
Электропилы Ryobi RCS1935B 5133004338 - инструкция пользователя по применению, эксплуатации и установке на русском языке. Мы надеемся, она поможет вам решить возникшие у вас вопросы при эксплуатации техники.
Если остались вопросы, задайте их в комментариях после инструкции.
"Загружаем инструкцию", означает, что нужно подождать пока файл загрузится и можно будет его читать онлайн. Некоторые инструкции очень большие и время их появления зависит от вашей скорости интернета.


8
| English
frequently.
The chain tension is correct when the gap between the
cutter in the chain and the bar is between 3 mm - 4
mm. Pull the chain in the middle of the lower side of the
bar downwards (away from the bar) and measure the
distance between the bar and the chain cutters.
3. Tighten and lock the chain tension/guide bar locking
knob by turning it clockwise.
Note:
Make sure that the bar and chain tensioning
assembly is moving freely without dirt and the saw
chain is correctly looped around the sprocket. If the
chain tension is too tight or too loose after locking
the chain tension/guide bar locking knob, check if the
guide bar and chain tensioning assembly are clean and
properly assembled.
If necessary, remove the sprocket cover and guide bar
for cleaning, then re-assemble the parts.
OPERATION
ADDING CHAIN LUBRICATING OIL
See page 269.
WARNING
Never work without chain lubricant. If the saw chain is
running without lubricant, the guide bar and saw chain
can be damaged. It is essential to frequently check the
oil level in the oil level gauge and before starting to use
the chainsaw.
1. Clear surface around the oil cap to prevent
contamination.
2. Unscrew and remove the cap from the oil tank.
3. Pour the oil into the oil tank and monitor the oil level
gauge. Ensure that no dirt enters the oil tank while
filling.
4. Put the oil cap back on and tighten it up. Wipe away
any spillage.
5. One full oil tank will enable you to use the saw for 18
- 28 min.
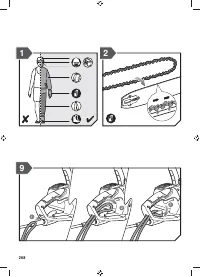
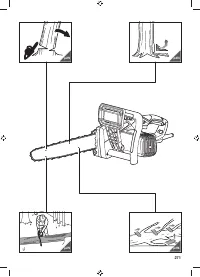
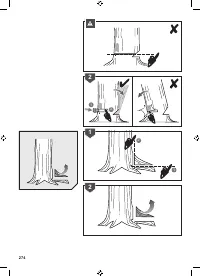
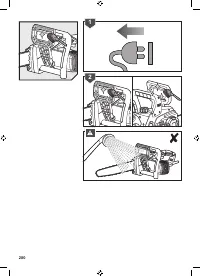
HOLDING THE CHAINSAW
See page 269.
Always hold the chain saw with your right hand at the rear
handle and your left hand at the front handle. Grip both
handles with the thumbs and
fi
ngers encircling the handles.
Ensure that your left hand is holding the front handle so that
your thumb is underneath.
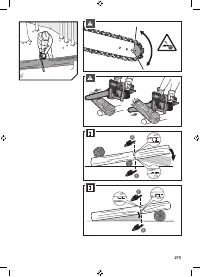
WARNING
Always keep the power cable tidy and away from the
area of cutting. Apart from the danger of electrocution,
untidy cables cause falls and trips.
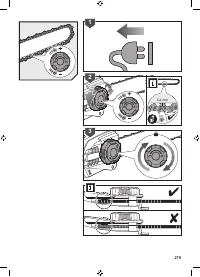
STARTING THE CHAINSAW
See page 269.
1. Connect the product to a power outlet. Make sure the
chain brake is in the run position by pulling back on the
lever/hand guard.
2. To start the product: Press the trigger release, and then
press the on/off trigger.
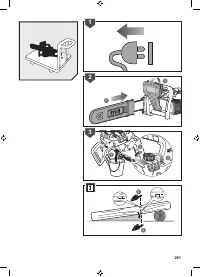
CHECKING AND OPERATING CHAIN BRAKE
1. Engage the chain brake by rotating your left hand
around the front handle. Allow the back of your hand to
push the chain brake lever/hand guard toward the bar
while the chain is rotating rapidly. The chain should stop
rotating immediately. Be sure to maintain both hands on
the saw handles at all times.
2. Reset the chain brake back into the Run position by
grasping the top of the chain brake lever/hand guard
and pulling toward the front handle until you hear a
click.
WARNING
If the chain brake does not stop the chain immediately, or
if the chain brake will not stay in the run position without
assistance, have the product serviced by an authorised
service centre prior to use.
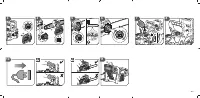
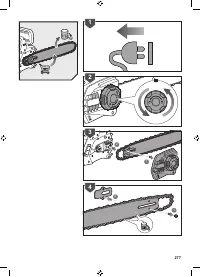
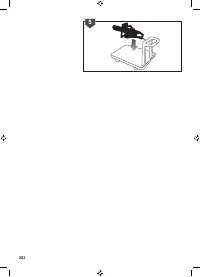
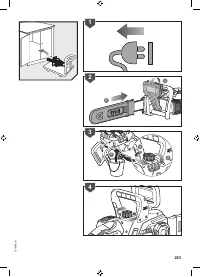
REPLACING THE GUIDE BAR AND SAW CHAIN
See page 277 - 278.
1. Disconnect the product from the power supply. Wear
protective gloves.
2. Unlock the chain tension/guide bar locking knob by
turning it counterclockwise until the sprocket cover
comes loose.
3. Remove the sprocket cover. Remove the bar and saw
chain from the product.
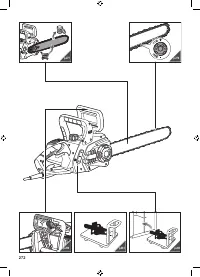
4. Remove the screw holding the guide bar to the chain
tension assembly. Dispose the used bar and saw chain
properly.
5. Mount the chain tension assembly on to the new bar
and tighten the screw. Put the new chain in the correct
direction onto the bar and make sure that the drive links
are aligned in the bar groove.
6.
Attach the bar to the chain saw and loop the chain
around the drive sprocket.
Replace the sprocket cover.
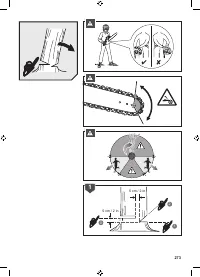
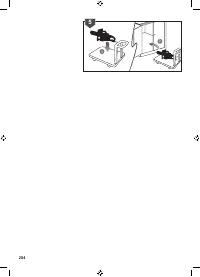
7.
Tighten and lock the chain tension/guide bar locking
knob by turning it clockwise.
The chain tension is correct when the gap between the
cutter in the chain and the bar is between 3 mm - 4
mm. Pull the chain in the middle of the lower side of the
bar downwards (away from the bar) and measure the
distance between the bar and the chain cutters.
Adjust the chain tension. Refer to the “Adjusting chain
tension” section.
WARNING
Improper chain sharpening increases the potential of
kickback.
WARNING
Failure to replace or repair a damaged chain can cause
serious injury.


