
Бензопилы Makita EA3202S40B - инструкция пользователя по применению, эксплуатации и установке на русском языке. Мы надеемся, она поможет вам решить возникшие у вас вопросы при эксплуатации техники.
Если остались вопросы, задайте их в комментариях после инструкции.
"Загружаем инструкцию", означает, что нужно подождать пока файл загрузится и можно будет его читать онлайн. Некоторые инструкции очень большие и время их появления зависит от вашей скорости интернета.


29
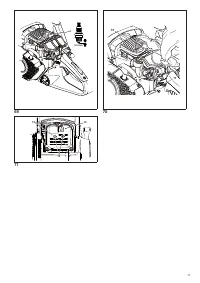
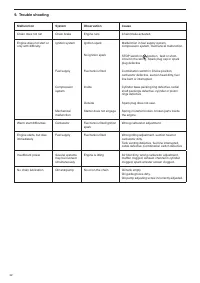
Note:
or saw models with catalytic converters
Ƽ
A3200
Ɠ
A3201
)
Ɠ
remove the converter along with the upper mu
ų
er
half
Ɩ
The screws on the bottom mu
ų
er half
Ƽ
14
) are now accessible
Ɠ
and it is possible to chec
Ã
them for tightness
Ɩ
If they are loose
Ɠ
tighten by hand
Ƽ
Caution
ƕ
do not over
Ƙ
tighten)
Ɩ
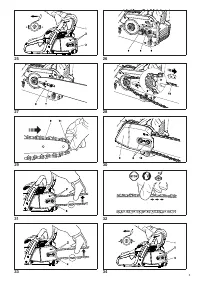
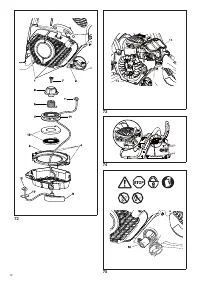
7-9. Replacing the starter cable
Ư
Replacing
the return spring pack
Ư
Replacing the
starter spring
(Fig. 72)
nscrew three screws
Ƽ
1
)
Ɩ
Remove fan housing
Ƽ
2
)
Ɩ
Remove the air guide
Ƽ
3
) from the fan housing
Ɩ
CAREFUL! Injury hazard! Do not unscrew screw (7) if the
return spring is under tension.
If the starter cable is to be replaced although it is not bro
Ã
en
Ɠ
it will be necessary to
Ų
rst de
Ƙ
tension the cable drum return
spring
Ƽ
13
)
Ɩ
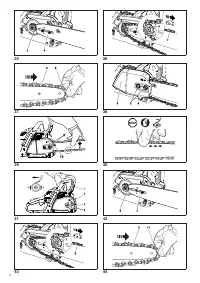
To do this
Ɠ
use the grip to pull the cable all the way out of the
fan housing
Ɩ
old the cable drum with one hand
Ɠ
and with the other push
the cable into the space
Ƽ
14
)
Ɩ
Carefully let the drum turn until the return spring is no longer
under tension
Ɩ
nscrew screw
Ƽ
7
) and remove the driver
Ƽ
8
) and spring
Ƽ
6
)
Ɩ
Carefully
remove the cable drum
Ɩ
Remove any cable pieces
Ɩ
Thread a new cable
Ƽ
dia
Ɩ
3
Ɩ
0 mm
Ɠ
length 900 mm) as shown
in the illustration
Ƽ
don
Ƣ
t forget the washer
Ƽ
10
)) and
Ã
not both
ends as shown
Ɩ
Pull
Ã
not
Ƽ
11
) into the cable drum
Ƽ
5
)
Ɩ
Pull
Ã
not
Ƽ
12
) into the starter grip
Ƽ
9
)
Ɩ
Put the drum on its spindle and turn it slightly until the return
spring engages
Ɩ
Place the spring
Ƽ
6
) in the driver
Ƽ
8
) and place them together
in the cable drum
Ƽ
5
) while turning slightly counter
Ƙ
cloc
Ã
wise
Ɩ
Insert screw
Ƽ
7
) and tighten
Ɩ
uide the cable into the slot
Ƽ
14
) on the cable drum and turn
the drum with the cable cloc
Ã
wise three times
Ɩ
old the cable drum with your left hand and with your right
hand untwist the cable
Ɠ
pull it tight and hold it
Ɩ
Carefully release the cable drum
Ɩ
The spring will wind the
cable around the drum
Ɩ
Repeat the procedure once
Ɩ
The starter grip should now stand
straight up on the fan housing
Ɩ
NOTE:
With the cable pulled all the way out
Ɠ
it must still be
possible to turn the pulley another 1
Ư
4 turn against the return
spring
Ɩ
CAUTION: Danger of injury! Secure the cable grip when
pulled out! It will whip back if the cable pulley is released
by accident.
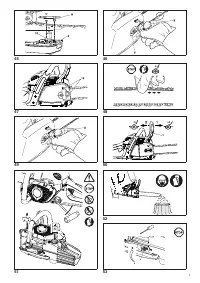
Replacing the return spring pack
isassemble the fan housing and cable drum
Ƽ
see above)
Ɩ
CAREFUL! Injury hazard! The return spring can pop out!
Always wear eye protection and protective gloves!
ightly tap the fan housing on a wooden surface with the en
Ƙ
tire surface of the hollow side
Ɠ
and
hold it down
Ɩ
ow lift the
fan housing
carefully and in small steps
Ɩ
This will allow the
return spring pac
Ã
Ƽ
13
)
Ɠ
which should now have fallen out
Ɠ
to
rela
Ð
in a controlled manner if the return spring has popped out
of the plastic pac
ÃƖ
Carefully insert a new return spring cassette and press down
until it engages
Ɩ
Place the cable drum on it and turn it slightly until the return
spring engages
Ɩ
Install the spring
Ƽ
6
) and driver
Ƽ
8
) and screw on tight with
screw
Ƽ
7
)
Ɩ
Tension the spring
Ƽ
see above)
Ɩ
Replacing the starter spring
NOTE:
If the spring
Ƽ
6
) in the
eatherlight
Ƙ
tarting system is
bro
Ã
en
Ɠ
more e
Ű
ort will be re
É
uired to start the engine and you
will notice some resistance when pulling the starter cable
Ɩ
If
you notice this
Ɠ
chec
Ã
the spring
Ƽ
6
) and replace if necessary
Ɩ
7-10. Mounting the fan housing
(Fig. 72)
Insert the air guide
Ƽ
3
) in the fan housing so that the three re
Ƙ
cesses
Ƽ
4
) engage
Ɩ
Position the fan housing against the housing
Ɠ
press against it
lightly and pull the starter grip until the starter engages
Ɩ
Tighten screws
Ƽ
1
)
Ɩ
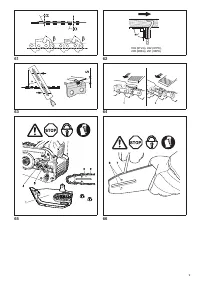
7-11. Cleaning the air
Ų
lter compartment
Ư
fan
compartment
(Fig. 73)
Remove cover
Ɩ
Remove the fan housing
Ɩ
CAUTION: To prevent eye injury, always wear eye protec-
tion when cleaning the
Ų
lter with compressed air!
The entire area
Ƽ
15
) can now be brushed clean or cleaned with
compressed air
Ɩ
7-12. Cleaning the cylinder
Ų
ns
(Fig. 74)
A bottle brush can be used to clean the cylinder
Ų
ns
Ɩ
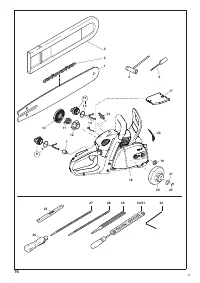
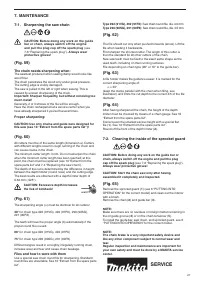
7-13. Replacing the suction head
(Fig. 75)
The felt
Ų
lter
Ƽ
16
) of the suction head can become clogged
Ɩ
It
is recommended to replace the suction head once every
three months in order to ensure unimpeded fuel
Ŵ
ow to the
carburetor
Ɩ
To remove the suction head for replacement
Ɠ
pull it out through
the tan
Ã
Ų
ller nec
Ã
using a piece of wire bent at one end to
form a hoo
ÃƖ


