
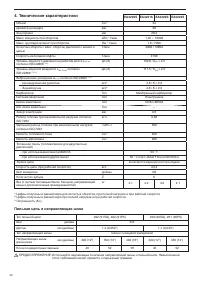
Бензопилы Makita EA3202S40B - инструкция пользователя по применению, эксплуатации и установке на русском языке. Мы надеемся, она поможет вам решить возникшие у вас вопросы при эксплуатации техники.
Если остались вопросы, задайте их в комментариях после инструкции.
"Загружаем инструкцию", означает, что нужно подождать пока файл загрузится и можно будет его читать онлайн. Некоторые инструкции очень большие и время их появления зависит от вашей скорости интернета.


27
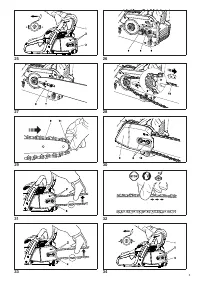
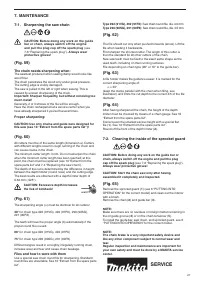
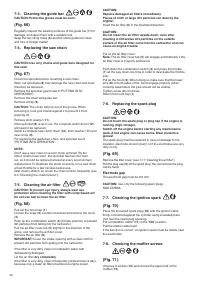
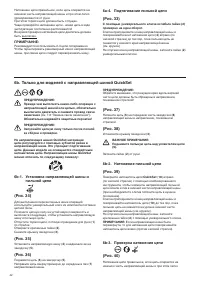
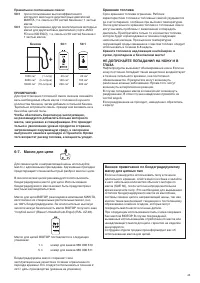
7-1. Sharpening the saw chain
CAUTION: Before doing any work on the guide
bar or chain, always switch o
Ű
the engine
and pull the plug cap o
Ű
the spark plug
Ƽ
see
7
Ƙ
6
ƣ
Replacing the spar
Ã
plug
Ƥ
)
. Always wear
protective gloves!
(Fig. 59)
The chain needs sharpening when:
The sawdust produced when sawing damp wood loo
Ã
s li
Ã
e
wood
Ŵ
our
Ɩ
The chain penetrates the wood only under great pressure
Ɩ
The cutting edge is visibly damaged
Ɩ
The saw is pulled to the left or right when sawing
Ɩ
This is
caused by uneven sharpening of the chain
Ɩ
Important: Sharpen frequently, but without removing too
much metal!
enerally
Ɠ
2 or 3 stro
Ã
es of the
Ų
le will be enough
Ɩ
ave the chain resharpened at a service center when you
have already sharpened it yourself several times
Ɩ
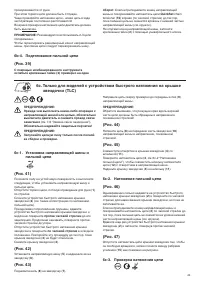
Proper sharpening:
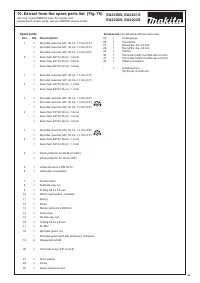
CAUTION: Use only chains and guide bars designed for
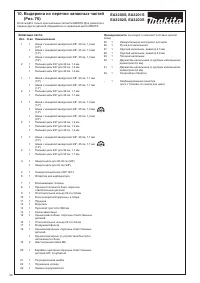
this saw (see 10
ƣ
Extract from the spare parts list”)!
(Fig. 60)
All cutters must be of the same length
Ƽ
dimension a)
Ɩ
Cutters
with di
Ű
erent lengths result in rough running of the chain and
can cause crac
Ã
s in the chain
Ɩ
The minimum cutter length
ƕ
3 mm
Ɩ
o not resharpen the chain
when the minimum cutter length has been reached
Ɣ
at this
point
Ɠ
the chain must be replaced
Ƽ
see 10
ƣÐ
tract from the
spare parts list
Ƥ
and 7
Ƙ
4
ƣ
Replacing the saw chain
Ƥ
)
Ɩ
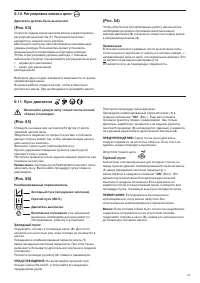
The depth of the cut is determined by the di
Ű
erence in height
between the depth limiter
Ƽ
round nose) and the cutting edge
Ɩ
The best results are obtained with a depth
Ƙ
limiter depth of
0
Ɩ
64 mm
ƼƖ
025
Ƥ
)
Ɩ
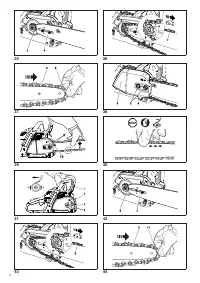
CAUTION: Excessive depth increases
the risk of kickback!
(Fig. 61)
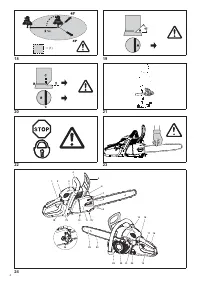
The sharpening angle
Ƽ
_
) must be identical for all cutters!
30
ͳ
for chain type 092
Ƽ
91
)
Ɠ
492
Ƽ
91P
)
Ɠ
290
Ƽ
90
)
Ɠ
291
Ƽ
90P
)
The teeth will have the proper angle
Ƽ
ß
) automatically if the
proper round
Ų
le is used
Ɩ
80
ͳ
for chain type 092
Ƽ
91
)
Ɠ
492
Ƽ
91P
)
75°
for chain type 290
Ƽ
90
)
Ɠ
291
Ƽ
90P
)
i
Ű
erent angles result in a roughly
Ɠ
irregularly running chain
Ɠ
increase wear and tear and cause chain bea
Ã
age
Ɩ
Files and how to work with them
se a special saw chain round
Ų
le for sharpening
Ɩ
tandard
round
Ų
les are unsuitable
Ɩ
ee 10
ƣÐ
tract from the spare parts
list
ƤƖ
Type 092 (91VG), 492 (91PX)
ƕ
aw chain round
Ų
le
Ɠ
dia
Ɩ
4
Ɩ
0 mm
Type 290 (90SG), 291 (90PX)
ƕ
aw chain round
Ų
le
Ɠ
dia
Ɩ
4
Ɩ
5 mm
Ɩ
(Fig. 62)
The
Ų
le should cut only when pushed forwards
Ƽ
arrow)
Ɩ
ift the
Ų
le when leading it bac
Ã
wards
Ɩ
irst sharpen the shortest cutter
Ɩ
The length of this cutter is
then the standard for all other cutters of the chain
Ɩ
ew saw teeth must be
Ų
led to the e
Ð
act same shape as the
used teeth
Ɠ
including on their running surfaces
Ɩ
ile depending on chain type
Ƽ
90
ͳ
or 10
ͳ
to the guide bar)
Ɩ
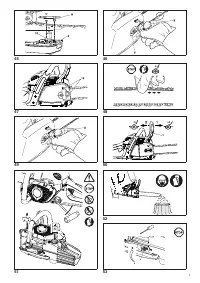
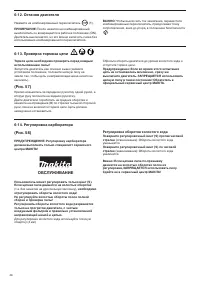
(Fig. 63)
A
Ų
le holder ma
Ã
es
Ų
le guidance easier
Ɩ
It is mar
Ã
ed for the
correct sharpening angle of
ƕ
_
̔
30
ͳ
ƼÃ
eep the mar
Ã
s parallel with the chain when
Ų
ling
Ɠ
see
illustration) and limits the cut depth to the correct 4
Ư
5 of the
Ų
le
diameter
Ɩ
(Fig. 64)
After having sharpened the chain
Ɠ
the height of the depth
limiter must be chec
Ã
ed by means of a chain gauge
Ɩ
ee 10
ƣÐ
tract from the spare parts list
ƤƖ
Correct even the smallest e
Ð
cess height with a special
Ŵ
at
Ų
le
Ƽ
1
)
Ɩ
ee 10
ƣÐ
tract from the spare parts list
ƤƖ
Round o
Ű
the front of the depth limiter
Ƽ
2
)
Ɩ
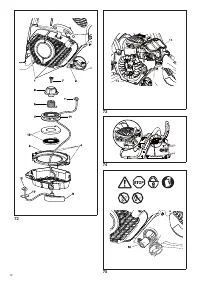
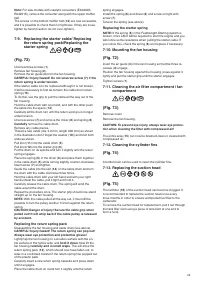
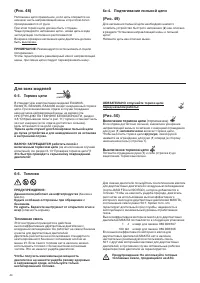
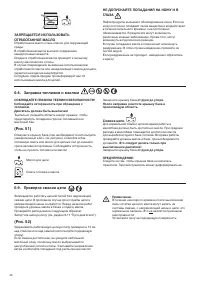
7-2. Cleaning the inside of the sprocket guard
CAUTION: Before doing any work on the guide bar or
chain, always switch o
Ű
the engine and pull the plug
cap o
Ű
the spark plug
Ƽ
see 7
Ƙ
6
ƣ
Replacing the spar
Ã
plug
Ƥ
)
.
Always wear protective gloves!
CAUTION: Start the chain saw only after having
assembled it completely and inspected.
(Fig. 65)
Remove the sproc
Ã
et guard
Ƽ
1
)
Ƽ
see 6
ƣ
P
TTI
I
T
P
RATI
Ƥ
for the correct model) and clean out the interior
with a brush
Ɩ
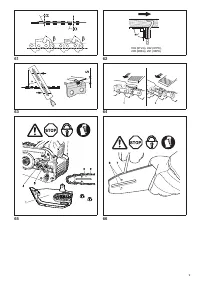
Remove the chain
Ƽ
2
) and guide bar
Ƽ
3
)
Ɩ
NOTE:
Ma
Ã
e sure there are no residues or foreign matter remaining in
the oil guide groove
Ƽ
4
) or on the chain tensioner
Ƽ
5
)
Ɩ
To install the guide bar
Ɠ
saw chain
Ɠ
and sproc
Ã
et guard
Ɠ
see 6
ƣ
P
TTI
I
T
P
RATI
Ƥ
for the correct model
Ɩ
NOTE:
The chain brake is a very important safety device and
like any other component subject to normal wear and
tear.
Regular inspection and maintenance are important for
your own safety and must be done by a MAKITA service
center.
SERVICE
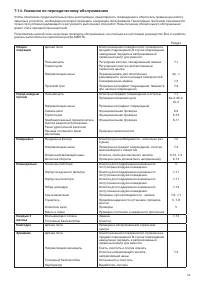
7. MAINTENANCE


