Заточные станки Einhell TC-WD 200/150, 250 Вт (4417242) - инструкция пользователя по применению, эксплуатации и установке на русском языке. Мы надеемся, она поможет вам решить возникшие у вас вопросы при эксплуатации техники.
Если остались вопросы, задайте их в комментариях после инструкции.
"Загружаем инструкцию", означает, что нужно подождать пока файл загрузится и можно будет его читать онлайн. Некоторые инструкции очень большие и время их появления зависит от вашей скорости интернета.


GB
- 23 -
push the workpiece support (7) as close as
possible to the grinding/sanding wheel (5).
•
Warning! The distance between the grinding/
sanding wheel (5) and the workpiece support
(7) must be set as small as possible and un-
der no circumstances should it exceed 2 mm.
•
Then secure the workpiece support (7) again
with the locking button (20).
•
Warning! Adjust the workpiece support (7)
periodically to compensate for wear on the
grinding/sanding wheel (5).
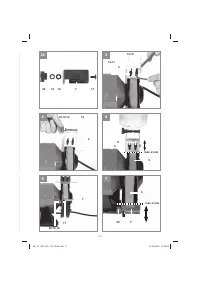
5.5 Changing the dry grinding wheel
(Fig. 8-12)
•
Before you replace the grinding wheel: Pull
out the power plug!
•
Undo the three screws (A) in the cover (4)
using a 4 mm hex key. Pull the screws (A) out
as far as they will go.
•
Then turn the cover (4) in a clockwise direc-
tion until the cover (4) can be removed by
taking it off past the spark deflector (3).
•
Lift the cover (4) off.
•
Slacken the socket head screws (11) as de-
scribed in 5.2 so that the spark deflector (3)
can be moved upwards. Position the spark
deflector (3) at the maximum height.
•
Important! Use a rag, cloth or similar to pre-
vent the grinding wheel (5) from rotating.
•
Undo the nut (B) using a size 19 mm wrench
while holding the grinding wheel (5) firmly
with a rag, cloth or similar.
•
Important! A size 19 mm wrench not supplied
with the product.
•
Important! Turn the nut (B) in the direction of
rotation of the grinding wheel (5).
•
Remove the nut (B), flange (C) and old grin-
ding wheel.
•
Carefully clean all parts which rotate during
operation before fitting the new grinding
wheel.
•
Fit the new grinding wheel (5), flange (C) and
nut (B) again in reverse order and tighten
them.
•
Note! Tighten the nut (B) moderately - the
screw connection is designed to promote the
clamping of the grinding/sanding wheel du-
ring operation.
•
Then refit the cover (4) using the 3 screws
(A).
•
Adjust the spark deflector (3) as described
in 5.2.
•
Warning! Check that the safety devices are in
good working condition before you work with
the equipment again.
•
Warning! Always use the grinding/sanding
machine with a grinding/sanding wheel fitted
on each side. This will reduce the risk of tou-
ching a rotating spindle.
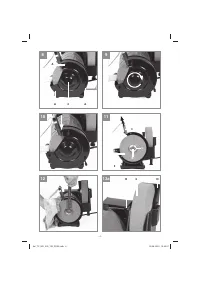
5.6 Changing the wet grinding wheel
(Fig. 13-15)
•
Before you replace the grinding wheel: Pull
out the power plug!
•
Remove the three screws (D) on the water
container (10) using a crosstip screwdriver.
Important! A crosstip screwdriver is not sup-
plied with the product.
•
Tilt the machine forward until the water con-
tainer (10) can be pulled off downwards.
•
Remove the water container (10).
•
Important! Use a rag, cloth or similar to pre-
vent the grinding wheel (6) from rotating.
•
Undo the nut (E) using a size 19 mm wrench
while holding the grinding wheel (6) firmly
with a rag, cloth or similar.
•
Important! A size 19 mm wrench not supplied
with the product.
•
Important! Turn the nut (E) in the direction of
rotation of the grinding wheel (6).
•
Remove the nut (E), flange (F) and old grin-
ding wheel.
•
Carefully clean all parts which rotate during
operation before fitting the new grinding
wheel.
•
Fit the new grinding wheel (6), flange (F) and
nut (E) again in reverse order and tighten
them.
•
Important! Tighten the nut (E) moderately;
the screw connection is designed to help the
grinding wheel clamp during operation.
•
Then fit the water container (10) back in place
using the three screws (D).
•
Warning! Check to make sure that all safety
devices are properly mounted and in good
working condition before you begin working
with the equipment again.
•
Warning! Always use the grinding machine
with the grinding fitted on both sides. This
will reduce the risk of contact with a rotating
spindle.
6. Operation
6.1 ON/OFF switch (1)
To switch on the equipment set the On/O
ff
switch
(1) to position I.
Move the ON/OFF switch (1) to position 0 to
switch o
ff
the equipment.
Anl_TC_WD_200_150_SPK9.indb 23
Anl_TC_WD_200_150_SPK9.indb 23
23.06.2020 15:30:18
23.06.2020 15:30:18
Характеристики

Остались вопросы?Не нашли свой ответ в руководстве или возникли другие проблемы? Задайте свой вопрос в форме ниже с подробным описанием вашей ситуации, чтобы другие люди и специалисты смогли дать на него ответ. Если вы знаете как решить проблему другого человека, пожалуйста, подскажите ему :)


