
Вытяжки Falmec BUILT-IN 50 - инструкция пользователя по применению, эксплуатации и установке на русском языке. Мы надеемся, она поможет вам решить возникшие у вас вопросы при эксплуатации техники.
Если остались вопросы, задайте их в комментариях после инструкции.
"Загружаем инструкцию", означает, что нужно подождать пока файл загрузится и можно будет его читать онлайн. Некоторые инструкции очень большие и время их появления зависит от вашей скорости интернета.


22
USING THE RADIO CONTROL
WARNINGS!:
Place the hood away from sources of electromagnetic waves (e.g.
microwave ovens), which could interfere with the radio control
and with the hood electronics.
The maximum operating distance is 5 metres, that may vary according to
the presence of electromagnetic interferences.
Radio control operated at 433.92MHz.
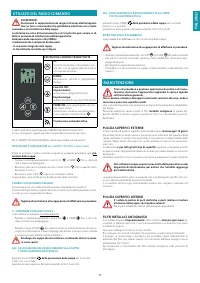
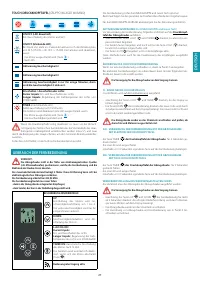
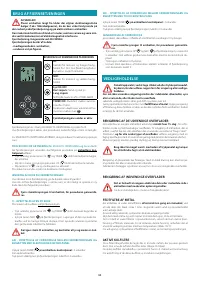
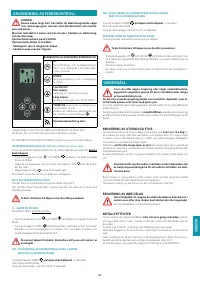
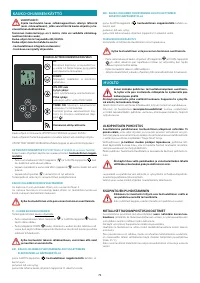
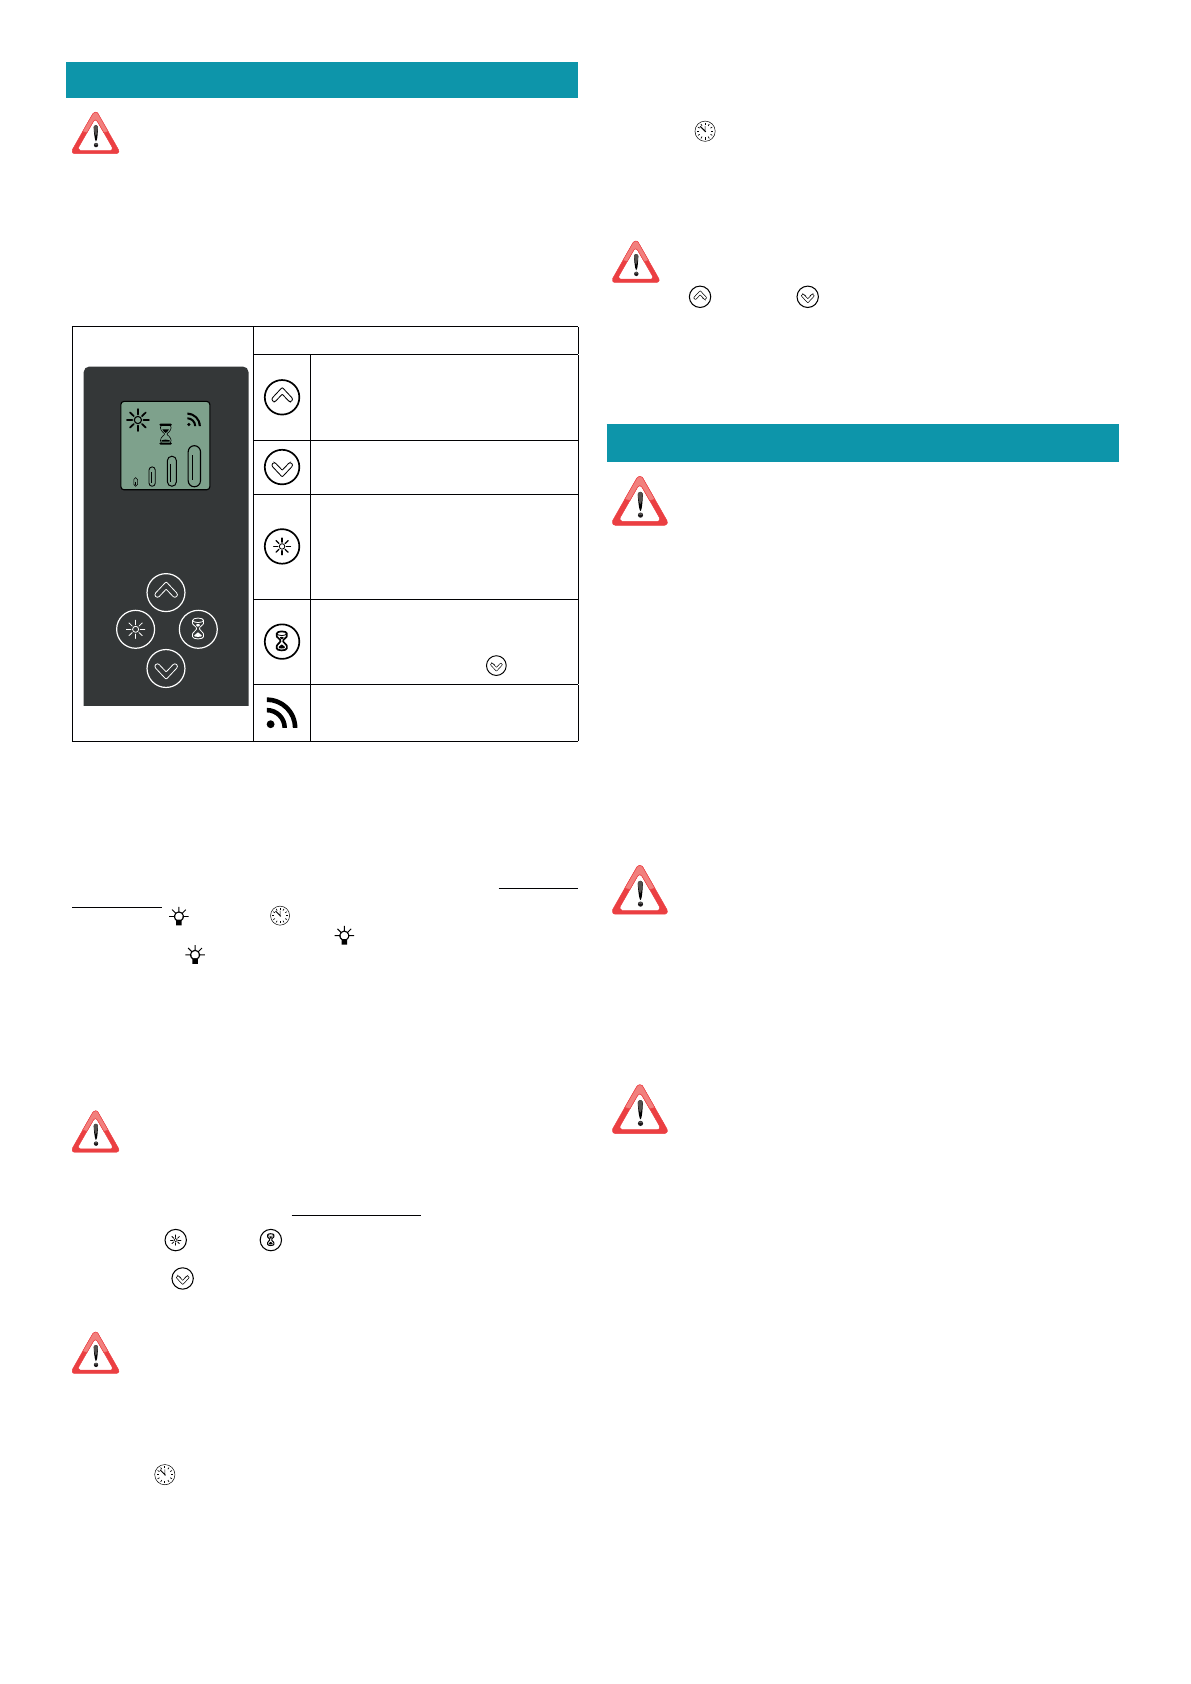
The radio control consists of two parts:
- the receiver built into the hood;
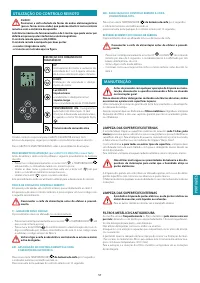
- the transmitter shown here in the figure.
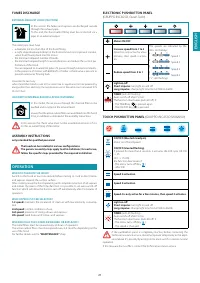
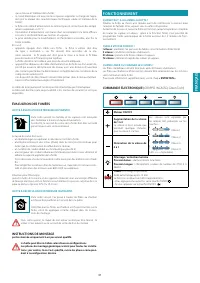
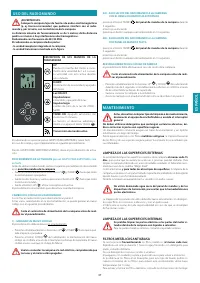
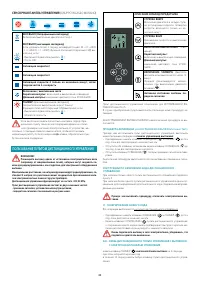
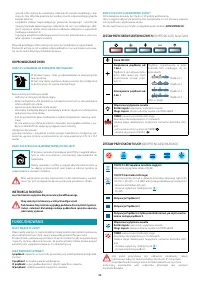
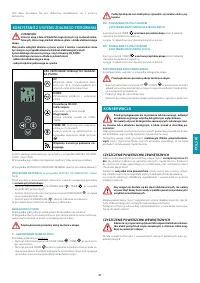
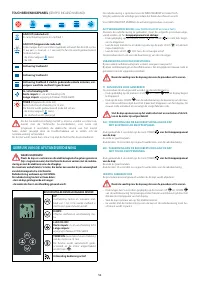
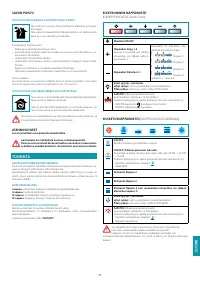
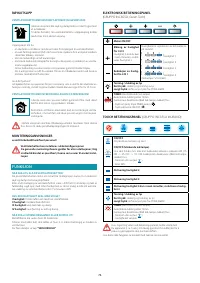
DESCRIPTION OF TRANSMITTING COMMANDS
UP
Motor switch-on and speed increase
from 1 to 4. Speed 4 is only active for a
few minutes.
DOWN
Speed decrease and motor switch-off.
Light ON-OFF
Short impulse:
turn light on and off
Long impulse:
change light tone from 2700K to 5600K
TIMER ON:
The motor automatically
switches off after 15 min.
The function is automatically disabled if
the motor is switched off (
key)
Command transmission active
The radio control is optional for the GRUPPO INCASSO and Green Tech.
Follow the entire procedure described below if purchased.
Skip the activation procedure for IL GRUPPO INCASSO MURANO.
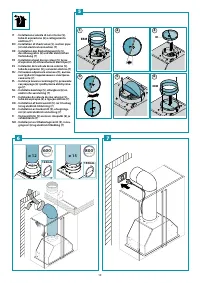
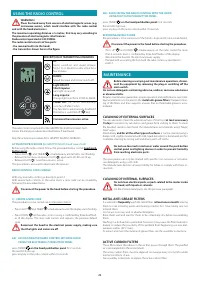
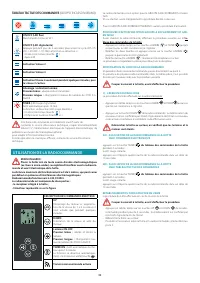
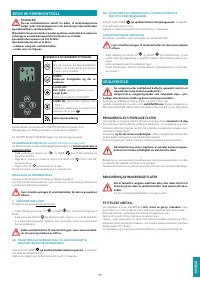
ACTIVATION PROCEDURE
(for GRUPPO INCASSO and Green Tech)
Before using the radio control, follow the procedure below on the
hood push-
button panel:
• Press LIGHT (
) and TIMER (
) simultaneously until all LEDs start flashing.
• Release the two keys and press LIGHT (
) again until all LEDs are lit up.
• Release LIGHT (
): now the receiver is active.
This procedure is also used to deactivate the receiver.
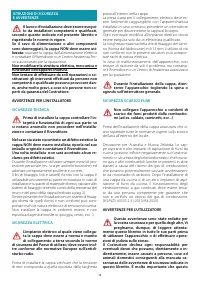
RADIO CONTROL CODE CHANGE
With only one radio control, go directly to point 2.
With several radio controls in the same room, a new code can be created by
following the procedure below.
Disconnect the power to the hood before starting the procedure.
1) - CREATE A NEW CODE
The procedure is to be carried out on the radio control.
• Press
LIGHT and TIMER
simultaneously until the display starts flashing.
• Press
DOWN on the radio control: saving is confirmed by three brief flash-
es of the display. The new code cancels and replaces the previous default
code.
Reconnect the hood to the electrical power supply, making sure
that the lights and motor are off.
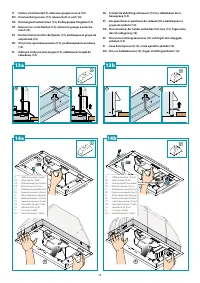
2A) - ASSOCIATING THE RADIO CONTROL WITH THE HOOD
USING THE ELECTRONIC PUSHBUT TON PANEL
press TIMER (
)
on the hood pushbutton panel
for 2 seconds:
the red LED lights up.
press any key on the radio control within 10 seconds.
2B) - ASSOCIATING THE RADIO CONTROL WITH THE HOOD
USING THE TOUCH PUSHBUT TON PANEL
press TIMER (
)
on the hood pushbutton panel
for 2 seconds:
the red LED lights up.
press any key on the radio control within 10 seconds.
RESTORING DEFAULT CODE
the procedure is to be carried out if the hood is disposed of, sold or transferred.
Disconnect the power to the hood before starting the procedure.
• Press UP
and DOWN
simultaneously on the radio control for more
than 5 seconds: reset is confirmed by three brief flashes of the display.
• Reconnect the hood to the electrical power supply.
• Proceed with associating the hood and the radio control, as described in
point
2.
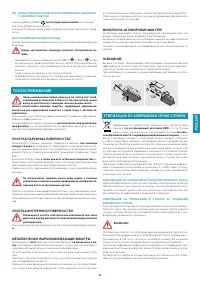
MAINTENANCE
Before cleaning or carrying out maintenance operations, discon-
nect the equipment by removing the plug or switching off the
main switch.
Do not use detergents containing abrasive, acidic or corrosive substances
or abrasive cloths.
Regular maintenance guarantees proper operation and performance over time.
Special attention is to be paid to the
metal anti-grease filters :
frequent clean-
ing of the filters and their supports ensures that no flammable grease is accu-
mulated.
CLEANING OF EXTERNAL SURFACES
You are advised to clean the external surfaces of the hood
at least once every
15 days
to prevent oily substances and grease from sticking to them. To clean
the brushed stainless steel hood, the Manufacturer recommends using "Magic
Steel" wipes.
Alternatively
and for all the other types of surfaces
, it can be cleaned using a
damp cloth, slightly moistened with mild, liquid detergent or denatured alcohol.
Complete cleaning by rinsing well and drying with soft cloths.
Do not use too much moisture or water around the push button
control panel and lighting devices in order to prevent humidity
from reaching electronic parts.
The glass panels can only be cleaned with specific, non-corrosive or non-abra-
sive detergents using a soft cloth.
The Manufacturer declines all responsibility for failure to comply with these in-
structions.
CLEANING OF INTERNAL SURFACES
Do not clean electrical parts, or parts related to the motor inside
the hood, with liquids or solvents.
For the internal metal parts, see the previous paragraph.
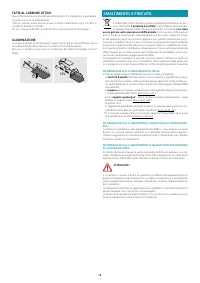
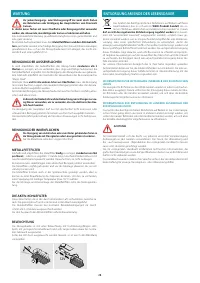
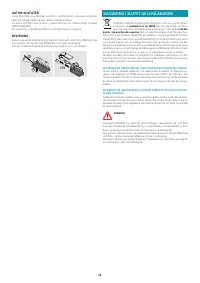
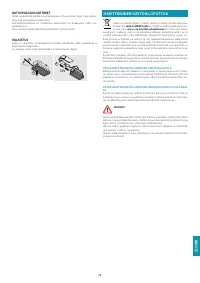
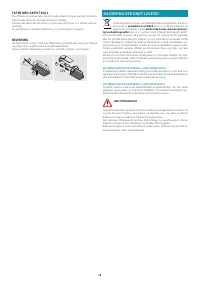
METAL ANTI-GREASE FILTERS
It is advised to
frequently
wash the metal filters (
at least once a month
) leaving
them to soak in boiling water and cleaning solution for 1 hour, taking care not
to bend them.
Do not use corrosive, acid or alkaline detergents.
Rinse them well and wait for them to be completely dry before reassembling
them.
Washing in a dishwasher is permitted, however, it may cause the filter material to
darken: to reduce the possibility of this problem from happening, use low-tem-
perature washes (55°C max.).
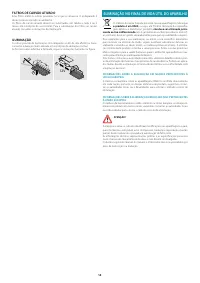
To extract and insert the metal anti-grease filters see the assembly instructions.
ACTIVE CARBON FILTERS
These filters retain the odours in the air that passes through them. The purified
air is recirculated into the environment.
The active carbon filters must be replaced on average every 3-4 months under
normal conditions of use.
See assembly instructions to replace the active carbon filters.
Содержание
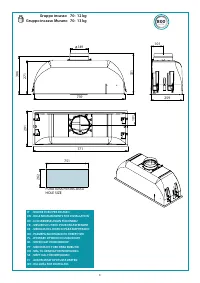
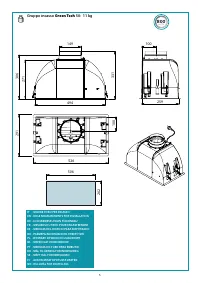
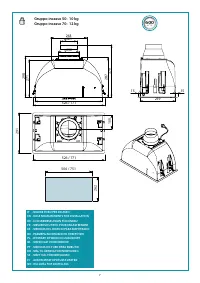
- 40 раздел предназначен только квалифицированному персоналу; ТЕХНИЧЕСКИЕ ХАРАКТЕРИСТИКИ
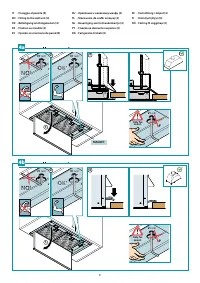
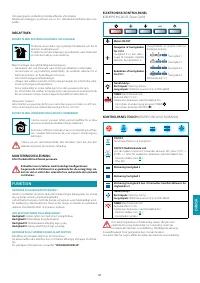
- 41 СИЙ; ЭЛЕКТРИЧЕСКОЕ ПОДКЛЮЧЕНИЕ; ВЫВОД ДЫМОВ; ИНСТРУКЦИИ ПО МОНТАЖУ; ФУНКЦИОНИРОВАНИЕ; ЭЛЕКТРОННАЯ ПАНЕЛЬ УПРАВЛЕНИЯ
- 42 СЕНСОРНАЯ ПАНЕЛЬ УПРАВЛЕНИЯ; ПОЛЬЗОВАНИЕ ПУЛЬТОМ ДИСТАНЦИОННОГО УПРАВЛЕНИЯ
- 43 ТЕХОБСЛУЖИВАНИЕ; ОЧИСТКА НАРУЖНЫХ ПОВЕРХНОСТЕЙ; У ТИЛИЗАЦИЯ ПО ЗАВЕРШЕНИИ СРОКА СЛУЖБЫ
Характеристики

Остались вопросы?Не нашли свой ответ в руководстве или возникли другие проблемы? Задайте свой вопрос в форме ниже с подробным описанием вашей ситуации, чтобы другие люди и специалисты смогли дать на него ответ. Если вы знаете как решить проблему другого человека, пожалуйста, подскажите ему :)


