Вытяжки DeLonghi KCX-AF100X - инструкция пользователя по применению, эксплуатации и установке на русском языке. Мы надеемся, она поможет вам решить возникшие у вас вопросы при эксплуатации техники.
Если остались вопросы, задайте их в комментариях после инструкции.
"Загружаем инструкцию", означает, что нужно подождать пока файл загрузится и можно будет его читать онлайн. Некоторые инструкции очень большие и время их появления зависит от вашей скорости интернета.


- 7 -
ENGLISH
GB
GENERAL
Carefully read the following impor tant information regarding
installation safety and maintenance. Keep this infor mation
booklet accessible for further consultations. The appliance
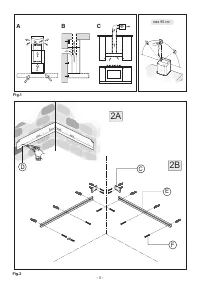
has been designed for use in the ducting version (air exhaust
to the outside – Fig.1B), filtering version (air circulation on
the inside – Fig.1A) or with external motor (Fig.1C).
SAFETY PRECAUTION
1.
Take care when the cooker hood is operating simultane-
ously with an open fireplace or burner that depend on the air
in the environment and are supplied by other than electr ical
e n e r g y, a s t h e c o o ke r h o o d r e m ove s t h e a i r f r o m t h e
environment which a burner or fireplace need for combustion.
The negative pressure in the environment must not exceed
4Pa (4x10⁻⁵ bar). Provide adequate ventilation in the envi-
ronment for a safe operation of the cooker hood. Follow the
local laws applicable for external air evacuation.
Before connecting the model to the electricity network:
- control the data plate (positioned inside the appliance) to
ascer tain that the voltage and power correspond to the network
and the socket is suitable. If in doubt ask a qualified electrician.
- If the power supply cable is damaged, it must be replaced
with another cable or a special assembly, which may be
obtained direct from the manufacturer or from the Technical
Assistance Centre.
2. WARNING !
In certain circumstances electrical appliances may be a
danger hazard.
A) Do not check the status of the filters while the cooker
hood is operating
B) Do not touch bulbs or adjacent areas, during or straight
after prolonged use of the lighting installation.
C) Flambè cooking is prohibited underneath the cooker
hood
D) Avoid free flame, as it is damaging for the filters and a
fire hazard
E) Constantly check food frying to avoid that the over-
heated oil may become a fire hazard
F) Disconnect the electrical plug prior to any mainte-
nance .
G) This appliance is not intended for use by young
children or infirm persons without supervision
H) Young children should be supervised to ensure they
do not play with the appliance
I)
There shall be adequate ventilation of the room when
the rangehood is used at the same time as appliances
burning gas or other fuels
L) There is a risk of fire if cleaning is not carried out in
accordance with the instructions
This appliance conforms to the European Directive EC/2002/
96, Waste Electr ical and Electronic Equipment (WEEE). By
making sure that this appliance is disposed of in a suitable
manner, the user is helping to prevent potential damage to
the environment or to public health.
The
symbol on the product or on the accompanying
paperwork indicates that the appliance should not be treated
as domestic waste, but should be delivered to a suitable
electr ic and electronic appliance recycling collection point.
Follow local guidelines when disposing of waste. For more
infor mation on the treatment, re-use and recycling of this
product, please contact your local authority, domestic waste
collection ser vice or the shop where the appliance was
purchased.
INSTALLATION INSTRUCTIONS
Assembly and electrical connections must be carried out
by specialised personnel.
• Electric Connection
The appliance has been manufactured as a class II, therefore
no ear th cable is necessary.
The connection to the mains is carried out as follows:
BROWN =
L
line
BLUE =
N
neutral
If not provided, connect a plug for the electrical load indicated
on the description label. Where a plug is provided, the cooker
h o o d mu s t b e i n s t a l l e d i n o r d e r t h a t t h e p l u g i s e a s i l y
accessible.
An omnipolar switch with a minimum opening of 3mm between
contacts, in line with the electrical load and local standards,
must be placed between the appliance and the network in the
case of direct connection to the electrical network.
•
The minimum distance between the support surfaces of the
cooking pots on the cooker top and the lowest part of the
cooker hood must be at least 65 cm. If a connection tube
composed of two par ts is used, the upper part must be placed
outside the lower par t. Do not connect the cooker hood
exhaust to the same conductor used to circulate hot air or for
evacuating fumes from other appliances generated by other
than an electrical source.Before proceeding with the assembly
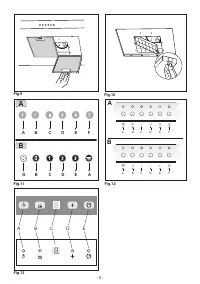
operations, remove the anti-grease filter(s) (Fig.9) so that the
unit is easier to handle.
In the case of assembly of the appliance in the suction version
prepare the hole for evacuation of the air.
•
WALL FIXING
- Position the fixing template on the wall while maintaining the
minimum distance from the hob.
- Mark fixing holes
D
and cut them into the material (fig. 2A).
- Take guide rails
E
and brackets
C
and fix them to the wall
u s i n g s c r ew s
F
( f i g . 2 B ) . W h e n c a r r y i n g o u t t h e f i x i n g
procedures, use only screws and screw anchors which are
suited to the type of wall (e.g. reinforced concrete, plasterboard
etc.).
- If the screws and screw anchors are supplied with the
appliance, make sure that they are suited to the type of wall
to which the hood must be fixed.
- Take the hood and (in line with our advice), with the help of
another person, thread the hood
B
along the guide rails
A
(fig. 3).
- Align the hood with bracket
C
(fig. 4) and fix it in place using
screws
E
.
•
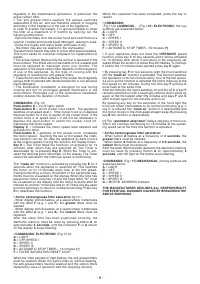
FIXING DECORATIVE TELESCOPIC DUCTS
Make sure the electrical power supply is within the values
required by the decorative duct. If your appliance must be
installed as an extractor version or as a version with an external
motor, make sure an air exhaust hole is prepared.
This product has been designed so that the duct fixing bracket
C
(fig. 5) can be fitted to walls or ceilings.
When fixing the appliance to the wall, please consult figure
5A.
- adjust the height of bracket
C
and use a pencil to mark the 4
holes which should be made afterwards. Use the 4 screws
D
to fix the bracket to the wall.
When fixing the appliance to the ceiling, please consult
figure 5B.
- Place bracket
C
against the ceiling and use a pencil to mark
the 3 holes which should be made afterwards. Use the 3 screws
E
to fix the bracket to the ceiling.
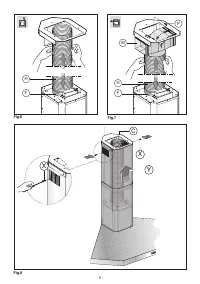
- Extractor hood:
fix flexible hose
H
(not supplied) to the air
exhaust hole made previously (fig. 6).
- Filter hood:
connect the flexible hose to the baffle plate M
and tighten screws
P
as indicated in (fig. 7), the active carbon
filters should be fitted to the extraction assembly inside the
hood (fig. 10). If the kit is not supplied, order it from your local
dealer as an accessory.
- Fix the flexible hose
H
(not supplied) over the connector
flange
F
(fig. 6 - 7). Place the decorative duct over the
bodywork.
Pull out the upper decorative duct
Y
as far as bracket
C
and
fix it in place using screws
X
(fig. 8).
USE AND MAINTENANCE
•
It is recommended to operate the appliance prior to cooking.
It is recommended to leave the appliance in operation for 15
minutes after cooking is terminated in order to completely
eliminate cooking vapours and odours.
The proper function of the cooker hood is conditioned by the


