
Триммеры DEFORT DGT-1010N 98299328 - инструкция пользователя по применению, эксплуатации и установке на русском языке. Мы надеемся, она поможет вам решить возникшие у вас вопросы при эксплуатации техники.
Если остались вопросы, задайте их в комментариях после инструкции.
"Загружаем инструкцию", означает, что нужно подождать пока файл загрузится и можно будет его читать онлайн. Некоторые инструкции очень большие и время их появления зависит от вашей скорости интернета.


9
GB
Advance line whenever you hear the engine running
faster than normal. This will maintain best performance
and keep line long enough to advance properly.
How to
fi
t new trimmer thread
When you need to replace or
fi
t new trimmer thread,
remove the plug from the power socket!
Depending on the reel design:
●
Either depress the release lugs on the sides of the
hubcap. Pull the hubcap off of the prop shaft.
●
Or remove the retaining cap by turning it
counterclockwise.
●
Remove the trimmer thread cartridge from the prop
shaft and either replace it with a new cartridge or
wind on new thread. (If you wish to wind on the new
thread, then take a thread about 5-6 m long, fold it in
two and
fi
x the middle of this thread in a spool slot.
Wind the thread around the spool according to the
arrow).
●
Fix two ends of the thread in the spool slots for the
time being.
●
Push 150 mm of thread from one end of the reel
through the hole in the hubcap and 150 mm of
thread from the other end through the second hole.
●
Ensure no thread is trapped.
●
Re
fi
t the hubcap assembly to the prop shaft and
push it in until it clicks in position (or secure the
hubcap by the retaining cap in case of another
design).
●
Release the thread ends from the spool slots by
sharply pul ling them out.
OPERATION
WARNING!
The product may throw objects during op-
eration, causing injury to the operator or to bystanders.
Always wear suitable eye protection, boots, gloves and
long, heavy trousers while operating the product.
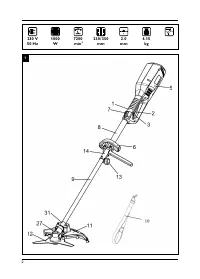
Starting and stopping (
fi
g.8)
●
To start the tool: press the lock button (3) and then
press the trigger (2). Release the lock button once
the motor has started.
●
To stop the tool: Release the trigger.
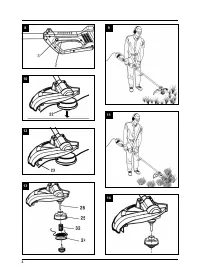
Operating the trimmer (
fi
g. 9)
●
Follow these steps to operate the trimmer.
●
Plug the trimmer cord into an extension cord
approved for outdoor use. Refer to “Electrical Safety
Rules” earlier in this manual.
●
Put the shoulder strap (10) over your shoulder
opposite side to the unit. Adjust shoulder strap to
most comfortable length.
●
Hold the trimmer with your right hand on the trigger
handle and your left hand on the front handle.
NOTE!
Keep a
fi
rm grip with both hands during
operation.
●
Place the trimmer on the side of your body with the
motor behind and away form your body.
Removing the string head
●
Align the slot in the upper
fl
ange washer (28) with
the hole in the gear head (27). Place a holding pin
through the slot in the upper
fl
ange washer and the
clockwise to remove. Remove the spool (24) and
trimmer head (25) from the drive connector (26).
●
Place the holding pin through the upper
fl
ange
washer and the gear head. Using a wrench, turn the
drive connector clockwise to remove.
●
Remove the upper
fl
ange washer from the gear
shaft and retain for blade installation.
●
Remove the grass de
fl
ector (21).
NOTE:
store the string head parts together for later
use.
Installing the balde
●
Place the upper
fl
ange washer over the gear shaft
with the hollow side toward the blade guard.
●
Centre the blade on the upper
fl
ange, making sure
the blade sits
fl
at. Install the cupped washer(29) with
the raised centre away from the blade. Install the
blade nut(30). The blade (12) turns counterclockwise
from the operator’s position.
●
Place the holding pin through the slot in the upper
fl
ange washer and the hole in the gear head (27).
Using a wrench, turn the blade nut counterclockwise.
●
Tighten nut securely
●
Install the blade guard.
Converting from brushcutter to string trimmer.
Removing the blade
●
Place the holding pin through the slot in the upper
fl
ange washer and the gear head. Turn the blade nut
clockwise to remove.
●
Remove the cupped washer and the blade.
●
Remove the upper
fl
ange washer and the gear shaft
and retain for the string head installation.
NOTE:
store the brush cutter parts together for later
use.
Installing the string head
●
Install the upper
fl
ange washer onto the gear shaft
with the hollow side towards the gear head.
●
Place the holding pin through the slot in the upper
fl
ange washer and the hole in the gear head. Using
a wrench, turn the drive connector anticlockwise to
install. Tighten securely.
●
Place the trimmer head on the drive connector.
●
Place the holding pin through the slot in the upper
fl
ange washer and the hole in the gear head.
●
Install the bump knob and turn anticlockwise to
tighten securely.
●
Install the grass trimmer guard.
Grass de
fl
ector line trimmer cut-off blade
(
fi
g. 12)
This trimmer is equipped with a line trimming cut-off
blade (23) on the grass de
fl
ector. For best cutting, ad-
vance line until it is trimmed to length by the cut-off
blade.


