
Триммеры DEFORT DGT-1010N 98299328 - инструкция пользователя по применению, эксплуатации и установке на русском языке. Мы надеемся, она поможет вам решить возникшие у вас вопросы при эксплуатации техники.
Если остались вопросы, задайте их в комментариях после инструкции.
"Загружаем инструкцию", означает, что нужно подождать пока файл загрузится и можно будет его читать онлайн. Некоторые инструкции очень большие и время их появления зависит от вашей скорости интернета.


8
GB
Attach the brown cable (Live) to the terminal marked L
or co loured red or brown.
Using Extension cables
All electrical connections e.g. extension cable, must be
of an approved waterproof type for outdoor use and
marked accordingly. As a supply for this machine al-
ways use an extension cable of at least 1.5 mm
2
.
Always fully unwind extension cables before use.
SPECIFIC SAFETY WARNINGS
Attention: Danger!
●
The cutting elements continue to rotate after the mo-
tor is switch off.
●
If the cord becomes damaged during use, discon-
nect the cord from the power supply immediately. DO
NOT TOUCH THE CORD BEFORE DISCONNECT-
ING THE SUPPLY. Do not use the appliance if the
appliance cord or the extension cord are damaged.
●
Keep extension cord away from cutting elements.
●
Never
fi
t metal cutting elements to this appliance.
●
Inspect and maintain the trimmer regularly. Have the
trimmer repaired only by an authorised repairer.
●
Keep your hands and feet away from the cutting
area at all times. Keep your second (front) hand on
the auxiliary handle.
●
Always hold the trimmer at a safe distance from the
body.
●
Always wear protective goggles.
●
Always use gloves.
●
Only use the trimmer in daylight.
●
Ensure the ventilation openings are clear of debris
at all times.
●
Ensure there are no people or animals within 5 me-
tres of your trimming area.
●
Before using the trimmer, remove any stones, sticks,
toys or other foreign objects from the area.
●
Take care not to injure yourself on the blade
fi
tted for
trimming the
fi
lament line. After extending new cutter
line always return the trimmer to its normal operating
position before switching on.
●
Never reach into the underside of the appliance with
the power still on. Remove the plug from the power
socket before attempting to remove or touch the
trimmer thread hubcap.
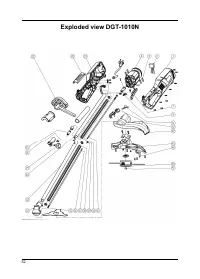
ASSEMBLY
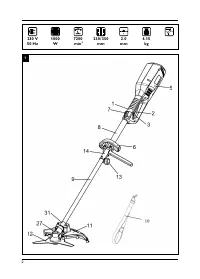
Connecting the attachment to the upper shaft
(
fi
g. 2)
The couper (14) connects the attachment to the upper
shaft.
Follow these steps to connect the attachment to the
upper shaft
●
Loosen the knob (13) by turning it counter clockwise
●
Remove the end cap from the attachment shaft
●
Align the button with the guide recess on the upper
shaft.
●
Slide the attachment shaft (9) into the upper shaft
(8) until the attachment shaft clicks into place.
NOTE:
If the button does not release completely in the
positioning hole, the shaft until the button is locked into
place.
●
Tighten the knob securely by turning it clockwise.
Removing the attachmentfrom the upper shaft
(
fi
g. 2)
Disconnect the upper shaft and attachment shaft for
storage or when a job calls for a different attachment.
Follow these steps to remove the attachment from the
upper shaft.
●
Release the trigger (2) and allow the trimmer to
coast to a stop.
●
Unplug the tool.
●
Loosen the knob by turning it counterclockwise.
●
Push the button, while pulling out the attachment.
Attaching the front handle (
fi
g. 3)
Follow these steps to attach he front handle.
●
Press the front handle (6) onto the upper shaft(8)
●
Place the front handle along the upper shaft to a po-
sition that allows for comfortable operation.
●
Slide the bolt (16) through the hole in the front han-
dle.
●
Side the washer (17) onto the bolt.
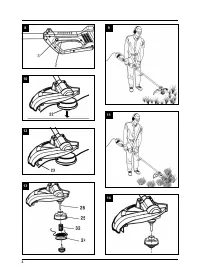
Attching the blade guard or the grass de
fl
ector
(
fi
g. 4 &
fi
g. 5)
Follow these steps to attach the blade guard (Fig.4)
●
Attach the blade guard (11) to the mounting bracket
(31)
●
Install two screws (18) from the top of the mounting
bracket (31) into the blade guard (11).
Follow these steps to attach the grass de
fl
ector (Fig.5)
●
Attach the trimmer guard to the gear case.
●
Install four screws (18) through the blade guard (11)
and into to the trimmer guard.
●
Install two screws through the grass blade(26) into
the trimmer guard.
Extension cord retainer (
fi
g.6)
An extension cord retainer (4) is located on the bottom
of the trimmer. This provides strain relief for the cord,
preventing unwanted disconnects.
●
Use the extension cord retainer when you connect
the extension cord to the power cord to prevent dis-
connection. Use only an outdoor approved exten-
sion cord.
●
Loop the extension cord through the extension cord
retainer slot located on the bottom end of the trim-
mer.
●
Pull loop of extension cord around tongue and pull
tight.
●
Attach extension cord to plug on trimmer guard to
the gear case.(extension cord not available)
Shoulder strap (
fi
g. 7)
A shoulder strap (10) is supplied for your greater com-
fort.
●
Simply attach the clip (20) of the shoulder strap onto
the hanger (7) at the motor housing(5)
Converting from string trimmer to brushcutter
(
fi
g. 4 &
fi
g. 5)


