Термопоты Brayer BR1090 (MULTI) - инструкция пользователя по применению, эксплуатации и установке на русском языке. Мы надеемся, она поможет вам решить возникшие у вас вопросы при эксплуатации техники.
Если остались вопросы, задайте их в комментариях после инструкции.
"Загружаем инструкцию", означает, что нужно подождать пока файл загрузится и можно будет его читать онлайн. Некоторые инструкции очень большие и время их появления зависит от вашей скорости интернета.


7
EN
THERMOPOT IS INTENDED FOR HOUSEHOLD USE
ONLY, DO NOT USE THE COFFEE MAKER FOR
COMMERCIAL OR LABORATORY PURPOSES.
BEFORE USING THE THERMOPOT
After unit transportation or storage at low
temperature keep it for at least 3 hours at room
temperature before switching on.
•
Unpack the thermopot and remove all the packaging
materials.
•
Keep the original package.
• Read the safety measures and operating
recommendations.
•
Check the delivery set.
• Examine the thermopot for damages, in case of
damage do not plug it into the mains.
•
Make sure that the specifications of power supply
voltage specified on the label correspond to the
specifications of your mains.
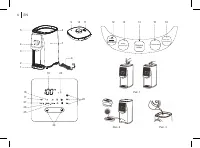
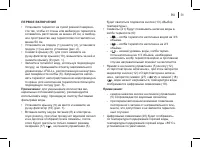
• Wipe the outer surface of the unit body (7) with a
clean, slightly damp cloth to remove dust.
•
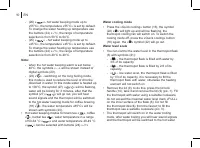
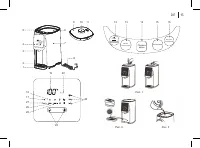
Remove the lid (9), to do this, press the lid lock
handle (10), take it and remove the lid (9) (pic. 1).
•
Wipe the inner surface of the thermopot flask (6) with
a clean, slightly damp cloth to remove dust. Install
the lid (9) back to its place and press the lock handle
(10).
•
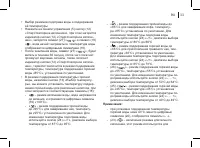
SWITCHING ON FOR THE FIRST TIME
•
Place the thermopot on a dry flat surface so that
the distance between the thermopot and the wall or
furniture is at least 20 cm and the free space above
the thermopot is at least 50 cm.
• Place the grid (2) on the tray (1), place the tray (1) on
the installation place (pic. 2).
•
Remove the lid (9), to do this, press the lid lock
handle (10), take it and remove the lid (9) (pic. 1).
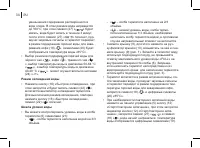
• Fill the thermopot with water using a suitable
cookware, do not exceed the maximal water level
mark «FULL» which is located on the inner surface
of the flask (6). Do not fill the thermopot directly
from the faucet; to fill the thermopot use a suitable
cookware (pic. 3).
Note:
to reduce the mineral deposit (scale) level, it is
recommended to use the water cleaned with domestic
water filters.
•
Install the lid (9) back to its place and press the lock
handle (10) (pic. 1).
• Insert the plug of the power cord (8) into the mains
socket, you will hear a sound signal and all the
symbols will be shown on the display, after that
only the stand-by mode symbol (17) « » will be
glowing, illumination of the button (13) «Temperature
selection» will be glowing on the control panel (5).
• Symbols (21) will show the presence of water in the
thermopot flask (6):
Характеристики

Остались вопросы?Не нашли свой ответ в руководстве или возникли другие проблемы? Задайте свой вопрос в форме ниже с подробным описанием вашей ситуации, чтобы другие люди и специалисты смогли дать на него ответ. Если вы знаете как решить проблему другого человека, пожалуйста, подскажите ему :)


при включении нет звукового сигнала табло мигает кнопки нериагируют