
Телевизоры D43DM54UANS - инструкция пользователя по применению, эксплуатации и установке на русском языке. Мы надеемся, она поможет вам решить возникшие у вас вопросы при эксплуатации техники.
Если остались вопросы, задайте их в комментариях после инструкции.
"Загружаем инструкцию", означает, что нужно подождать пока файл загрузится и можно будет его читать онлайн. Некоторые инструкции очень большие и время их появления зависит от вашей скорости интернета.


English
- 15 -
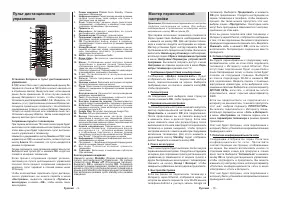
Channel Skip:
6HW FKDQQHOV WR EH VNLSSHG ZKHQ
switching the channels via
Programme +/-
buttons
on the remote. Highlight the desired channel/s on the
OLVWDQGSUHVV
OK
to select/unselect.
Channel Swap:
5HSODFH WKH SRVLWLRQV RI WKH WZR
selected channels in the channel list. Highlight the
GHVLUHG FKDQQHOV RQ WKH OLVW DQG SUHVV
OK
to select.
:KHQWKHVHFRQGFKDQQHOLVVHOHFWHGWKHSRVLWLRQRI
WKLV FKDQQHO ZLOO EH UHSODFHG ZLWK WKH SRVLWLRQ RI WKH
¿UVWVHOHFWHGFKDQQHO<RXFDQSUHVVWKH
Yellow
button
and enter the number of the channel you want to select.
Then highlight
OK
DQGSUHVV
OK
to go to that channel.
You may need to set the
LCN
RSWLRQWR
2ႇ
in order to
enable this feature.
Channel Move:
0RYH D FKDQQHO WR WKH SRVLWLRQ RI
another channel. Highlight the channel you want to
PRYHDQGSUHVV
OK
to select. Then do the same for a
VHFRQGFKDQQHO:KHQWKHVHFRQGFKDQQHOLVVHOHFWHG
\RXFDQSUHVVWKH
Blue
EXWWRQDQGWKH¿UVWVHOHFWHG
FKDQQHOZLOOEHPRYHGWRWKHSRVLWLRQRIWKDWFKDQQHO
<RXFDQSUHVVWKH
Yellow
button and enter the number
of the channel you want to select. Then highlight
OK
DQGSUHVV
OK
to go to that channel. You may need to
set the
LCN
RSWLRQWR
2ႇ
in order to enable this feature.
Channel Edit:
Edit channels in the channel list. Edit
WKHQDPHRIWKHVHOHFWHGFKDQQHODQGGLVSOD\
Network
Name
Channel Type
and
Frequency
information
UHODWHGWRWKDWFKDQQHOLIDYDLODEOH'HSHQGLQJRQWKH
FKDQQHORWKHURSWLRQVPD\DOVREHHGLWDEOH3UHVV
OK
or the
Yellow
button to edit the highlighted channel.
<RXFDQSUHVVWKH
Blue
button to delete the highlighted
channel.
Channel Delete:
Highlight the desired channel/s on
WKHOLVWDQGSUHVV
OK
or the
Yellow
button to select/
XQVHOHFW 7KHQ SUHVV WKH
Blue
button to delete the
selected channel/s.
Clear Channel List:
Delete all channels stored in the
FKDQQHOOLVW$GLDORJXHZLOOEHGLVSOD\HGIRUFRQ¿UPD
-
tion. Highlight
OK
DQG SUHVV
OK
EXWWRQ WR SURFHHG
Highlight
Cancel
DQGSUHVV
OK
to cancel.
Input Source - Cable
Channel Scan:
Start a scan for digital cable channels.
,IDYDLODEOHRSHUDWRURSWLRQVZLOOEHOLVWHG6HOHFWWKH
GHVLUHGRQHDQGSUHVV
OK
.
Scan Mode
Frequency
and
Network ID
RSWLRQVPD\EHDYDLODEOH7KHRSWLRQV
PD\ YDU\ GHSHQGLQJ RQ WKH RSHUDWRU DQG WKH
Scan
Mode
selections. Set the
Scan Mode
as
Full
if you
GRQ¶WNQRZKRZWRVHWXSRWKHURSWLRQV+LJKOLJKW
Scan
DQGSUHVV
OK
or the
Right
directional button to start
WKH VFDQ <RX FDQ SUHVV WKH
Back/Return
button to
cancel the scan. The channels that have already been
found will be stored in the channel list.
Single RF Scan:
Enter the
Frequency
value.
Signal
Level
and
Signal Quality
of the selected
Frequency
will be shown. Highlight
the
Scan
RSWLRQDQGSUHVV
OK
or the
Right
directional button to start scan. The found
channels will be stored in the channel list.
LCN:
6HW\RXUSUHIHUHQFHIRU/&1/&1LVWKH/RJLFDO
Channel Number system that organises available
broadcasts in accordance with a recognisable channel
QXPEHUVHTXHQFHLIDYDLODEOH
Channel Scan Type:
6HW\RXUVFDQW\SHSUHIHUHQFH
Channel Store Type:
6HW\RXUVWRUHW\SHSUHIHUHQFH
Favourite Network Select:
Select your favourite net-
ZRUN7KLVPHQXRSWLRQZLOOEHDFWLYHLIPRUHWKDQRQH
network is available.
7KLVRSWLRQPD\QRWEHDYDLODEOH
GHSHQGLQJ RQ WKH
selected country during the initial
VHWXSSURFHVV
Channel Skip:
6HW FKDQQHOV WR EH VNLSSHG ZKHQ
switching the channels via
Programme +/-
buttons
on the remote. Highlight the desired channel/s on the
OLVWDQGSUHVV
OK
to select/unselect.
Channel Swap:
5HSODFH WKH SRVLWLRQV RI WKH WZR
selected channels in the channel list. Highlight the
GHVLUHG FKDQQHOV RQ WKH OLVW DQG SUHVV
OK
to select.
:KHQWKHVHFRQGFKDQQHOLVVHOHFWHGWKHSRVLWLRQRI
WKLV FKDQQHO ZLOO EH UHSODFHG ZLWK WKH SRVLWLRQ RI WKH
¿UVWVHOHFWHGFKDQQHO<RXFDQSUHVVWKH
Yellow
button
and enter the number of the channel you want to select.
Then highlight
OK
DQGSUHVV
OK
to go to that channel.
You may need to set the
LCN
RSWLRQWR
2ႇ
in order to
enable this feature.
Channel Move:
0RYH D FKDQQHO WR WKH SRVLWLRQ RI
another channel. Highlight the channel you want to
PRYHDQGSUHVV
OK
to select. Then do the same for a
VHFRQGFKDQQHO:KHQWKHVHFRQGFKDQQHOLVVHOHFWHG
\RXFDQSUHVVWKH
Blue
EXWWRQDQGWKH¿UVWVHOHFWHG
FKDQQHOZLOOEHPRYHGWRWKHSRVLWLRQRIWKDWFKDQQHO
<RXFDQSUHVVWKH
Yellow
button and enter the number
of the channel you want to select. Then highlight
OK
DQGSUHVV
OK
to go to that channel. You may need to
set the
LCN
RSWLRQWR
2ႇ
in order to enable this feature.
Channel Edit:
Edit channels in the channel list. Edit
WKHQDPHRIWKHVHOHFWHGFKDQQHODQGGLVSOD\
Network
Name
Channel Type
Frequency
Modulation
and
Symbol Rate
information related to that channel.
'HSHQGLQJRQWKHFKDQQHORWKHURSWLRQVPD\DOVREH
editable. Press
OK
or the
Yellow
button to edit the
KLJKOLJKWHG FKDQQHO <RX FDQ SUHVV WKH
Blue
button
to delete the highlighted channel.
Channel Delete:
Highlight the desired channel/s on
WKHOLVWDQGSUHVV
OK
or the
Yellow
button to select/
XQVHOHFW 7KHQ SUHVV WKH
Blue
button to delete the
selected channel/s.
Clear Channel List:
Delete all channels stored in the
FKDQQHOOLVW$GLDORJXHZLOOEHGLVSOD\HGIRUFRQ¿UPD
-
tion. Highlight
OK
DQG SUHVV
OK
EXWWRQ WR SURFHHG
Highlight
Cancel
DQGSUHVV
OK
to cancel.
Input Source - Satellite
English
- 16 -
Satellite Re-scan:
Start a satellite scan beginning
with the antenna selection screen. When this scanning
RSWLRQLVSUHIHUUHGVRPHVFDQQLQJFRQ¿JXUDWLRQVZLOO
QRWEHDYDLODEOHDQGWKXVWKHSUHIHUHQFHV\RXPDGH
GXULQJWKHLQLWLDOVHWXSSURFHVVPD\QRWEHFKDQJHG
For the
General Satellite
channel installation mode
SatcoDX Scan
RSWLRQ PD\ DOVR EH DYDLODEOH KHUH
&RS\WKHUHOHYDQWVG[¿OHLQWRWKHURRWGLUHFWRU\RIDQ
86%VWRUDJHGHYLFHDQGFRQQHFWLWWR\RXU79+LJKOLJKW
WKLVRSWLRQDQGSUHVV
OK
.
Download SatcoDX
RSWLRQ
ZLOOEHKLJKOLJKWHGSUHVV
OK
to continue. Select the sdx
¿OHIURPWKHFRQQHFWHG86%VWRUDJHGHYLFHRQWKHQH[W
VFUHHQ DQG SUHVV
OK
. Satellite selection screen will
EHGLVSOD\HG7KHVWDWXVRIWKH¿UVWVDWHOOLWHRSWLRQZLOO
DSSHDUDV
On
+LJKOLJKWWKDWVDWHOOLWHRSWLRQDQGSUHVV
OK
6HWWKHSDUDPHWHUVFRUUHVSRQGLQJWR\RXUV\VWHP
DQGFRUUHFWVDWHOOLWHDQGSUHVV
the
Back/Return
button
to return to the satellite selection screen.
Highlight
Next
DQG SUHVV
OK
WR SURFHHG ZLWK WKH 6DWFR'; FKDQQHO
list installation. If the selected satellite is not correct
IRU 6DWFR'; LQVWDOODWLRQ D ZDUQLQJ GLDORJXH ZLOO EH
GLVSOD\HG RQ WKH VFUHHQ 7KH VDWHOOLWHV WKDW FDQ EH
selected will be listed. Press
OK
to close the dialogue
DQGSUHVV
Back/Return
to return to satellite selection
screen. Then set the satellite accordingly.
Satellite Add:
$GG VDWHOOLWH DQG SHUIRUP D VDWHOOLWH
VFDQ 7KLV PHQX RSWLRQ ZLOO EH DFWLYH LI
Channel
Installation Mode
is set to
General Satellite
.
Satellite Update:
6HDUFKIRUDQ\XSGDWHVE\UHSHDWLQJ
WKHSUHYLRXVVFDQZLWKWKHVDPHVHWWLQJV
You will also
EHDEOHWRFRQ¿JXUHWKHVHVHWWLQJVEHIRUHWKHVFDQ
If
Channel Installation
Mode
is set to
Preferred Satel-
lite
WKLVRSWLRQPD\EHQDPHGGLႇHUHQWO\GHSHQGLQJRQ
WKHDYDLODEOHVHUYLFHV+LJKOLJKWWKHVDWHOOLWHDQGSUHVV
OK
EXWWRQWRFRQ¿JXUHGHWDLOHGVDWHOOLWHSDUDPHWHUV
Then
SUHVV
the
Back/Return
button to return to the
satellite selection screen.
Highlight
Next
DQG SUHVV
OK
WRSURFHHG
Satellite Manual Tuning:
Start a manual satellite scan.
+LJKOLJKWWKHVDWHOOLWHDQGSUHVV
OK
EXWWRQWRFRQ¿JXUH
GHWDLOHGVDWHOOLWHSDUDPHWHUV7KHQ
highlight
Next
and
SUHVV
OK
WRSURFHHG
Favourite Network Select:
Select your favourite net-
ZRUN7KLVPHQXRSWLRQZLOOEHDFWLYHLIPRUHWKDQRQH
network is available.
7KLVRSWLRQPD\QRWEHDYDLODEOH
GHSHQGLQJ RQ WKH
selected country during the initial
VHWXSSURFHVV
Channel Skip:
6HW FKDQQHOV WR EH VNLSSHG ZKHQ
switching the channels via
Programme +/-
buttons
on the remote. Highlight the desired channel/s on the
OLVWDQGSUHVV
OK
to select/unselect.
Channel Swap:
5HSODFH WKH SRVLWLRQV RI WKH WZR
selected channels in the channel list. Highlight the
GHVLUHG FKDQQHOV RQ WKH OLVW DQG SUHVV
OK
to select.
:KHQWKHVHFRQGFKDQQHOLVVHOHFWHGWKHSRVLWLRQRI
WKLV FKDQQHO ZLOO EH UHSODFHG ZLWK WKH SRVLWLRQ RI WKH
¿UVWVHOHFWHGFKDQQHO<RXFDQSUHVVWKH
Yellow
button
and enter the number of the channel you want to select.
Then highlight
OK
DQGSUHVV
OK
to go to that channel.
Channel Move:
0RYH D FKDQQHO WR WKH SRVLWLRQ RI
another channel. Highlight the channel you want to
PRYHDQGSUHVV
OK
to select. Then do the same for a
VHFRQGFKDQQHO:KHQWKHVHFRQGFKDQQHOLVVHOHFWHG
\RXFDQSUHVVWKH
Blue
EXWWRQDQGWKH¿UVWVHOHFWHG
FKDQQHOZLOOEHPRYHGWRWKHSRVLWLRQRIWKDWFKDQQHO
<RXFDQSUHVVWKH
Yellow
button and enter the number
of the channel you want to select. Then highlight
OK
DQGSUHVV
OK
to go to that channel.
Channel Edit:
Edit channels in the channel list. Edit
the name and channel number of the selected channel
DQGGLVSOD\
Network Name
Channel Type
and
Fre-
quency
information related to that channel if available.
'HSHQGLQJRQWKHFKDQQHORWKHURSWLRQVPD\DOVREH
editable. Press
OK
or the
Yellow
button to edit the
KLJKOLJKWHG FKDQQHO <RX FDQ SUHVV WKH
Blue
button
to delete the highlighted channel.
Channel Delete:
Highlight the desired channel/s on
WKHOLVWDQGSUHVV
OK
or the
Yellow
button to select/
XQVHOHFW 7KHQ SUHVV WKH
Blue
button to delete the
selected channel/s.
Clear Channel List:
Delete all channels stored in the
FKDQQHOOLVW$GLDORJXHZLOOEHGLVSOD\HGIRUFRQ¿UPD
-
tion. Highlight
OK
DQG SUHVV
OK
EXWWRQ WR SURFHHG
Highlight
Cancel
DQGSUHVV
OK
to cancel.
Note:
Some options may not be available and appear as
greyed out depending on the operator selection and operator
related settings.
Channel Installation Mode
6HW WKLV RSWLRQ DV
Preferred Satellite
or
General
Satellite
7KHFKDQQHOOLVWZLOODOVRFKDQJHGHSHQGLQJ
RQ WKH VHOHFWHG RSWLRQ KHUH ,Q RUGHU WR ZDWFK WKH
FKDQQHOVRQWKHVDWHOOLWH\RXZDQWWKLVRSWLRQVKRXOG
be selected accordingly. Set to
Preferred Satellite
WR ZDWFK RSHUDWRU FKDQQHOV LI \RX KDYH SHUIRUPHG
DQ RSHUDWRU LQVWDOODWLRQ 6HW WR
General Satellite
to
ZDWFKRWKHUVDWHOOLWHFKDQQHOVLI\RXKDYHSHUIRUPHG
a normal installation.
Auto Channel Update
7XUQWKHDXWRFKDQQHOXSGDWHIXQFWLRQRQRURႇ
Channel Update Message
7XUQWKHFKDQQHOXSGDWHPHVVDJHIXQFWLRQRQRURႇ
Parental Controls
7RHQWHUWKLVPHQX3,1VKRXOGEHHQWHUHG¿UVW8VHWKH3,1
WKDW\RXKDYHGH¿QHGGXULQJWKHLQLWLDOVHWXSSURFHVV,I\RXKDYH
changed the PIN after the initial setup use that PIN. If you didn’t
set a PIN during the initial setup, you can use the default PIN.
The default PIN is
1234
. Some options may not be available or
vary depending on the country selection during the initial setup.
The content of this menu may not be displayed if the channel
installation is not completed and no channels are installed.
Характеристики

Остались вопросы?Не нашли свой ответ в руководстве или возникли другие проблемы? Задайте свой вопрос в форме ниже с подробным описанием вашей ситуации, чтобы другие люди и специалисты смогли дать на него ответ. Если вы знаете как решить проблему другого человека, пожалуйста, подскажите ему :)


