
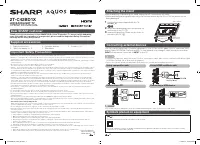
Телевизоры Sharp 2T-C42BD1X - инструкция пользователя по применению, эксплуатации и установке на русском языке. Мы надеемся, она поможет вам решить возникшие у вас вопросы при эксплуатации техники.
Если остались вопросы, задайте их в комментариях после инструкции.
"Загружаем инструкцию", означает, что нужно подождать пока файл загрузится и можно будет его читать онлайн. Некоторые инструкции очень большие и время их появления зависит от вашей скорости интернета.

5
6
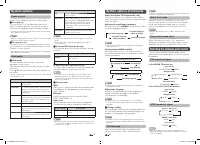
Easy setup
When the TV powers on for the first time after
purchase, the initial auto installation wizard appears.
Follow the menu and make the necessary settings
one after another.
1
Press
POWER
on the remote control.
• The initial auto installation wizard appears.
Press
ENTER
to start the wizard.
2
Select language
s
country
s
ENTER
.
Select “Home” or “Store”
s
ENTER
.
Home:
• “STANDARD” will be the default value for the
“AV mode” setting.
Store:
• “DYNAMIC (Fixed)” will be the default value
for the “AV mode” setting. If the “AV mode” is
changed, the TV will automatically switch back to
“DYNAMIC (Fixed)” when there is no further change
to TV setting for 30 minutes.
• To change the Store mode to Home mode, please
refer to page 7 to reset the unit.
3
Select “DTV”, “ATV” or “DTV + ATV”
s
ENTER
.
• Auto installation will be executed.
• You do not need to do anything during the auto
search.
• If you select “Others” country, some of DTV channel
may not tune properly.
Select “Start” or “Cancel”
s
ENTER
.
NOTE
• In the setting of some country, selecting of “DTV”, “ATV”
or “DTV + ATV” may not be shown.
• A region or service selection screen may display depending
on the country settings or cable providers selections.
Follow the screen prompts to make the selections.
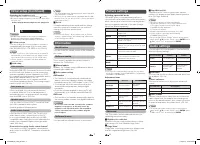
Digital setting
You can reconfi gure DTV services settings
automatically or manually.
H
Auto search
Use this menu to add new services automatically
after auto installation has been completed.
• Press
a
/
b
to select “DTV” or “DTV+ATV”.
H
Manual search
Add new services within a specifi ed channel band.
• Press
c
/
d
to fi nd the channel and then press
ENTER
.
H
Signal information
Use this menu to check signal information depends
on receiving channel.
Analogue setting
You can reconfi gure the TV channel settings
automatically or manually using
Auto search
or
Manual adjust
.
H
Auto search
You can also automatically search by performing
the procedure below. This is the same function as
programme auto search in auto installation.
H
Manual adjust
You can set some channel items manually.
Item
Description
Current CH
Select the channel you want to edit.
• Selected channel will be automatically
refl ected in the background.
Sound
system
Select the optimum sound system
(Broadcasting system) to receive.
(B/G, D/K, I, M)
Colour
system
Select the optimum colour system to
receive. (NTSC 3.58, NTSC 4.43, PAL,
SECAM)
Search
Start searching from current channel.
• Press
c
/
d
to auto search.
Fine-tune
Tune the frequency of the stored channel
to your desired position.
• Instead of pressing
c
/
d
, you can set by
directly entering the frequency number of the
channel with
0−9
and then press
ENTER
to adjust while checking the background
picture as a reference.
NOTE
• The frequency shown below the On-Screen Display shows
the real-time frequency of the displayed channel.
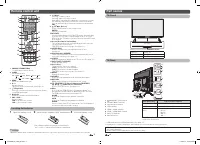
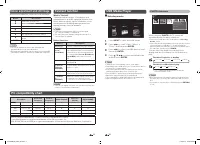
Menu operation
Initial setup
Easy setup
Digital setting
Analogue setting
Time setting
Language
Child lock
Programme edit
[English]
Child screen timer
[Off]
Input settings
Reset
Menu
Initial
setup
System
options
Audio
settings
Picture
settings
Information
TV
Select menu
Select
ENTER
Enter
RETURN
Exit
1
Press
MENU
and the MENU screen displays.
2
Press
c
/
d
to select the desired menu.
(Initial setup, Information, Picture settings, Audio
settings, System options)
3
Press
a
/
b
to select the desired menu item.
Press
ENTER
to proceed if necessary.
4
Press
a
/
b
or
c
/
d
to select the desired item
or adjust the item to the desired level. Press
ENTER
if necessary.
5
Press
RETURN
as necessary to return to the
previous MENU. Press
MENU
to exit the MENU.
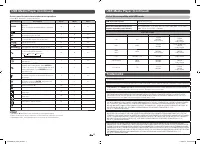
Initial setup
Time setting
This function can display the time, data on screen
and channel’s timetable with updated time info.
H
Time adjustment
This function allows you to set the clock manually.
NOTE
• If you select “On” in “Auto synchronization” the TV will try
to get the time for the broadcast. It will only be selectable
when “Auto synchronization” is set to “Off”.
• “Time zone” enables you to select your local time zone.
It will only be selectable when “Auto synchronization” is set
to “On”.
H
Time display
This function allows you to display the clock time in
the lower-right corner of the screen.
Selected item
Description
Off
Hides the clock time.
On
Displays the clock time.
Language
Select from among 13 languages: English, Simplifi ed
Chinese, Arabic, French, Portuguese, Russian,
Persian, Thai, Malay, Vietnamese, Indonesian,
Hebrew and Hindi.
Child lock
Allows you to use a password to protect certain
settings from being accidentally changed.
H
Lock system
If the password is not set, the “Lock system” is
invalid.
Please make sure the “Lock system” is set to “On”
before the Child lock is set. (Off, On).
H
Set password
NOTE
• To view a locked channel, you must enter a password.
When you select a locked channel, “Child lock has been
activated” is displayed.
• Press
ENTER
to display the password input window.
H
Block programme
The “Block programme” can be select after “Lock
system” is set to “On”.
H
Parental rating
This function allows TV channels to be restricted.
It prevents children from watching violent or sexual
scenes that may be considered inappropriate.
Selected item
Description
Off
Cancel the blocking.
Age xx years
Select desired age to block.
(Example) If age 14 is selected, programmes
rated for ages of 15 or more are blocked.
Child screen timer
This function allows you to set a screen viewing time
limit. When counter reach the time you already set, it
will display a warning/information screen.
(Off, 1 hour, 2 hours, 3 hours)
NOTE
• This warning/information screen will keep display at the
center until user turn off the TV and “Child screen timer”
will automatically set to “Off”.
• Once “Child screen timer” is selected, “COMFORT MODE”
is automatically turned “On”.
Programme edit
Use this menu to set up a channel individually.
Selected item
Description
Erase
Channels can be erased individually.
Press
a
/
b
to select “Yes” or “No”,
and then press
ENTER
to erase the
selected channel.
Label
You can change channel names
individually.
Maximum 5 alphanumerics can be
input.
Press
ENTER
to start labelling.
Press
a
/
b
to select a character,
press
c
/
d
to select next character,
and then press
ENTER
to save.
Sort
Channel position can be sorted freely.
Skip
Channels can be skip by select “Off”
or “On”.
Input settings
H
HDMI auto view (HDMI input mode only)
Selected
item
Description
Enable/
Disable
Set whether or not to use the Auto Selection
of WIDE MODE based on signal recognition
received from the HDMI signal.
H
Digital audio
This function allows you to select the digital audio
signal type. (Off, Bitstream, PCM)
H
Audio output select
You can select which device is used for outputting
audio.
Option
Description
Headphone
Output audio through headphones.
Audio out
Output audio through an A/V receiver or
surround audio controller.
NOTE
• If you select “Headphone” when a cable is inserted in the
AUDIO output terminal, the TV speakers are muted and all
Audio menu items cannot be adjusted.
• If you select “Audio out”, sound via the AUDIO output
terminal is not adjustable and constantly outputs.
2T-C42BD1X_H264_EN.indd 3
2T-C42BD1X_H264_EN.indd 3
7/12/2019 10:35:25 AM
7/12/2019 10:35:25 AM
Характеристики

Остались вопросы?Не нашли свой ответ в руководстве или возникли другие проблемы? Задайте свой вопрос в форме ниже с подробным описанием вашей ситуации, чтобы другие люди и специалисты смогли дать на него ответ. Если вы знаете как решить проблему другого человека, пожалуйста, подскажите ему :)


