
Телевизоры Sharp 2T-C42BD1X - инструкция пользователя по применению, эксплуатации и установке на русском языке. Мы надеемся, она поможет вам решить возникшие у вас вопросы при эксплуатации техники.
Если остались вопросы, задайте их в комментариях после инструкции.
"Загружаем инструкцию", означает, что нужно подождать пока файл загрузится и можно будет его читать онлайн. Некоторые инструкции очень большие и время их появления зависит от вашей скорости интернета.
3
4
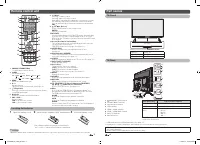
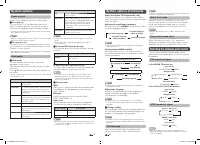
Remote control unit
DISPLAY
ATV/DTV
AD/MPX
EPG
HDMI
SUPER
ECO
COLOUR
ADJ.
GUIDE
INFO
RADIO
1
2
5
7
8
9
11
6
3
4
12
13
14
15
16
17
18
10
19
20
21
8
e
(Mute)
Press
e
s
Mutes sound.
Press
e
again
s
Restores sound.
Mute will be cancelled after 30 minutes. However, the TV will
not suddenly output loud sound as the volume level will be
set to 0 automatically. Increase the volume level by pressing
VOL
k
.
9
a
/
b
/
c
/
d
(Cursor)
Select a desired item on the setting screen.
ENTER
Execute a command.
10 ATV/DTV
Press to switch between ATV and DTV mode. After switching
from ATV or DTV, radio or external input mode to ATV and
DTV mode, the TV jumps to the most recently viewed ATV and
DTV channel.
11 Colour (Red/Green/Yellow/Blue)
The coloured buttons are correspondingly used to select the
coloured items on the screen.
TELETEXT mode: Select a page. (See page 11.)
12 SUPER ECO
Reduce overall power consumption based on user
preferences.
13 COLOUR ADJ. (FREEZE)
Freeze a motion picture on the screen and adjust the colour
tone of the still image. (See page 11.)
14 PHOTO
Display your pictures directly on the TV screen. (See page 12.)
15 INPUT (INPUT SOURCE)
Select an input source.
16 CH
r
/CH
s
TV input mode: Select the channel.
(
CH
r
) Increase the channel number.
(
CH
s
) Decrease the channel number.
TELETEXT mode: Select a page. (See page 11.)
17 MENU
Display the menu screen.
18 AD/MPX
Select the sound multiplex mode and audio description.
19 RETURN
MENU mode: Return to the previous menu screen.
20
m
(TELETEXT),
k
(Reveal hidden for TELETEXT),
3
(Hold),
[
(SUBTITLE for TELETEXT)
Use for TELETEXT mode. (See page 11.)
21 EPG
DTV mode: An “EPG (Electronic Programme Guide)” is a
programme schedule, which is displayed on the TV screen.
The EPG is broadcasted together with DTV.
GUIDE
DTV mode: Display the programme channel list.
INFO
DTV mode: Display the programme information.
RADIO
Press to switch from DTV to radio mode. The TV will jumps to
the most recently tuned radio channel.
1 POWER
(STANDBY/ON)
To switch the power on and off.
2 SLEEP
Set the Sleep timer.
0 hr. 30 min.
1 hr. 00 min.
2 hr. 30 min.
1 hr. 30 min.
2 hr. 00 min.
Off
3 HDMI
Select the HDMI input mode.
4 0 – 9
Set the channel.
TELETEXT mode: Set the page. (See page 11.)
5
A
(Flashback)
Press
A
to return to the previous selected channel
or external input mode.
6 DISPLAY
Display the channel or input information.
7 VOL
k
/VOL
l
Set the volume.
(
VOL
k
) Increase the volume.
(
VOL
l
) Decrease the volume.
Inserting the batteries
1
Open the battery cover.
2
Insert the two supplied “AAA” size batteries.
3
Close the battery cover.
• Place batteries with their terminals corresponding to
the (
e
) and (
f
) indications in the battery compartment.
CAUTION
• Batteries (battery pack or batteries installed) shall not be exposed to excessive heat such as sunshine, fi re or the like.
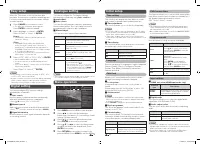
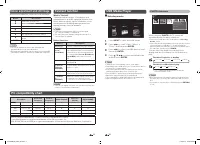
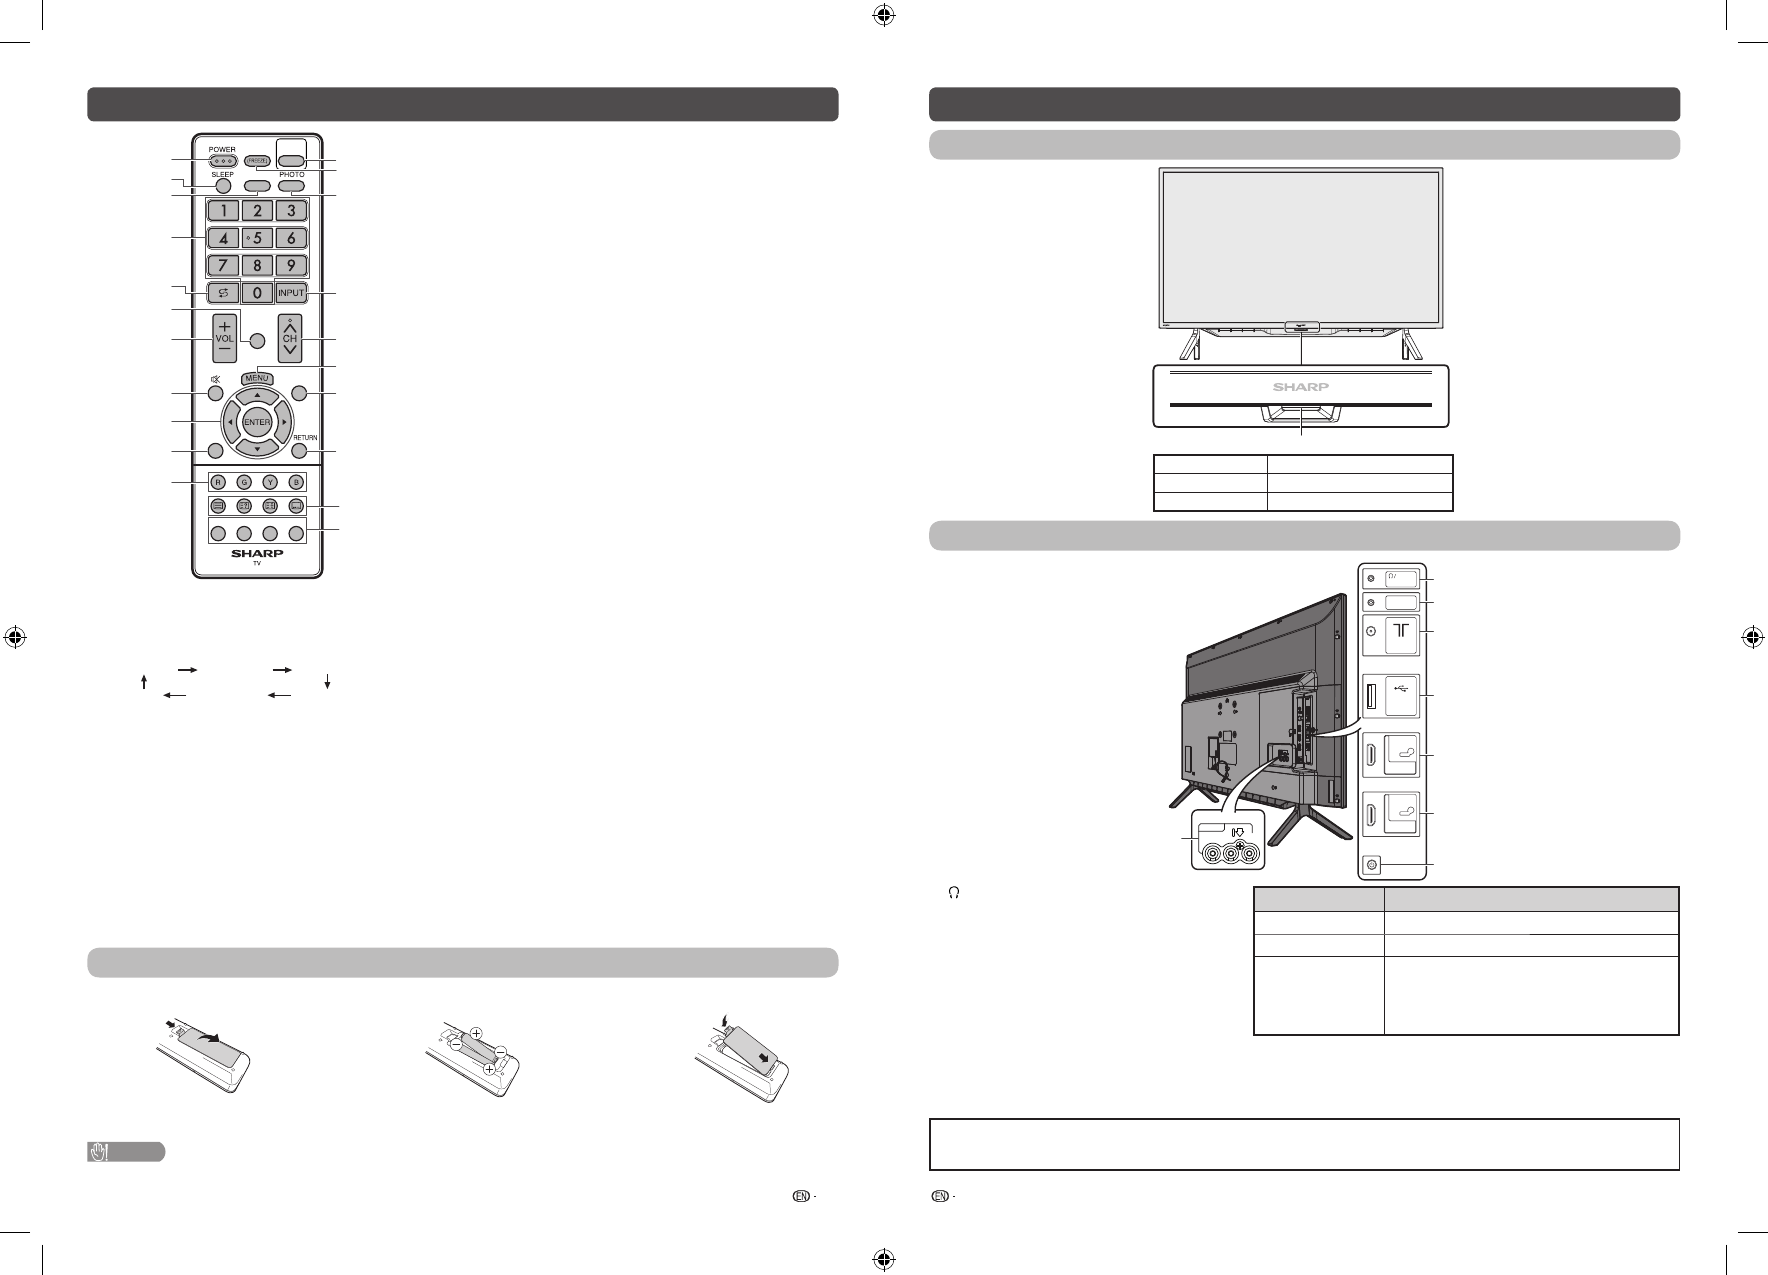
Part names
TV (Front)
Remote control sensor /
POWER indicator
Light off
Power off.
Lighted (Red)
The TV is in standby mode.
Lighted (Green)
The TV is on.
TV (Rear)
1
3
4
5
2
ANT
SERVICE
ONLY
6
8
OUT (L/R)
AUDIO
USB
(DC5V 1.5A)
7
INPUT 3
R - AUDIO - L
VIDEO
ARC
HDMI 1
1
HDMI 2
2
1
/AUDIO OUT (L/R) terminal
2
SERVICE ONLY terminal**
3
Antenna input terminal
4
USB terminal*
5
HDMI 2 (HDMI) terminal
6
HDMI 1 (HDMI/ARC) terminal
7
INPUT 3 terminals
8
One Button Key
One Button Key
Functions Descriptions
Single Press
On/Off (No OSD display)
Long Press
Sub-menu display on TV screen (10s timeout)
Function During
Menu
1. INPUT*
2. CH
r
*
3. CH
s
*
4. VOL +*
5. VOL –*
* Single Press: Scroll Down
* Hold Press: Select Item
* USB terminal use for USB media player. (See page 12.)
** Usually do not connect anything to this terminal as it reserved only for service personnel.
• The illustrations and on-screen displays in this operation manual are for explanation purposes and may vary slightly from
the actual operations.
• Some features differ depending on the selected country.
2T-C42BD1X_H264_EN.indd 2
2T-C42BD1X_H264_EN.indd 2
7/12/2019 10:35:25 AM
7/12/2019 10:35:25 AM
Характеристики

Остались вопросы?Не нашли свой ответ в руководстве или возникли другие проблемы? Задайте свой вопрос в форме ниже с подробным описанием вашей ситуации, чтобы другие люди и специалисты смогли дать на него ответ. Если вы знаете как решить проблему другого человека, пожалуйста, подскажите ему :)


