
Швейная машина Janome Memory Craft 350Е - инструкция пользователя по применению, эксплуатации и установке на русском языке. Мы надеемся, она поможет вам решить возникшие у вас вопросы при эксплуатации техники.
Если остались вопросы, задайте их в комментариях после инструкции.
"Загружаем инструкцию", означает, что нужно подождать пока файл загрузится и можно будет его читать онлайн. Некоторые инструкции очень большие и время их появления зависит от вашей скорости интернета.


42
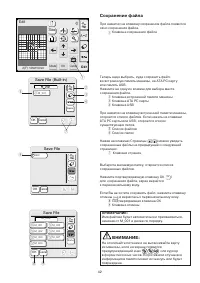
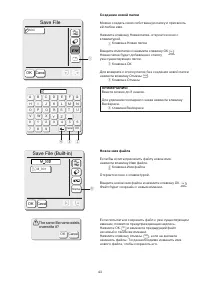
SAVING A FILE
When you press the
Save file
key, the
Save file
dialog
box will open.
q
Save file key
You can select a memory location from Built-in memory,
ATA PC card or USB memory.
Press one of the following keys to select the desired
location to where you wish to save the file.
w
Built-in memory key
e
ATA PC card key
r
USB memory key
The
File list
will open if you press the Built-in memory
key, while the
Folder list
will open if you press the PC
card key or USB memory key.
t
File list
y
Folder list
When you press the
Page
keys, you will be able
to see the saved files in the previous and next pages.
u
Page keys
Select the desired folder and the file list of the selected
folder will open.
Press the
OK
key to save the file and the screen will
return to the original screen.
If you do not want to save the file, press the
Cancel
key to return to the previous window.
i
OK key
o
Cancel key
NOTE:
The file name will be automatically assigned starting
from M_001 in order.
CAUTION:
Do not turn the power off or eject the card when the
warning sign or hourglass is showing on
the visual touch screen. Otherwise, the data stored in
the memory may be lost or damaged.
OK
Cancel
OK
Name
Save File (Built-in)
Cancel
M_001
Edit
A(F): 126x110mm
Mode
Cancel
OK
Size
A Z
OK
Name
Save File
Cancel
M_008
M_001
M_002
M_003
M_004
M_005
M_006
M_007
q
w
e
r
t
y
i
o
Save File
Cancel
ABC
OK
u
42
SAVING A FILE
When you press the
Save file
key, the
Save file
dialog
box will open.
q
Save file key
You can select a memory location from Built-in memory,
ATA PC card or USB memory.
Press one of the following keys to select the desired
location to where you wish to save the file.
w
Built-in memory key
e
ATA PC card key
r
USB memory key
The
File list
will open if you press the Built-in memory
key, while the
Folder list
will open if you press the PC
card key or USB memory key.
t
File list
y
Folder list
When you press the
Page
keys, you will be able
to see the saved files in the previous and next pages.
u
Page keys
Select the desired folder and the file list of the selected
folder will open.
Press the
OK
key to save the file and the screen will
return to the original screen.
If you do not want to save the file, press the
Cancel
key to return to the previous window.
i
OK key
o
Cancel key
NOTE:
The file name will be automatically assigned starting
from M_001 in order.
CAUTION:
Do not turn the power off or eject the card when the
warning sign or hourglass is showing on
the visual touch screen. Otherwise, the data stored in
the memory may be lost or damaged.
OK
Cancel
OK
Name
Save File (Built-in)
Cancel
M_001
Edit
A(F): 126x110mm
Mode
Cancel
OK
Size
A Z
OK
Name
Save File
Cancel
M_008
M_001
M_002
M_003
M_004
M_005
M_006
M_007
q
w
e
r
t
y
i
o
Save File
Cancel
ABC
OK
u
41
Edit
A(F): 126x110mm
Mode
Cancel
OK
Size
A Z
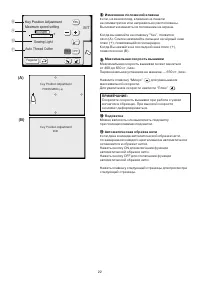
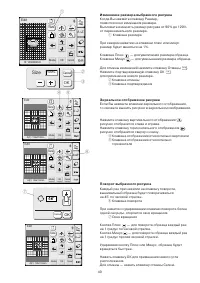
Deleting the pattern
When you press the
Delete
key, the selected pattern
will be deleted.
q
Delete key
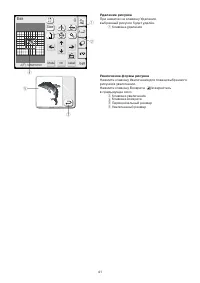
Magnifying the pattern image
Press the
Magnifier
key to show a magnified image of
the selected pattern.
Press the
Return
key to return to the previous
screen.
w
Magnifier key
e
Return key
r
Original image
t
Magnified image
q
w
e
r
t
44
Short of memory space,
the file cannot be saved.
Mode
USB Memory Stick
A Z
A-001
B-002
C-003
Cancel
A-001
B-002
C-003
Cancel
OK
Are you sure you want
to delete this file?
w
q
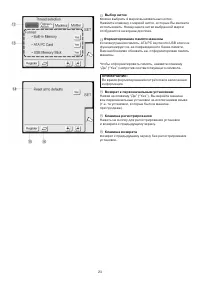
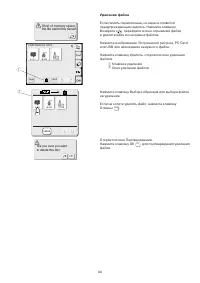
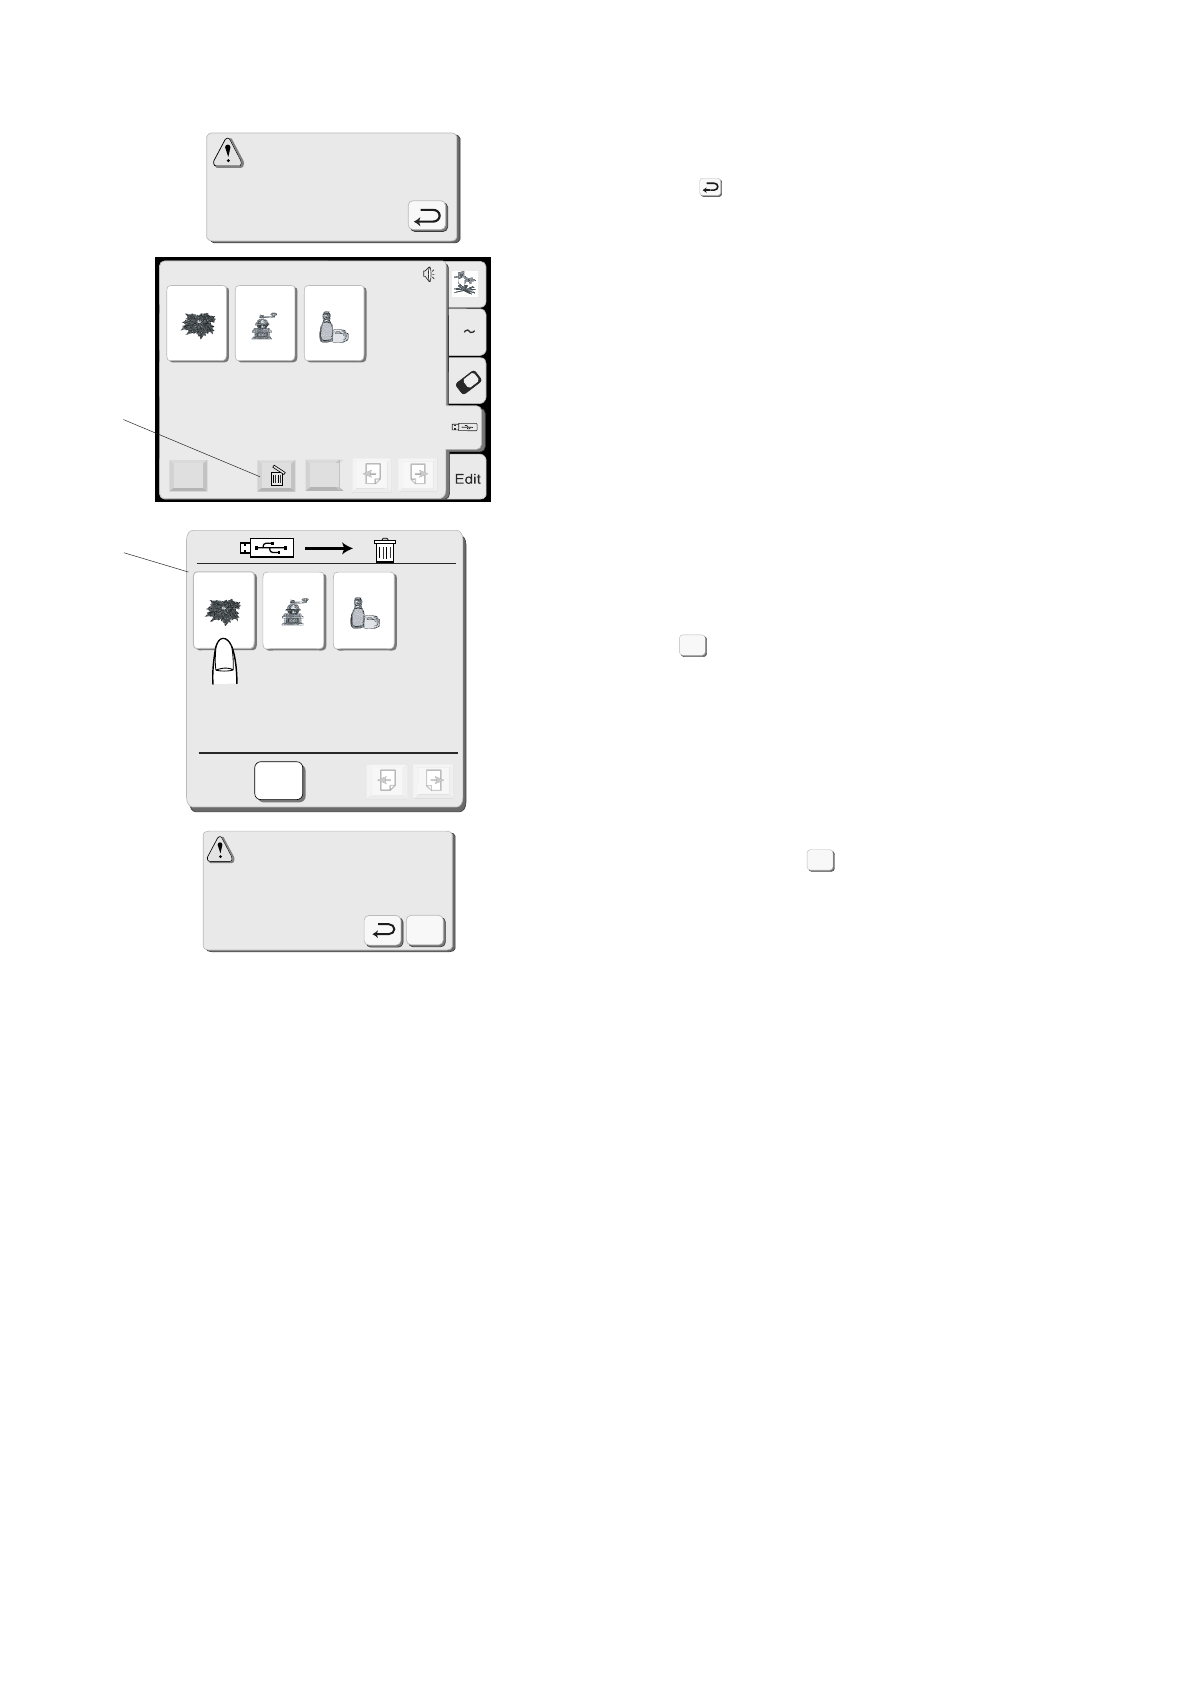
Deleting the file
When the memory is full, a warning message will
appear. Press the
OK
key and go to the open file
window then delete the file that you do not need.
Press the
Built-in design
,
PC card
or
USB memory
tab to select the location of the file to delete.
Press the
Delete
key and the
File delete
dialog box will
open.
q
Delete key
w
File delete dialog box
Press the
Pattern selection
key to select the file you
wish to delete.
If you do not wish to delete the file, press the
Cance
l
key.
The
Confirmation
dialog box will open.
Press the
OK
key to delete the file.
Cancel
OK
OK
44
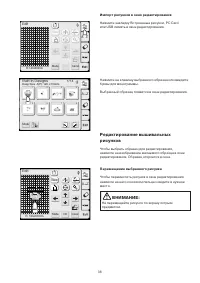
Удаление файла
Если память переполнена, на экране появится
предупреждающая надпись. Нажмите клавишу
Возврата , перейдите в окно отрывания файла
и удалите один из ненужных файлов.
Нажмите изображение Встроенного рисунка, РС Card
или USB для нахождения ненужного файла.
Нажмите клавишу Удалить, откроется окно удаления
файлов.
Клавиша удаления
Окно удаления файлов
Нажмите клавишу Выбора образцов для выбора файла
на удаление.
Если не хотите удалять файл, нажмите клавишу
Отмены .
Откроется окно Подтверждения.
Нажмите клавишу ОК для подтверждения удаления
файла.
37
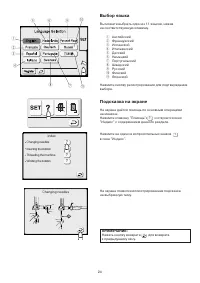
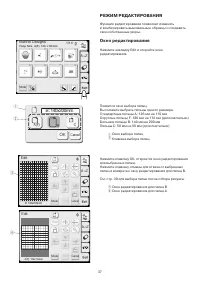
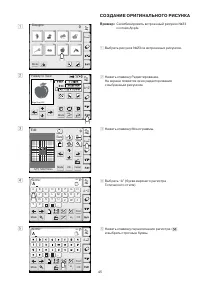
EDITING MODE
The editing function allows you to modify and combine
embroidery patterns to create your own original
designs.
Editing Screen
Press the
Edit
tab to open the Editing window.
The
Hoop selection
dialog box opens to allow you to
select the hoop you wish to use.
You can select one of the following hoops:
Standard Hoop A: 126 mm by 110 mm
Round Hoop F:
126 mm by 110 mm (Optional item)
Large Hoop B:
140 mm by 200 mm
Free arm Hoop C: 50 mm by 50 mm (Optional item)
q
Hoop selection dialog box
w
Hoop selection key
Press the
OK
key and the Editing window for the
selected hoop will open.
Press the
Cancel
key to cancel the selection and
return to the Editing window for the hoop B.
Refer to page 39 for hoop selection after selecting the
embroidery pattern.
e
Editing window for the hoop B
r
Editing window for the hoop A
Mode
1
2
3
4
5
6
7
8
Built-in Designs
A Z
Hoop Size A(F): 126
X
110 mm
Mode
Cancel
OK
Edit
B: 140x200mm
Size
A Z
Edit
A(F): 126x110mm
Mode
Cancel
OK
Size
A Z
A(F)
B
Cancel
OK
B: 140x200mm
C
q
w
e
r
OK
Cancel
1/14
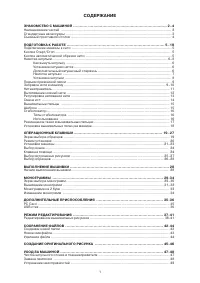
Содержание
- 3 СОДЕРЖАНИЕ
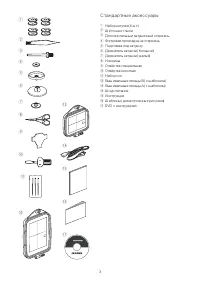
- 5 Стандартныеаксессуары
- 6 Съёмный приставной столик
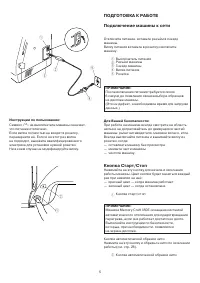
- 7 ПОДГОТОВКА К РАБОТЕ; Для Вашей безопасности:
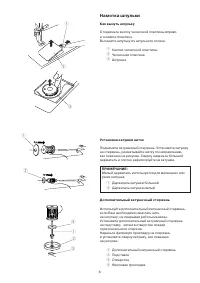
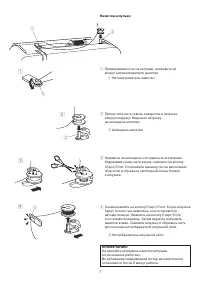
- 8 Намотка шпульки; Как вынуть шпульку
- 10 Установка шпульки
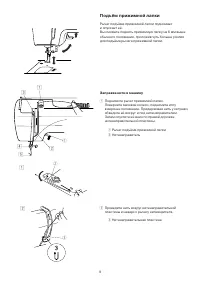
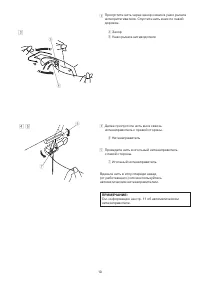
- 11 Подъём прижимной лапки; Заправка нити в машину
- 12 v b
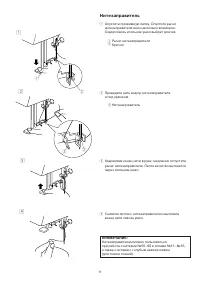
- 13 Нитезаправитель
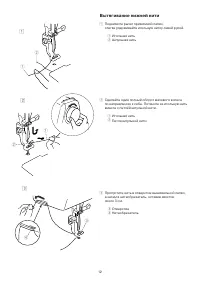
- 14 Вытягивание нижней нити
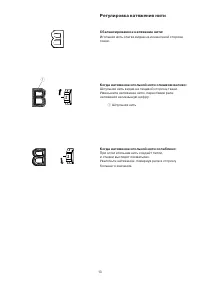
- 15 Регулировка натяжения нити; Сбалансированное натяжение нити:
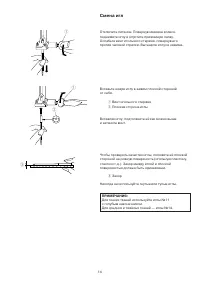
- 16 Смена игл
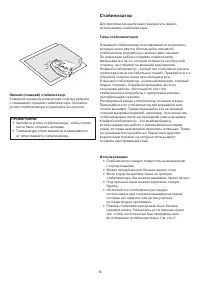
- 18 Стабилизатор; Типы стабилизаторов
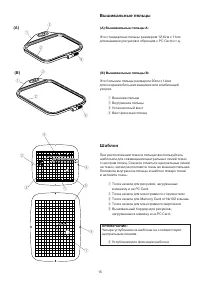
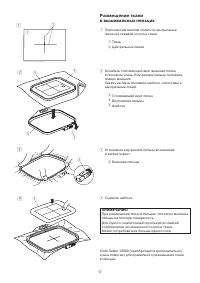
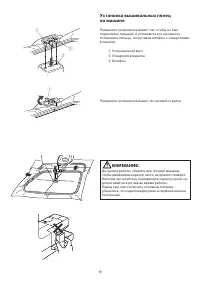
- 20 Установка вышивальных пялец
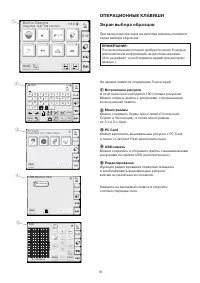
- 21 A Z; ОПЕРАЦИОННЫЕ КЛАВИШИ; Встроенные рисунки
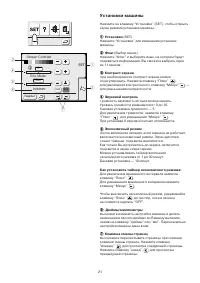
- 22 Режим установок; Клавиша “Установки”
- 23 Установки машины
- 24 Yes; SET; Изменение положений клавиш
- 26 Index; Changing needles; Выбор языка
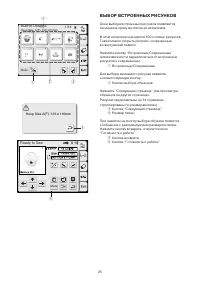
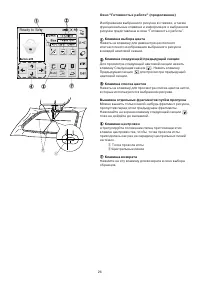
- 27 Ready to Sew; ВЫБОР ВСТРОЕННЫХ РИСУНКОВ
- 28 centerlines on the fabric.
- 29 Trace outline; Cancel; Paused; Клавиша траектории
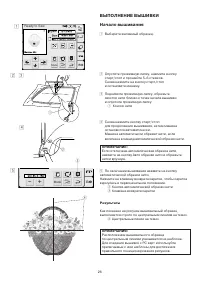
- 30 x c; ВЫПОЛНЕНИЕ ВЫШИВКИ; Результаты
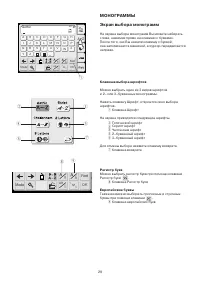
- 31 pper or lower case letters by pressing; AA ZZ; МОНОГРАММЫ; Клавиша выбора шрифтов
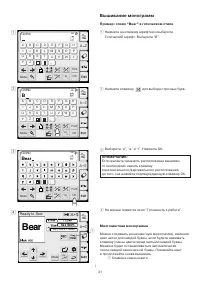
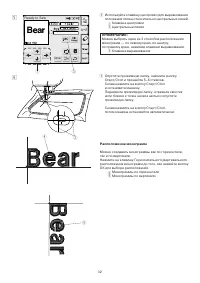
- 33 ear; Bear; Вышивание монограмм; Пример: слово “Bear” в готическом стиле
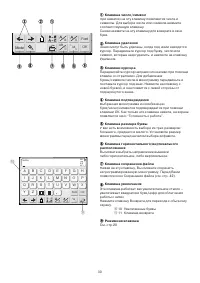
- 34 Расположение монограмм
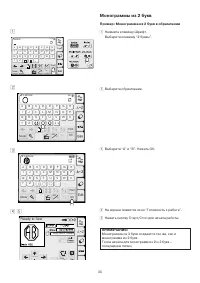
- 35 Монограммы из 2 букв; Пример: Монограмма из 2 букв в обрамлении
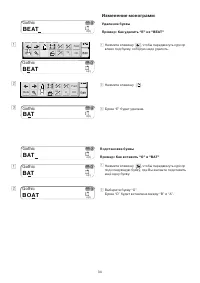
- 36 l t; BEAT; BAT; BAT; BOAT; Изменение монограмм; Удаление буквы
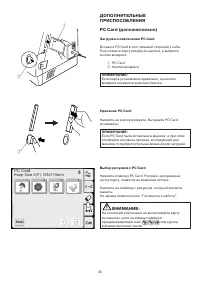
- 37 ДОПОЛНИТЕЛЬНЫЕ; Загрузка и извлечение PC Card
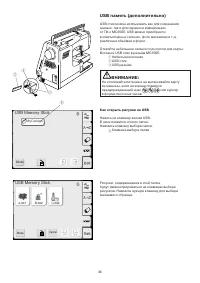
- 38 Как открыть рисунки на USB
- 39 РЕЖИМ РЕДАКТИРОВАНИЯ
- 40 Редактирование вышивальных; Перемещение выбранного рисунка
- 41 Перемещение выбранного объекта (продолжение)
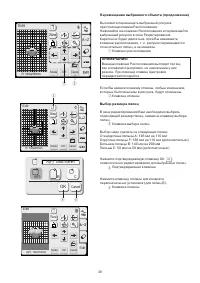
- 42 Изменение размера выбранного рисунка; MONOGRAMMING; A Z
- 43 Deleting the pattern; Deleting the pattern; Deleting the pattern
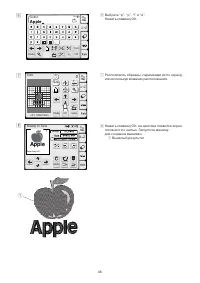
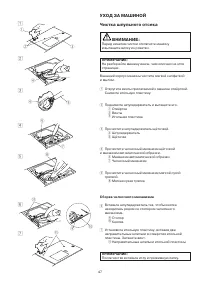
- 47 Apple; CREATING AN ORIGINAL DESIGN; Apple; CREATING AN ORIGINAL DESIGN; Apple
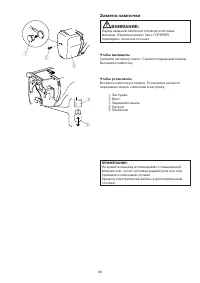
- 50 HOT; Replacing the Light Bulb; HOT
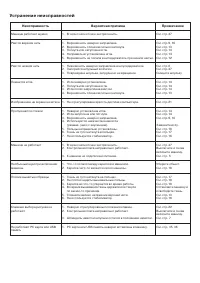
- 51 Устранение неисправностей; Неисправность


