Швейная машина Jaguar 962 - инструкция пользователя по применению, эксплуатации и установке на русском языке. Мы надеемся, она поможет вам решить возникшие у вас вопросы при эксплуатации техники.
Если остались вопросы, задайте их в комментариях после инструкции.
"Загружаем инструкцию", означает, что нужно подождать пока файл загрузится и можно будет его читать онлайн. Некоторые инструкции очень большие и время их появления зависит от вашей скорости интернета.


11
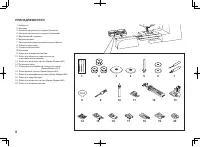
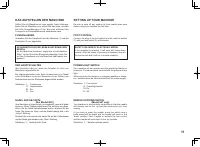
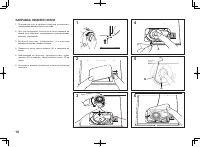
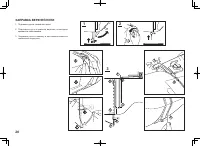
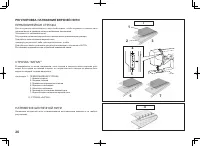
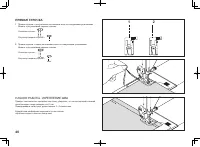
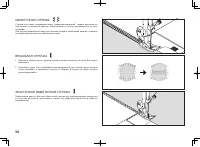
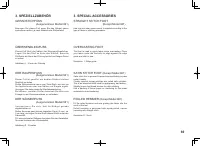
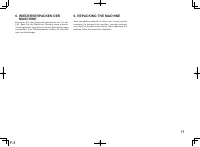
DAS AUFSTELLEN DER MASCHINE
Stellen Sie die Maschine auf eine gerade, feste Unterlage.
Bevor Sie die Maschine zum ersten Mal benutzen, wischen
Sie bitte überschüssiges Öl ab, das sich während des
Transports im Stichplattenbereich ansammeln kann.
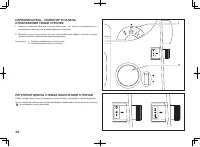
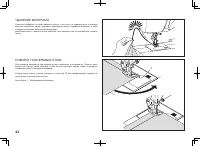
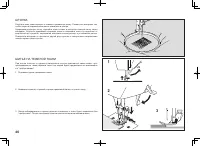
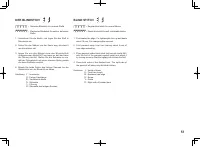
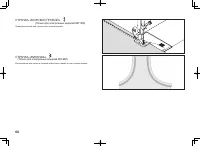
FUSSANLASSER
Verbinden Sie das Hauptkabel mit der Maschine (1) und der
Steckdose (2) wie abgebildet.
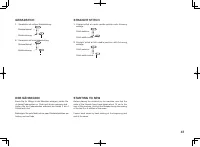
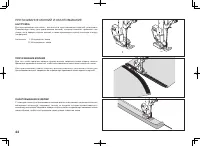
DER HAUPTSCHALTER
Ihre Maschine näht nur, wenn der Schalter für Licht und
Maschine eingeschaltet ist.
Bei Wartungsarbeiten oder beim Auswechseln von Nadel
oder Glühlampe muss die Maschine durch Ziehen des
Netzsteckers aus der Steckdose abgeschaltet werden.
Abbildung
I
: Fußanlasser
II
: Hauptschalter
III
: Ein
IV
: Aus
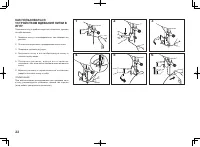
SETTING UP YOUR MACHINE
Be sure to wipe off any surplus oil from needle plate area
before using your machine the first time.
FOOT CONTROL
Connect the plug of the foot control into the machine socket
(1) and your wall outlet (2) as illustrated.
POWER/LIGHT SWITCH
Your machine will not operate until the power/light switch is
turned on. The same switch controls both the power and the
light.
When servicing the machine, or changing needles or Iamps,
etc., machine must be disconnected from the mains supply.
Illustration
I
: Foot control
II
: Power/light switch
III
: On
IV
: Off
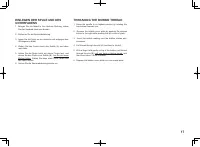
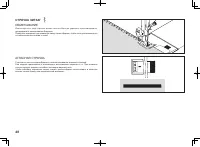
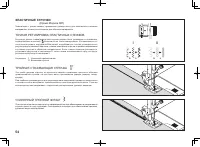
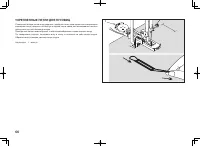
SAFETY FEATURE OF ELECTRONIC MODEL
If the machine is jammed, it will stop with three beep
sounds. After the cause of jamming is removed, step on
the foot control and it will run in normal condition.
SICHERHEITS-FEATURE BEIM ELEKTRONISCHEN
MODELL
Ist die Maschine blockiert, stoppt sie mit dreifachem
„Biep“. Ist der Grund der Blockierung beseitigt, treten Sie
auf den Fußanlasser und die Maschine näht wieder wie
gewohnt.
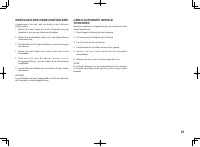
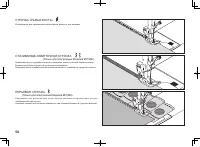
NADEL AUF/AB-TASTE
(Nur Modell 967)
Ihre Maschine ist elektronisch so eingestellt, dass die Nadel
immer in „Oben“-Stellung bleibt wenn Sie aufhören zu nähen.
Wenn Sie die Nadel herunterlassen wollen, drücken Sie die
Taste, Sie hören ein „Biep“ und die Nadel bewegt sich in die
„Unten“-Stellung.
Drücken Sie noch einmal oder treten Sie auf den Fußanlasser
und die Nadel geht wieder in die „Oben“-Stellung.
Abbildung
V
: Nadel Auf/Ab-Taste
NEEDLE UP/DOWN SWITCH
(Model 967 only)
Your machine is electronically controlled so that the needle
will always rise to the ‘up’ position whenever you stop
sewing.
IIf you wish to lower the needle, press the switch and a
beep sound will be heard and the needle will move to the
‘down’ position. Push it again or activate the foot control
and the needle will move back to the ‘up’ position.
Illustration
V
: Needle up/down switch
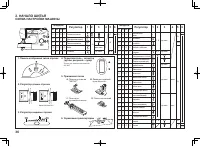
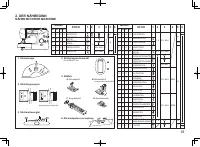
Содержание
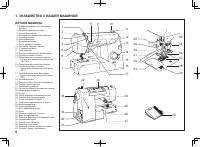
- 5 СОДЕРЖАНИЕ; ЗНАКОМСТВО С ВАШЕЙ МАШИНОЙ
- 8 ДЕТАЛИ МАШИНЫ
- 10 ПРИНАДЛЕЖНОСТИ
- 12 ПОДГОТОВКА МАШИНЫ К РАБОТЕ; НОЖНАЯ ПЕДАЛЬ УПРАВЛЕНИЯ; II; ПЕРЕКЛЮЧАТЕЛЬ ИГЛЫ ВВЕРХ ВНИЗ
- 14 ГОРИЗОНТАЛЬНЫЙ СТЕРЖЕНЬ для стандартной катушки; РЫЧАГ ПРИЖИМНОЙ ЛАПКИ
- 16 НАМОТКА ШПУЛЬКИ
- 18 ЗАПРАВКА НИЖНЕЙ НИТКИ
- 20 Замена иглы; ТАБЛИЦА ИГЛ, НИТОК И МАТЕРИАЛОВ; Auswechseln der Nadel
- 22 ЗАПРАВКА ВЕРХНЕЙ НИТИ
- 26 ПОДЬЕМ НИЖНЕЙ НИТИ
- 28 РЕГУЛИРОВКА НАТЯЖЕНИЯ ВЕРХНЕЙ НИТИ; ПРЯМОЛИНЕЙНАЯ СТРОЧКА; НАТЯЖЕНИЕ ШПУЛЕЧНОЙ НИТИ
- 30 СМЕНА ПРИЖИМНОЙ ЛАПКИ; УПРАВЛЕНИЕ ТРАНСПОРТЕРОМ
- 32 РЕГУЛЯТОР ДЛИНЫ СТЕЖКА ЭЛАСТИЧНОЙ СТРОЧКИ
- 34 РЫЧАГ РЕВЕРСА СТРОЧКИ; РЕГУЛЯТОР ДАВЛЕНИЯ ЛАПКИ
- 36 РЕГУЛЯТОР ШИРИНЫ СТРОЧКИ; СВОБОДНЫЙ ПОШИВ РУКАВА
- 38 Управление транспортером; СХЕМА НАСТРОЙКИ МАШИНЫ; Модель
- 42 ПРЯМАЯ СТРОЧКА; НАЧАЛО РАБОТЫ. УКРЕПЛЕНИЕ ШВА
- 44 УДАЛЕНИЕ МАТЕРИАЛА; ПОВОРОТ ПОД ПРЯМЫМ УГЛОМ
- 46 ПРИТАЧИВАНИЕ МОЛНИЙ И ОКАНТОВЫВАНИЕ; НАСТРОЙКА; ПРИТАЧИВАНИЕ МОЛНИЙ
- 48 ШТОПКА; ШИТЬЕ НА ТЕЖЕЛОЙ ТКАНИ
- 50 СТРОЧКА ЗИГЗАГ; ОБМЕТЫВАНИЕ; АТЛАСНАЯ СТРОЧКА
- 52 ПОТАЙНАЯ СТРОЧКА
- 54 БЕЛЬЕВАЯ СТРОЧКА; СТАЧИВАНИЕ И ОБМЕТЫВАНИЕ ОДНОВРЕМЕННО; ПОДРУБКА «РАКУШКА»; ТРИКОТАЖНАЯ СТРОЧКА; ТРЕХШАГОВЫЙ ЗИГЗАГ
- 56 ЭЛАСТИЧНЫЕ СТРОЧКИ; (Кроме Модели 961); ТОЧНАЯ РЕГУЛИРОВКА ЭЛАСТИЧНЫХ СТЕЖКОВ; ТРОЙНАЯ СТАЧИВАЮЩАЯ СТРОЧКА; S L
- 58 ОБМЕТОЧНАЯ СТРОЧКА; ВЯЗАЛЬНАЯ СТРОЧКА
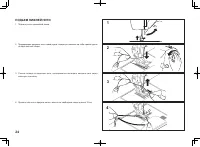
- 60 СТРОЧКА «РЫБЬЯ КОСТЬ»; ПЕРЬЕВАЯ СТРОЧКА; СТАЧИВАЮЩЕ-ОБМЕТОЧНАЯ СТРОЧКА; (Только для электронных Моделей 967,966)
- 62 (Только для электронных моделей 967,966)
- 64 ФАСОННЫЕ СТРОЧКИ ДЛЯ ВЫШИВАНИЯ; НЕКОТОРЫЕ ПОЛЕЗНЫЕ СОВЕТЫ
- 66 ОБМЕТКА ПУГОВИЧНЫХ ПЕТЕЛЬ; АВТОМАТИЧЕСКАЯ ПЕТЛЯ; РЕГУЛИРОВКА БАЛАНСА СТЕЖКА
- 68 УКРЕПЛЕННЫЕ ПЕТЛИ ДЛЯ ПУГОВИЦ
- 70 КАК ПОЛЬЗОВАТЬСЯ КОМПЛЕКТОМ ЛАПОК; ЛАПКА ДЛЯ ПРЯМОЙ СТРОЧКИ; (Кроме Модель 961)
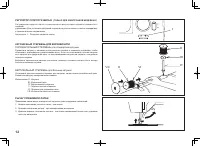
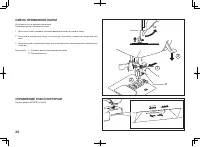
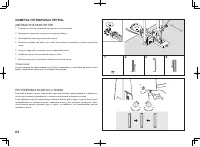
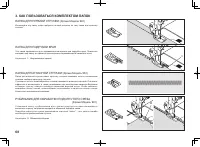
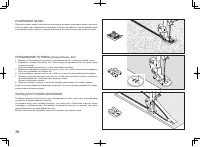
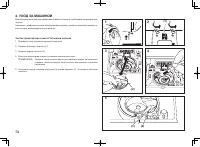
- 74 Чистка транспортера и места Установки челнока
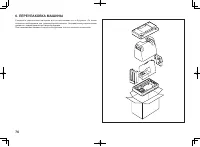
- 78 ПЕРЕУПАКОВКА МАШИНЫ


