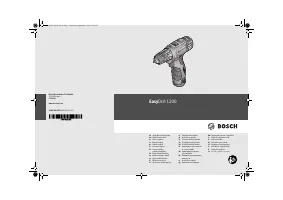
Шуруповерты Bosch 1200 (06039A210A) - инструкция пользователя по применению, эксплуатации и установке на русском языке. Мы надеемся, она поможет вам решить возникшие у вас вопросы при эксплуатации техники.
Если остались вопросы, задайте их в комментариях после инструкции.
"Загружаем инструкцию", означает, что нужно подождать пока файл загрузится и можно будет его читать онлайн. Некоторые инструкции очень большие и время их появления зависит от вашей скорости интернета.


English |
13
Bosch Power Tools
1 609 92A 3E9 | (7.9.16)
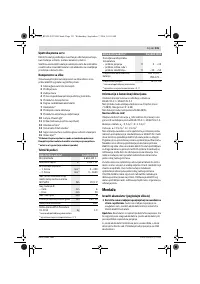
Noise/Vibration Information
Sound emission values determined according to
EN 60745-2-1, EN 60745-2-2.
Typically the A-weighted sound pressure level of the product
is 71 dB(A). Uncertainty K = 3 dB.
The noise level when working can exceed 80 dB(A).
Wear hearing protection!
Vibration total values a
h
(triax vector sum) and uncertainty K
determined according to EN 60745-2-1, EN 60745-2-2:
Drilling into metal: a
h
< 2.5 m/s
2
, K = 1.5 m/s
2
Screwdriving without impact: a
h
< 2.5 m/s
2
, K = 1.5 m/s
2
The vibration level given in this information sheet has been
measured in accordance with a standardised test given in
EN 60745 and may be used to compare one tool with anoth-
er. It may be used for a preliminary assessment of exposure.
The declared vibration emission level represents the main ap-
plications of te tool. However if the tool is used for different
applications, with different accessories or insertion tools or is
poorly maintained, the vibration emission may differ. This
may significantly increase the exposure level over the total
working period.
An estimation of the level of exposure to vibration should also
take into account the times when the tool is switched off or
when it is running but not actually doing the job. This may sig-
nificantly reduce the exposure level over the total working
period.
Identify additional safety measures to protect the operator
from the effects of vibration such as: maintain the tool and the
accessories, keep the hands warm, organisation of work pat-
terns.
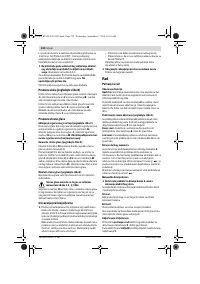
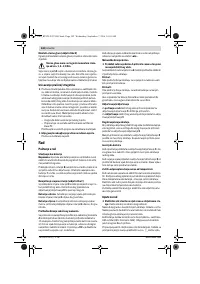
Assembly
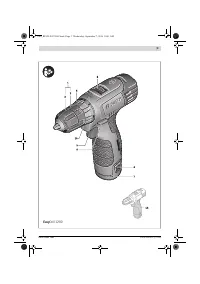
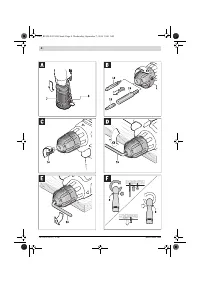
Removing the Battery (see figure A)
Use only the battery chargers listed on the accessories
page.
Only these battery chargers are matched to the lith-
ium-ion battery of your power tool.
Note:
The battery supplied is partially charged. To ensure full
capacity of the battery, completely charge the battery in the
battery charger before using your power tool for the first time.
The lithium-ion battery can be charged at any time without re-
ducing its service life. Interrupting the charging procedure
does not damage the battery.
The lithium-ion battery is protected against deep discharging
by the “Electronic Cell Protection (ECP)”. When the battery is
empty, the machine is switched off by means of a protective
circuit: The inserted tool no longer rotates.
Do not continue to press the On/Off switch after the
machine has been automatically switched off.
The bat-
tery can be damaged.
To remove the battery
7
press the unlocking buttons
6
and
pull out the battery downwards.
Do not exert any force.
Observe the notes for disposal.
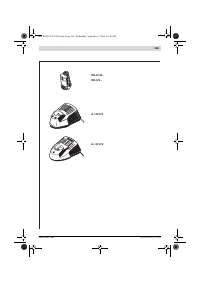
Changing the Tool (see figure B)
Hold the rear sleeve
3
of the keyless chuck
1
tight and turn the
front sleeve
2
in rotation direction
, until the tool can be in-
serted. Insert the tool.
Hold the rear sleeve
3
of the keyless chuck
1
tight and firmly
turn the front sleeve
2
in rotation direction
by hand.
The locking is released again to remove the tool when the
front sleeve
2
is turned in the opposite direction.
Replacing the Drill Chuck
Removing the Securing Screw (see figure C)
The keyless chuck
1
is secured with a securing screw
14
against unintentional loosening from the drill spindle. Com-
pletely open the keyless chuck
1
and unscrew the securing
screw
14
in rotation direction
.
Please note that the se-
curing screw has a left-hand thread.
Removing the Drill Chuck (see figure D)
Clamp the short end of a hex key
15
into the keyless chuck
1
.
Place the machine on a stable surface (e. g. a workbench).
Hold the machine firmly and loosen the keyless chuck
1
by
turning the hex key
15
in rotation direction
. Loosen a tight-
seated keyless chuck by giving the long end of the hex key
15
a light blow. Remove the hex key from the keyless chuck and
completely unscrew the keyless chuck.
Mounting the Drill Chuck (see figure E)
The keyless chuck is mounted in reverse order.
The drill chuck must be tightened with a tightening
torque of approx. 1.5 – 2.0 Nm.
Screw the securing screw
14
in anti-clockwise direction into
the opened keyless chuck. Always use a new securing screw,
as the threads are covered with a thread-locking compound
that loses its effect after multiple usage.
Dust/Chip Extraction
Dust from materials such as lead-containing coatings,
some wood types, minerals and metal can be harmful to
one’s health. Touching or breathing-in the dust can cause
allergic reactions and/or lead to respiratory infections of
the user or bystanders.
Certain dust, such as oak or beech dust, is considered car-
cinogenic, especially in connection with wood-treatment
additives (chromate, wood preservative). Materials con-
taining asbestos may only be worked by specialists.
– Provide for good ventilation of the working place.
– It is recommended to wear a P2 filter-class respirator.
Observe the relevant regulations in your country for the
materials to be worked.
Prevent dust accumulation at the workplace.
Dust can
easily ignite.
OBJ_BUCH-2997-001.book Page 13 Wednesday, September 7, 2016 10:01 AM
Содержание
- 96 Описание продукта и услуг; Применение по назначению
- 97 Технические данные; Сборка
- 98 Смена сверлильного патрона; Работа с инструментом; Включение электроинструмента
- 99 Указания по применению; Техобслуживание и сервис; Техобслуживание и очистка
- 100 Транспортировка; Українська; Вказівки з техніки безпеки; Загальні застереження для електроприладів
Характеристики

Остались вопросы?Не нашли свой ответ в руководстве или возникли другие проблемы? Задайте свой вопрос в форме ниже с подробным описанием вашей ситуации, чтобы другие люди и специалисты смогли дать на него ответ. Если вы знаете как решить проблему другого человека, пожалуйста, подскажите ему :)


