Плита Gorenje G51101FWC - инструкция пользователя по применению, эксплуатации и установке на русском языке. Мы надеемся, она поможет вам решить возникшие у вас вопросы при эксплуатации техники.
Если остались вопросы, задайте их в комментариях после инструкции.
"Загружаем инструкцию", означает, что нужно подождать пока файл загрузится и можно будет его читать онлайн. Некоторые инструкции очень большие и время их появления зависит от вашей скорости интернета.


7
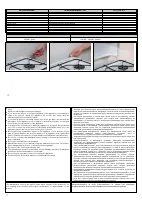
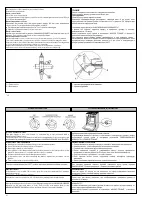
For best baking/roasting results insert the grid with the tray into the second level
guide from below.
Experience says that yeast dough is well baked after 25
–
30 minutes, Christmas
cake after 45 minutes, and pastry after 12
–
18 minutes. However, these times are
merely referential and it is necessary to test them individually.
If possible, avoid opening the oven door during the baking process if possible. The
temperature regime within the oven might be disturbed, resulting in prolonged
baking time or burnt food.
If you should detect considerable differences between the set temperature and the
actual oven temperature, contact qualified service personnel.
,
,
, 25
-
30
.
45
,
-
12-
18
.
(
)
,
.
,
,
.
,
,
,
.
H E L P F U L H I N T:
When baking high rise yeast dough put it on aluminum baking tray and insert it in the
second guide level from the bottom.
!
(
)
,
.
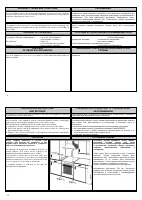
Inserting of grid in the oven
CLEANING AND MAINTENANCE
Before attempting any cleaning or maintenance set all gas control knobs and
ЭОmЩОЫКЭЮЫО ЬОlОМЭШЫЬ ЭШ “OFF” ЩШЬТЭТШЧ КЧН lОЭ ЭСО МШШkОЫ МШШl НШаЧ МШmЩlОЭОlв.
,
,
,
,
.
C L E AN I N G TH E C AB I N E T
Clean the exterior with a damp sponge and some
detergent.
Fat stains can be removed with warm water and
special detergent for enamel.
Never clean enameled surfaces with abrasive agents
as they may permanently damage the surface of the
appliance.
-
.
.
.
,
.
12
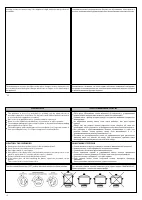
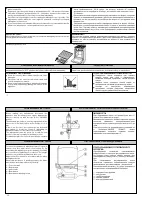
HOB BURNER SETTINGS
M I N I M UM O U TP U T AD J U S T M E N T
Before starting any adjustments disconnect the
appliance from the mains power supply. Adjustments
must be carried out with the tap at the "SAVING"
position.
The minimum gas output is correctly adjusted when the
inner cone of the flame arrives at the height of 3 to 4
mm.
If this is not the case, first remove the tap knob and
then tighten or loosen the screw C, depending on
whether the flame is to be reduced or increased.
The adjustments must be crried out so that the end
position of the tap is actually its minimum position.
For butane/propane the screw C must be fully screwed
in
-
.
,
3
4
.
,
„
",
,
.
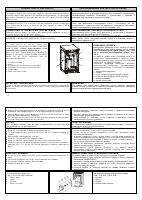
OVEN BURNER SETTINGS
P R I M AR Y AI R AD J U S TM E N T
To access the primary air adjusting screw (5), open or
remove oven door and remove oven bottom (2). By
unscrewing the adjusting screw the quantity of primary
air is increase, by tightening it is reduced. The air/gas
mixture is correct when the flame has blue color.
Adjust screw 5 for value X in accordance with the table,
and tighten the nut.
Check that the burner is working properly: the flame
must be blue and sharp, without a yellow tip.
1
–
Front oven wall
2
–
Oven bottom
3
–
Ignition tube
4
–
Oven burner
5
–
Oven burner adjusting screw
.
(
,
)
.
,
-
.
(
„Х“)
.
1
–
2
–
3
–
4
–
5
–


