
Пилы дисковые Makita HS011GZ - инструкция пользователя по применению, эксплуатации и установке на русском языке. Мы надеемся, она поможет вам решить возникшие у вас вопросы при эксплуатации техники.
Если остались вопросы, задайте их в комментариях после инструкции.
"Загружаем инструкцию", означает, что нужно подождать пока файл загрузится и можно будет его читать онлайн. Некоторые инструкции очень большие и время их появления зависит от вашей скорости интернета.


17 ENGLISH
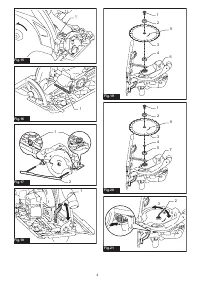
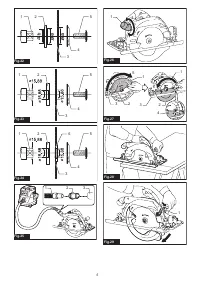
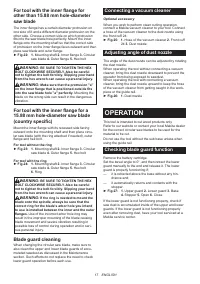
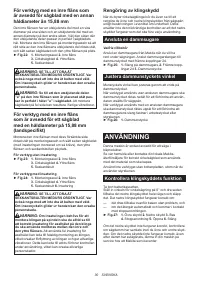
For tool with the inner flange for
other than 15.88 mm hole-diameter
saw blade
The inner flange has a certain diameter protrusion on
one side of it and a different diameter protrusion on the
other side. Choose a correct side on which protrusion
fits into the saw blade hole perfectly. Mount the inner
flange onto the mounting shaft so that the correct side
of protrusion on the inner flange faces outward and then
place saw blade and outer flange.
►
Fig.22:
1.
Mounting shaft
2.
Inner flange
3.
Circular
saw blade
4.
Outer flange
5.
Hex bolt
WARNING:
BE SURE TO TIGHTEN THE HEX
BOLT CLOCKWISE SECURELY. Also be careful
not to tighten the bolt forcibly. Slipping your hand
from the hex wrench can cause a personal injury.
WARNING:
Make sure that the protrusion "a"
on the inner flange that is positioned outside fits
into the saw blade hole "a" perfectly.
Mounting the
blade on the wrong side can result in the dangerous
vibration.
For tool with the inner flange for a
15.88 mm hole-diameter saw blade
(country specific)
Mount the inner flange with its recessed side facing
outward onto the mounting shaft and then place circu-
lar saw blade (with the ring attached if needed), outer
flange and hex bolt.
For tool without the ring
►
Fig.23:
1.
Mounting shaft
2.
Inner flange
3.
Circular
saw blade
4.
Outer flange
5.
Hex bolt
For tool with the ring
►
Fig.24:
1.
Mounting shaft
2.
Inner flange
3.
Circular
saw blade
4.
Outer flange
5.
Hex bolt
6.
Ring
WARNING:
BE SURE TO TIGHTEN THE HEX
BOLT CLOCKWISE SECURELY. Also be careful
not to tighten the bolt forcibly. Slipping your hand
from the hex wrench can cause a personal injury.
WARNING:
If the ring is needed to mount the
blade onto the spindle, always be sure that the
correct ring for the blade's arbor hole you intend
to use is installed between the inner and the outer
flanges.
Use of the incorrect arbor hole ring may
result in the improper mounting of the blade causing
blade movement and severe vibration resulting in
possible loss of control during operation and in seri-
ous personal injury.
Blade guard cleaning
When changing the circular saw blade, make sure to
also clean the upper and lower blade guards of accu-
mulated sawdust as discussed in the Maintenance
section. Such efforts do not replace the need to check
lower guard operation before each use.
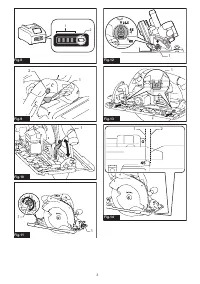
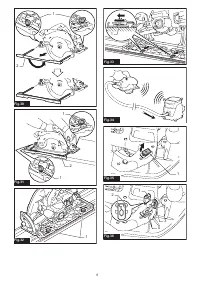
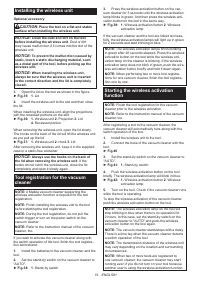
Connecting a vacuum cleaner
Optional accessory
When you wish to perform clean cutting operation,
connect a Makita vacuum cleaner to your tool. Connect
a hose of the vacuum cleaner to the dust nozzle using
the front cuff 24.
►
Fig.25:
1.
Hose of the vacuum cleaner
2.
Front cuff
24
3.
Dust nozzle
Adjusting angle of dust nozzle
The angle of the dust nozzle can be adjusted by rotating
the dust nozzle.
When operating the tool without connecting a vacuum
cleaner, bring the dust nozzle downward to prevent the
operator from being exposed to sawdust.
When operating the tool with connecting a vacuum
cleaner, bring the dust nozzle upward to keep the hose
of the vacuum cleaner from getting caught in the work-
piece or the guide rail.
►
Fig.26:
1.
Dust nozzle
OPERATION
This tool is intended to cut wood products only.
Refer to our website or contact your local Makita dealer
for the correct circular saw blades to be used for the
material to be cut.
Do not use the tool without the sub base unless when
using the guide rail.
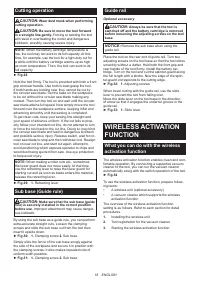
Checking blade guard function
Remove the battery cartridge.
Set the bevel angle to 0°, and then retract the lower
guard manually to the end and release it. The lower
guard is properly functioning if;
— it is retracted above the base without any hin
-
drance and;
— it automatically returns and contacts with the
stopper.
►
Fig.27:
1.
Upper guard
2.
Lower guard
3.
Base
4.
Stopper
5.
Open
6.
Close
If the lower guard is not functioning properly, check if
saw dust is accumulated inside of the upper and lower
guards. If the lower guard is not functioning properly
even after removing dust, have your tool serviced at a
Makita service center.
Содержание
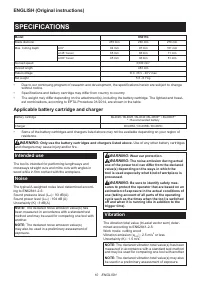
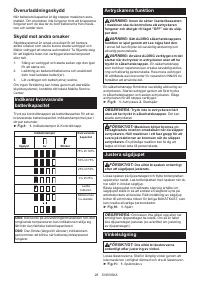
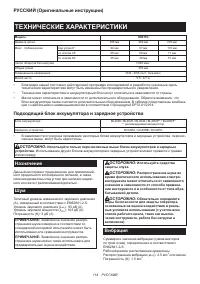
- 114 ТЕХНИЧЕСКИЕ ХАРАКТЕРИСТИКИ; Подходящий блок аккумулятора и зарядное устройство; Вибрация
- 115 МЕРЫ БЕЗОПАСНОСТИ; Сохраните брошюру с инструк
- 117 СОХРАНИТЕ ДАННЫЕ; Важные правила техники
- 119 ОПИСАНИЕ РАБОТЫ; Установка или снятие блока
- 120 Защита от перегрева; Действие выключателя
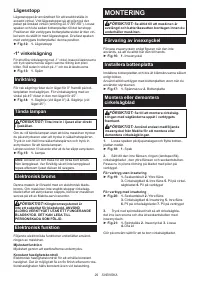
- 121 СБОРКА
- 122 Установка подосновы
- 123 ЭКСПЛУАТАЦИЯ
- 124 Подоснова (направляющая; ФУНКЦИЯ; Что позволяет делать функция
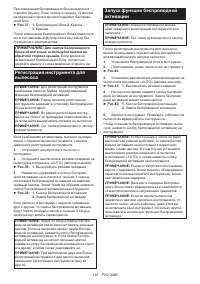
- 125 Регистрация инструмента для
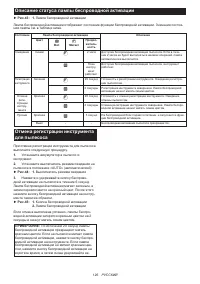
- 126 Описание статуса лампы беспроводной активации
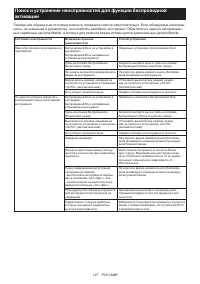
- 127 Поиск и устранение неисправностей для функции беспроводной
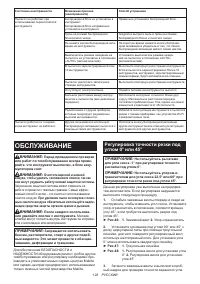
- 128 ОБСЛУЖИВАНИЕ; Регулировка точности резки под
- 129 Регулировка направляющей глубины; ДОПОЛНИТЕЛЬНЫЕ
Характеристики

Остались вопросы?Не нашли свой ответ в руководстве или возникли другие проблемы? Задайте свой вопрос в форме ниже с подробным описанием вашей ситуации, чтобы другие люди и специалисты смогли дать на него ответ. Если вы знаете как решить проблему другого человека, пожалуйста, подскажите ему :)


