Пилы дисковые Makita 2712 - инструкция пользователя по применению, эксплуатации и установке на русском языке. Мы надеемся, она поможет вам решить возникшие у вас вопросы при эксплуатации техники.
Если остались вопросы, задайте их в комментариях после инструкции.
"Загружаем инструкцию", означает, что нужно подождать пока файл загрузится и можно будет его читать онлайн. Некоторые инструкции очень большие и время их появления зависит от вашей скорости интернета.


10
Switch action
CAUTION:
• Remove workpiece from the table.
• Before plugging in the tool, always be sure that the tool
is switched off.
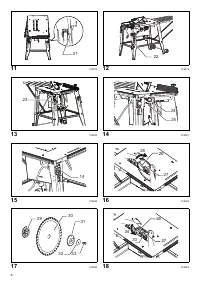
(Fig. 15)
To start the tool, press the ON (I) button.
To stop it, press the OFF (O) button or the switch cover.
ASSEMBLY
CAUTION:
• Always be sure that the tool is switched off and
unplugged before carrying out any work on the tool.
The tool is shipped from the factory with the saw blade
and blade guard not in the installed condition.
Removing or installing saw blade
CAUTION:
• Always be sure that the tool is switched off and
unplugged before installing or removing the blade.
• Use only the Makita hex wrench provided to install or
remove the blade. Failure to do so may result in
overtightening or insufficient tightening of the hex bolt.
This could cause an injury.
• Use the following saw blade. Do not use saw blades
which do not comply with the characteristics specified
in these instructions.
014540
To remove the saw blade, remove the table insert on the
table. Hold the outer flange with the wrench and loosen
the hex bolt clockwise with the hex wrench. Then remove
the outer flange.
(Fig. 16)
To install the saw blade, assemble the inner flange, saw
blade, outer flange, washer and hex bolt onto the arbor.
Make sure that the teeth of the blade are pointing down at
the front of the table.
(Fig. 17)
CAUTION:
• Keep the flange surface clean of dirt or other adhering
matter; it could cause blade slippage. Be sure that the
blade is installed so that the teeth are aligned in the
cutting (turning) direction.
To secure the blade in place, hold the outer flange with
the wrench, then tighten the hex bolt counterclockwise
with the hex wrench. BE SURE TO TIGHTEN THE HEX
BOLT SECURELY.
(Fig. 18)
CAUTION:
• Be sure to hold the hex bolt carefully with the hex
wrench. If your grip should slip, the hex wrench may
come off the hex bolt, and your hand could strike the
sharp blade edges.
Installing blade guard
CAUTION:
• Before installing the blade guard, adjust the depth of
cut to its maximum elevation.
Place the blade guard into the groove on the riving knife.
Secure the blade guard by pivoting the lever on the blade
guard.
(Fig. 19 & 20)
CAUTION:
• If the blade and riving knife are not aligned properly, a
dangerous pinching condition may result during
operation. Make sure they are properly aligned. You
could suffer serious personal injury while using the tool
without a properly aligned riving knife.
• If they are not aligned for any reasons, always have
Makita authorized service center repair it.
• Don’t remove the riving knife.
There must be a clearance of about 4 - 5 mm between the
riving knife and the blade teeth. Adjust the riving knife
accordingly and tighten the hex nut securely. Attach the
table insert on the table, then check to see that the blade
guard works smoothly before cutting.
(Fig. 21)
Installing and adjusting rip fence (Fig. 22)
Install the rip fence on the table so that the rip fence
holder engages with the guide rail. Tighten the knob of the
rip fence firmly clockwise.
(Fig. 23)
To check that the rip fence is parallel with the blade,
secure the rip fence 2 - 3 mm from the blade.
Raise the blade up to maximum elevation. Measure the
distance (A) and (B) between the rip fence and blade.
These two measurements should be identical.
If the rip fence is not parallel with the blade, proceed as
follows;
1. Loosen the knob of the rip fence.
2. Adjust the rip fence until it becomes parallel with the
blade.
3. Tighten the knob.
CAUTION:
• Make sure that the rip fence is parallel with the blade,
or a dangerous kickback condition may occur.
Connecting to vacuum cleaner (Fig. 24)
Cleaner operations can be performed by connecting the
tool to Makita vacuum cleaner or dust collector.
OPERATION
CAUTION:
• Always use “work helpers” such as push sticks and
push blocks when there is a danger that your hands or
fingers will come close to the blade.
• Always hold the workpiece firmly with the table and the
rip fence or miter gauge. Do not bend or twist it while
feeding. If the workpiece is bent or twisted, dangerous
kickbacks may occur.
• NEVER withdraw the workpiece while the blade is
running. If you must withdraw the workpiece before
completing a cut, first switch the tool off while holding
the workpiece firmly. Wait until the blade has come to a
complete stop before withdrawing the workpiece.
Failure to do so may cause dangerous kickbacks.
• NEVER remove cut-off material while the blade is
running.
• NEVER place your hands or fingers in the path of the
saw blade. Be especially careful with bevel cuts.
• Always secure the rip fence firmly, or dangerous
kickbacks may occur.
Model Dia.
Blade
thickness
Kerf
2712
315 mm
2 mm or more
2.8 mm or more
Характеристики

Остались вопросы?Не нашли свой ответ в руководстве или возникли другие проблемы? Задайте свой вопрос в форме ниже с подробным описанием вашей ситуации, чтобы другие люди и специалисты смогли дать на него ответ. Если вы знаете как решить проблему другого человека, пожалуйста, подскажите ему :)


