Перфораторы Bosch GBH 2 26 DBR - инструкция пользователя по применению, эксплуатации и установке на русском языке. Мы надеемся, она поможет вам решить возникшие у вас вопросы при эксплуатации техники.
Если остались вопросы, задайте их в комментариях после инструкции.
"Загружаем инструкцию", означает, что нужно подождать пока файл загрузится и можно будет его читать онлайн. Некоторые инструкции очень большие и время их появления зависит от вашей скорости интернета.


16
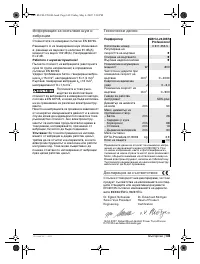
| English
1 619 929 787 • 4.5.07
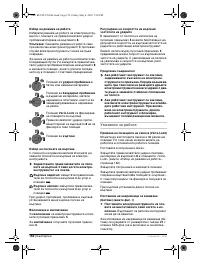
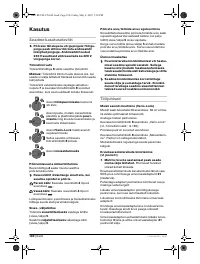
Assembly
Auxiliary Handle
¢
Operate your machine only with the auxiliary
handle 11.
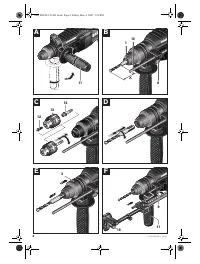
Rotating the Auxiliary Handle (see figure A)
The auxiliary handle
11
can be set to any position for
a secure and low-fatigue working posture.
Turn the bottom part of the auxiliary handle
11
in coun-
terclockwise direction and swivel the auxiliary handle
11
to the desired position. Then retighten the bottom
part of the auxiliary handle
11
by turning in clockwise
direction.
Pay attention that the clamping band of the auxiliary
handle is positioned in the groove on the housing as
intended for.
Adjusting the Drilling Depth (see figure B)
The required drilling depth
X
can be set with the
depth stop
10
.
Press the button for the depth stop adjustment
9
and
insert the depth stop into the auxiliary handle
11
.
The knurled surface of the depth stop
10
must face
downward.
Insert the SDS-plus drilling tool to the stop into the
SDS-plus tool holder
1
. Otherwise, the movability of
the SDS-plus drilling tool can lead to incorrect adjust-
ment of the drilling depth.
Pull out the depth stop until the distance between the
tip of the drill bit and the tip of the depth stop corre-
spond with the desired drilling depth
X
.
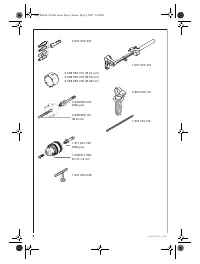
Selecting Drill Chucks and Tools
For hammer drilling and chiselling, SDS-plus tools are
required that are inserted in the SDS-plus drill chuck.
For drilling without impact in wood, metal, ceramic
and plastic as well as for screwdriving and thread cut-
ting, tools without SDS-plus are used (e. g., drills with
cylindrical shank). For these tools, a keyless chuck or
a key type drill chuck are required.
Changing the Key Type Drill Chuck
To work with tools without SDS-plus (e. g., drills with
cylindrical shank), a suitable drill chuck must be mount-
ed (key type drill chuck or keyless chuck, accessories).
Mounting the Key Type Drill Chuck
(see figure C)
Screw the SDS-plus adapter shank
14
into a key type
drill chuck
13
. Secure the key type drill chuck
13
with
the securing screw
12
.
Please observe that the
securing screw has a left-hand thread.
Inserting the Key Type Drill Chuck (see figure C)
Clean the shank end of the adapter shank and apply a
light coat of grease.
Insert the key type drill chuck with the adapter shank
into the tool holder with a turning motion until it auto-
matically locks.
Check the locking effect by pulling the key type drill
chuck.
Removing the Key Type Drill Chuck
Push the locking sleeve
3
toward the rear and pull out
the key type drill chuck
13
.
Changing the Tool
The dust protection cap
2
largely prevents the entry of
drilling dust into the tool holder during operation.
When inserting the tool, take care that the dust pro-
tection cap
2
is not damaged.
¢
A damaged dust protection cap should be
changed immediately. We recommend hav-
ing this carried out by an after-sales service.
Inserting SDS-plus Drilling Tools (see figure D)
The SDS-plus drill chuck allows for simple and con-
venient changing of drilling tools without the use of
additional tools.
Clean and lightly grease the shank end of the tool.
Insert the tool in a twisting manner into the tool holder
until it latches itself.
Check the latching by pulling the tool.
As a requirement of the system, the SDS-plus drilling
tool can move freely. This causes a certain radial run-
out at no-load, which has no effect on the accuracy of
the drill hole, as the drill bit centres itself upon drilling.
Removing SDS-plus Drilling Tools (see figure E)
Push back the locking sleeve
3
and remove the tool.
Inserting Drilling Tools without SDS-plus
Note:
Do not use tools without SDS-plus for hammer
drilling or chiselling! Tools without SDS-plus and their
drill chucks are damaged by hammer drilling or chisel-
ling.
Insert a key type drill chuck
13
(see “Changing the
Key Type Drill Chuck”, page 16).
Open the key type drill chuck
13
by turning until the
tool can be inserted. Insert the tool.
Insert the chuck key into the corresponding holes of
the key type drill chuck
13
and clamp the tool uni-
formly.
Turn the mode selector switch
8
to the “drilling” posi-
tion.
Removing Drilling Tools without SDS-plus
Turn the sleeve of the key type drill chuck
13
with the
drill chuck key in anticlockwise direction until the drill-
ing tool can be removed.
OBJ_BUCH-370-001.book Page 16 Friday, May 4, 2007 5:30 PM


