Навигаторы Garmin VHF_300 - инструкция пользователя по применению, эксплуатации и установке на русском языке. Мы надеемся, она поможет вам решить возникшие у вас вопросы при эксплуатации техники.
Если остались вопросы, задайте их в комментариях после инструкции.
"Загружаем инструкцию", означает, что нужно подождать пока файл загрузится и можно будет его читать онлайн. Некоторые инструкции очень большие и время их появления зависит от вашей скорости интернета.


6
VHF 300 Инструкция по установке
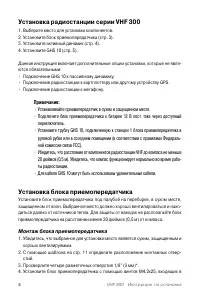
Подключение антенны к блоку приемопередатчика:
1. Установите антенну на борту вашего судна в соответствии с инструкциями про-
изводителя антенны.
2. Подключите антенну в порт антенны на блоке приемопередатчика.
ПРИМЕЧАНИЕ: Порт антенны расположен на противоположной стороне блока приемопередат-
чика относительно основного ряда коннекторов, показанных на стр. 4.
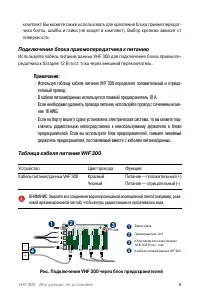
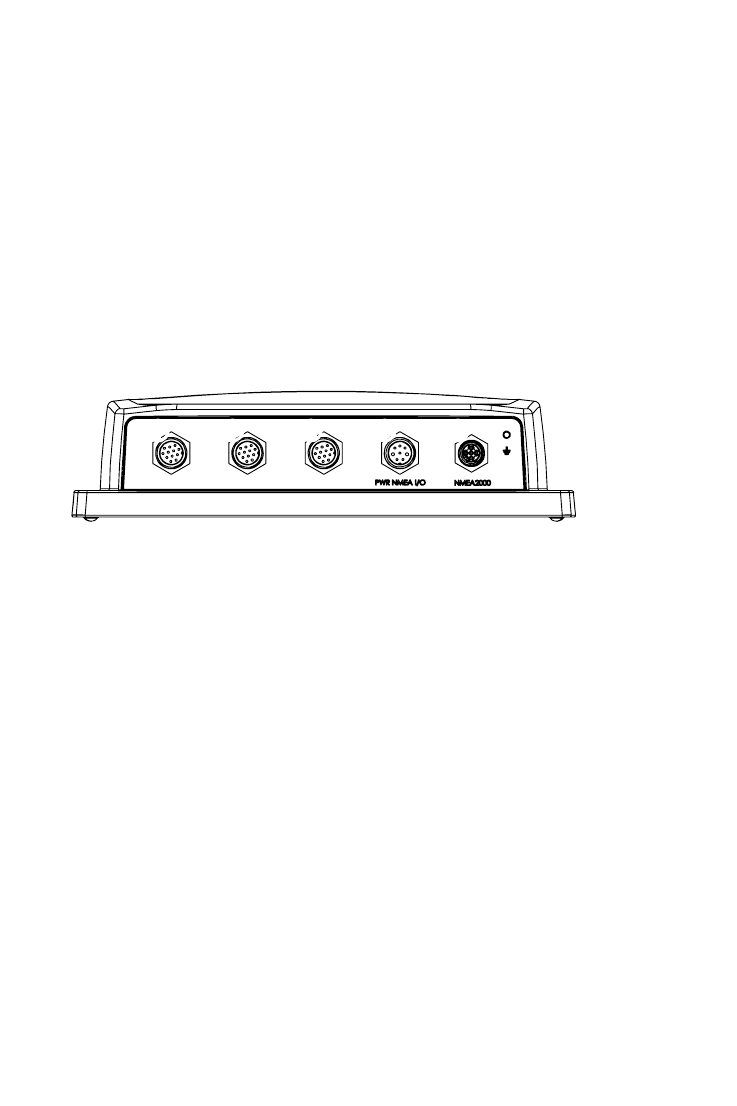
Идентификация коннекторов блока приемопередатчика
VHF 300
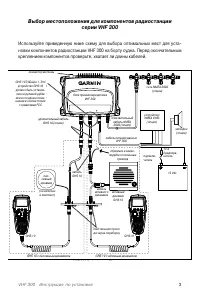
Используйте приведенный ниже рисунок для идентификации коннекторов, рас-
положенных на блоке приемопередатчика VHF 300.
Рис. Коннекторы блока приемопередатчика VHF 300
1 – Коннектор расширения GHS 10
2 – HS-1 – основной коннектор GHS 10; трубка GHS 10 в рулевой рубке должна быть
подключена к этому коннектору.
3 – Коннектор кабеля питания/данных VHF 300
4 – Коннектор NMEA 2000 (опция)
Порт антенны — с обратной стороны, не показан
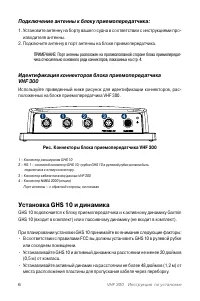
Установка GHS 10 и динамика
GHS 10 подключается к блоку приемопередатчика и к активному динамику Garmin
GHS 10 (входит в комплект) или к пассивному динамику (не входит в комплект).
При планировании установки GHS 10 принимайте во внимание следующие факторы:
• В соответствии с правилами FCC вы должны установить GHS 10 в рулевой рубке
или соседнем помещении.
• Устанавливайте GHS 10 и активный динамик на расстоянии не менее 20 дюймов
(0,5 м) от компаса.
• Устанавливайте активный динамик на расстоянии не более 48 дюймов (1,2 м) от
места расположения пластины для пропускания кабеля через переборку.
VHF 300 Series Installation Instructions
* A
1
/
8
in. (3 mm) pilot hole is nominal for plywood. Different dashboard materials my require a different size pilot hole.
Identifying the VHF 300 Transceiver Box Connectors
Use the illustration to identify the connectors on the VHF 300 transceiver box.
➊
GHS 10 expansion connector
➋
HS-1—primary GHS 10 connector
the wheelhouse GHS 10 must connect to
this port
➌
VHF 300 power/data cable connector
➍
NMEA 000 connector (optional)
Antenna port (on back - not pictured)
➊
➋
➌
➊
➍
VHF 300 Transceiver Box Connectors
Installing the GHS 10 and Speaker
The GHS 10 connects to the transceiver box and to either the Garmin GHS 10 active speaker (included) or a passive speaker (not included).
When planning the GHS 10 installation, consider the following:
Per FCC law, you must install the GHS 10 in the wheelhouse or an adjacent room.
Install the GHS 10 and the active speaker at least 20 in. (.5 m) from any compass.
Install the active speaker within 48 in. (1.2 m) of the location you mount the bulkhead pass-through plate.
Consult the VHF 300 Series Layout Diagram on
page 2
to determine how to connect the GHS 10 through a bulkhead to a speaker and to the
transceiver box.
If the cable is not long enough to reach the GHS 10 mounting location from the transceiver box, extension cables are available in lengths of
16 ft. (5 m) and 32 ft. (10 m). Install any extensions between the GHS 10 cable and the transceiver box according to the layout diagram on
page 2
.
When you install the GHS 10 active speaker, if you use the GHS 10 cable to connect the active speaker to the transceiver box, do not
connect a passive speaker to the GHS 10 cable. Clip and tape the passive speaker wires.
Installing the GHS 10 Active Speaker
1. Use the GHS 10 active speaker Flush Mount Template to mount the active speaker. The template is self-adhesive.
2. Remove the paper backing from the template and adhere it to the bulkhead in a suitable location.
3. Use a 3
1
/
2
in. (90 mm) hole saw to cut the opening as indicated on the template.
4. Place the speaker in the cutout.
5. Ensure that the mounting screw locations align with
the holes marked on the template. If they do not,
mark the locations of new pilot holes.
6. Drill four
1
/
8
in. (3 mm) pilot holes* in the correct
location.
7. Use the included M4.2×25 screws to mount the
active speaker.
8. Snap the cover plates on the active speaker.
9. To install the active speaker wiring harness to the
transceiver box, use the GHC 10 cable according to
the layout diagram on
page 2
.
Do not connect a passive speaker to the GHC 10
cable you use with the active speaker. Clip and tape the two passive speaker wires.
If the GHC 10 cable is not long enough to reach the transceiver box location, install an extension (not included) between the GHC 10
cable and the transceiver box as shown on the layout diagram on
page 2
.
10. To install the active speaker wiring harness though the bulkhead, follow the procedures on
page 5
.
•
•
•
•
•
•
•
•
➊
➋
➌
➍
➊
Cover plates (
×
)
➋
M.×5 screws (×)
➌
Active speaker
➍
Bulkhead
Mounting the Active Speaker
➊
➋
➌
➍
➊
Cover plates (
×
)
➋
M.×5 screws (×)
➌
Active speaker
➍
Bulkhead
Mounting the Active Speaker
Содержание
- 2 VHF 300 Инструкция по установке; Правила безопасности; Установка антенны и воздействие электромагнитной энергии; Необходимые инструменты
- 3 Installing your VHF 300 Series Radio; Выбор местоположения для компонентов радиостанции
- 4 Установка радиостанции серии VHF 300; • Для кабеля GHS 10 могут быть использованы удлинительные кабели.; Установка блока приемопередатчика; Монтаж блока приемопередатчика; хорошо вентилируемым.
- 5 Подключение блока приемопередатчика к питанию; Installing the Transceiver Box; Mounting the Transceiver Box; to determine mounting holes.; Connecting the Transceiver Box to Power; remove the in-line fuse holder supplied with the power/data cable.; Boat ground; Connecting an Antenna to the Transceiver Box:; Note; Рис. Подключение VHF 300 через блок предохранителей
- 6 Подключение антенны к блоку приемопередатчика:; Подключите антенну в порт антенны на блоке приемопередатчика.; Рис. Коннекторы блока приемопередатчика VHF 300; Установка GHS 10 и динамика; или соседнем помещении.; Identifying the VHF 300 Transceiver Box Connectors; VHF 300 Transceiver Box Connectors; Installing the GHS 10 and Speaker; When planning the GHS 10 installation, consider the following:; Installing the GHS 10 Active Speaker; Mounting the Active Speaker
- 7 GHS 10 через переборку к динамику и к блоку приемопередатчика.; Установка активного динамика; установки активного динамика. Шаблон имеет клейкую сторону.; Рис.Монтаж активного динамика
- 8 Таблица кабеля питания GHS 10
- 9 динамика) и пропустите коннектор через пластину.; Installing the Bulkhead Pass-Through Plate; Connecting the GHS 10; Connecting the VHF 300 Series Radio to a Chartplotter (Optional); Рис. Установка пластины для пропускания кабеля через переборку; Установка держателя GHS 10; Подключение GHS 10; Подключение радиостанции серии VHF 300
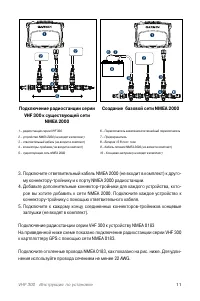
- 10 Подключение радиостанции серии VHF 300 к сети; стральному кабелю существующей сети NMEA 2000.
- 11 му коннектору-тройнику и к порту NMEA 2000 радиостанции.; Подключение радиостанции серии
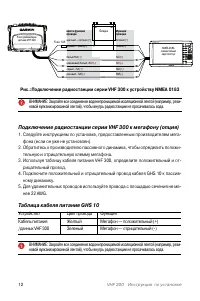
- 12 Подключение радиостанции серии VHF 300 к мегафону (опция)
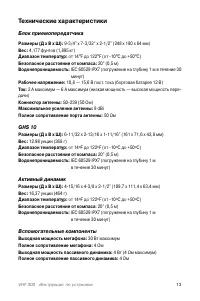
- 13 Технические характеристики; Блок приемопередатчика; А максимум — 6 А максимум (низкая мощность — высокая мощность пере-; Активный динамик; 0 Вт максимум
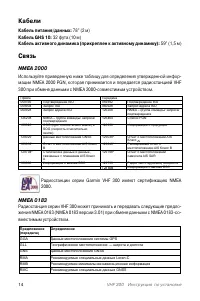
- 14 Связь; Связь
- 16 © 2010 Garmin Ltd. или дочерние компании


