
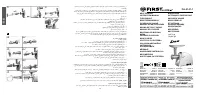
Мясорубки First FA-5141-1 - инструкция пользователя по применению, эксплуатации и установке на русском языке. Мы надеемся, она поможет вам решить возникшие у вас вопросы при эксплуатации техники.
Если остались вопросы, задайте их в комментариях после инструкции.
"Загружаем инструкцию", означает, что нужно подождать пока файл загрузится и можно будет его читать онлайн. Некоторые инструкции очень большие и время их появления зависит от вашей скорости интернета.


4
5
ENGLISH
short lengths. The tubes can then be stuffed with a minced meat mixture, the ends pinched
together and then deep fried.
MAKING SAUSAGES
1. Mince the meat
Insert the worm shaft into the cutter housing, the plastic end first. (fig. 11)
Place the separator in the cutter housing.
Place the sausage horn on the cutter housing and screw the ring on the cutter housing.
(Make sure the notches of the separator fit onto the projections of the mincer head.)
2. Attach the cutter housing to the motor unit.
3. Place the tray on the upright part of the cutter housing.
4. Now the appliance is ready for making sausages.
Put the ingredients in the tray. Use the pusher to gently push the meat into the cutter housing.
Put the sausage skin in lukewarm water for 10 minutes. Then slide the wet skin onto the sausage
horn. Push the (seasoned) minced meat into the cutter housing. If the skin gets stuck onto the
sausage horn, wet it with some water.
TOMATO JUICER
ASSEMBLING
(fig. B)
1. Place the plastic screw locking ring into the sleeve. (fig. B1)
2. Place the gauze into the sleeve next to the plastic screw locking ring. (fig. B2)
3. Put the fixing ring through the sleeve and make it at the end of the sleeve. (fig. B3)
4. Place the snake into the head, long end first, and turn to feed the snake slightly until it is set
into the motor housing. (fig. B4)
5. Insert the shaft of the snake into the central axis of the screw. (fig. B5)
6. Put the whole sleeve along with the fixing ring through the screw, then move the fixing ring
clockwise so that it being fastened tightly. (fig. B6)
7. Put the plastic juice tray through the sleeve and make it on the suitable position. (fig. B7)
8. Insert the plastic screw into the hole of the sleeve, then move it clockwise until it is properly
fastened. Then place the plastic cover onto the sleeve. (fig. B8)
Now the appliance is ready for juicing.
HOW TO CLEAN YOUR APPLIANCES
Meat left behind in the cutter housing may be removed from the inside of the appliance by
passing a slice of bread through the cutter housing.
1. Before you clean the appliance, switch the appliance off and remove the plug from the
socket. (fig. 12)
2. Press the release button and turn the whole cutter housing in the direction of the arrow.
Remove the pusher and the tray. (fig. 13)
3. Unscrew the screw ring and remove all parts of the cutter housing. Do not clean the parts in
the dishwasher!
4. Wash all parts that have come into contact with meat in hot soapy water. Clean them
immediately after use.
5. Rinse them with clear hot water and dry them immediately.
6. We advise you to lubricate the cutter unit and the grinding discs with some vegetable oil.
TECHNICAL CHARACTERISTICS
220-240V • 50/60Hz • 300W Nominal/1200W Maximal
Environment friendly disposal
You can help protect the environment! Please remember to respect the local regulations: hand in
the non-working electrical equipments to an appropriate waste disposal center.
FLEISCHWOLF
BEDIENUNGSANLEITUNG
Anleitungen bitte aufmerksam lesen und aufbewahren
AUFBAU
(Abb. A)
EINLEITUNG
Dieses Gerät ist mit einem Thermoschalter ausgestattet. Er schaltet das Gerät bei Überhitzung
aus.
Falls das Gerät plötzlich stehen bleibt:
1. Ziehen Sie den Netzstecker.
2. Schalten Sie das Gerät aus.
3. Lassen Sie das Gerät für 60 Minuten abkühlen.
4. Stecken Sie den Netzstecker wieder in die Steckdose.
5. Schalten Sie das Gerät wieder ein.
Bitte wenden Sie sich an Ihren Fachhändler oder den autorisierten Kundendienst, falls der Über-
hitzungsschutz mehrfach das Gerät ausschaltet.
Bei Netzanschluss leuchtet die Statusanzeige auf.
VORSICHT:
Schließen Sie das Gerät keinesfalls über eine Zeitschaltuhr an, um Gefahren zu
vermeiden.
SICHERHEITSHINWEISE
1. Lesen Sie vor Gebrauch alle Anleitungen aufmerksam durch und sehen Sie sich die Abbil-
dungen an.
2. Bewahren Sie die Bedienungsanleitung für späteres Nachschlagen auf.
3. Vergewissern Sie sich, dass Ihre Netzspannung mit den Angaben auf dem Typenschild über-
einstimmt.
4. Benutzen Sie keine Zubehörteile von Drittherstellern. Im Schadenfall erlischt hierdurch Ihr
Garantieanspruch.
5. Benutzen Sie das Gerät nicht mit beschädigtem Netzkabel oder Stecker.
6. Ein beschädigtes Netzkabel muss von einem autorisierten Kundendienst ausgetauscht wer-
den, um Gefahren zu vermeiden.
7. Vor Erstgebrauch reinigen Sie bitte alle Teile gründlich, die mit Lebensmitteln in Berührung
kommen.
8. Nach Benutzung ziehen Sie bitte den Netzstecker.
9. Stopfen Sie Zutaten keinesfalls mit den Fingern oder Küchenutensilien in den Einfülltrichter.
Benutzen Sie ausschließlich den mitgelieferten Stopfer.
10. Bewahren Sie das Gerät außerhalb des Zugriffs von Kindern auf.
11. Lassen Sie das Gerät während des Betriebs nicht unbeaufsichtigt.
12. Schalten Sie das Gerät aus, bevor Sie Zubehörteile anbauen oder abnehmen.
13. Warten Sie ab, bis alle beweglichen Teile zum Stillstand gekommen sind, bevor Sie Zubehör-
teile anbauen oder abnehmen.
14. Tauchen Sie die Motoreinheit nicht in Wasser oder sonstige Flüssigkeiten ein, spülen Sie das
Gerät nicht unter fließendem Wasser ab. Benutzen Sie zum Reinigen der Motoreinheit nur
ein feuchtes Tuch.
1. Gerätegehäuse
2. ON/0/R (EIN/AUS/Rücklauf)
3. Richtungsumschalter
4. Entriegelung
5. Anschluss
6. Stopfer
7. Fülltablett
8. Einfüllstutzen und Gehäuse für
Schneidwerk
9. Schnecke
10. Messer
11. Feiner Locheinsatz
12. Mittlerer Locheinsatz
13. Grober Locheinsatz
14. Verschlussring
15. Wurstfüllaufsatz
16. Kebbeaufsatz
17. Tomaten-Püriereinsatz
DEUTSCH
Характеристики

Остались вопросы?Не нашли свой ответ в руководстве или возникли другие проблемы? Задайте свой вопрос в форме ниже с подробным описанием вашей ситуации, чтобы другие люди и специалисты смогли дать на него ответ. Если вы знаете как решить проблему другого человека, пожалуйста, подскажите ему :)


