
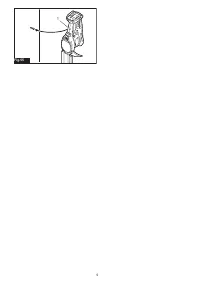
Кусторезы Makita DUM604ZX - инструкция пользователя по применению, эксплуатации и установке на русском языке. Мы надеемся, она поможет вам решить возникшие у вас вопросы при эксплуатации техники.
Если остались вопросы, задайте их в комментариях после инструкции.
"Загружаем инструкцию", означает, что нужно подождать пока файл загрузится и можно будет его читать онлайн. Некоторые инструкции очень большие и время их появления зависит от вашей скорости интернета.


15 ENGLISH
WARNING:
Never disable the lock function or
tape down the lock-off button.
NOTICE:
Do not pull the switch trigger forcibly
without pressing the lock-off button.
The switch
may break.
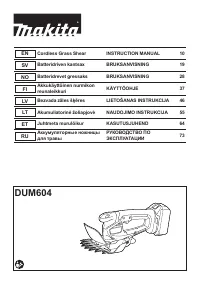
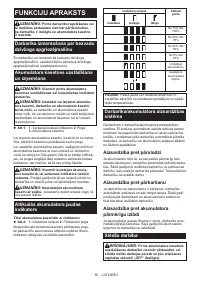
►
Fig.3:
1.
Switch trigger
2.
Lock-off button
To start the tool, depress the lock-off button and pull the
switch trigger. Release the switch trigger to stop. The
lock-off button can be pressed from either the right or
left side.
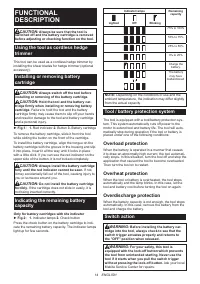
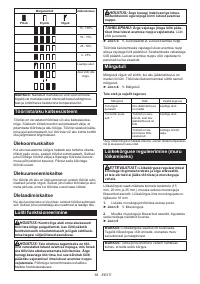
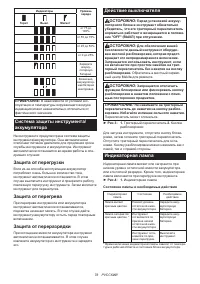
Indicator lamp
The indicator lamp blinks or lights up when the remain
-
ing battery capacity is low or empty. The indicator lamp
also lights up when the tool becomes overloaded.
►
Fig.4:
1.
Indicator lamp
Lamp status and action to be taken
Indicator lamp
Status
Action to be taken
The lamp blinks
red.
The remaining
battery capacity
is low.
Charge the battery.
The lamp lights up
red. *
The tool has
stopped because
the remaining
battery capacity is
empty.
Charge the battery.
The tool has
stopped due to
overload.
Turn off the tool.
* The time at which the indicator lamp lights up varies depending
on the temperature around the work area and the battery car
-
tridge conditions.
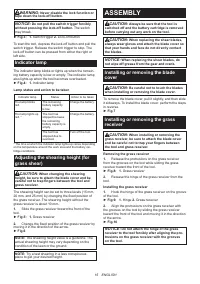
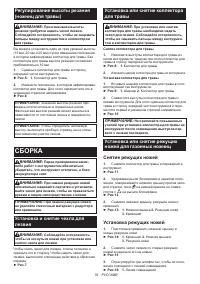
Adjusting the shearing height (for
grass shear)
CAUTION:
When changing the shearing
height, be sure to attach the blade cover and be
careful not to trap fingers between the tool and
grass receiver.
The shearing height can be set to three levels (15 mm,
20 mm, and 25 mm) by changing the fixed position of
the grass receiver. The shearing height without the
grass receiver is about 10 mm.
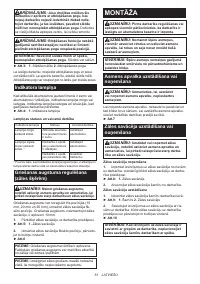
1.
Slide the grass receiver toward the front of the
tool.
►
Fig.5:
1.
Grass receiver
2.
Change the fixed position of the grass receiver by
moving it in the direction of the arrow.
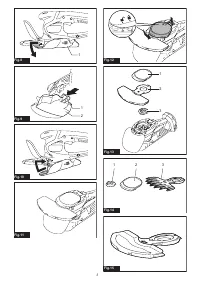
►
Fig.6
NOTE:
The shearing height value is a guideline. The
actual shearing height may vary depending on the
condition of the lawn or the ground.
NOTE:
Try a test shearing in a less conspicuous
place to get your desired height.
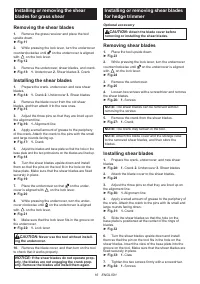
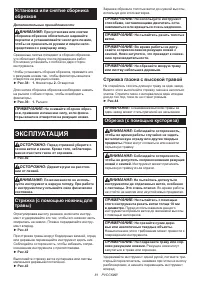
ASSEMBLY
CAUTION:
Always be sure that the tool is
switched off and the battery cartridge is removed
before carrying out any work on the tool.
CAUTION:
When replacing the shear blades,
always wear gloves and attach the blade cover so
that your hands and face do not directly contact
the blades.
NOTICE:
When replacing the shear blades, do
not wipe off grease from the gear and crank.
Installing or removing the blade
cover
CAUTION:
Be careful not to touch the blades
when installing or removing the blade cover.
To remove the blade cover, pull it slightly, and then slide
it sideways. To install the blade cover, perform the steps
in reverse.
►
Fig.7
Installing or removing the grass
receiver
CAUTION:
When installing or removing the
grass receiver, be sure to attach the blade cover
and be careful not to trap your fingers between
the tool and grass receiver.
Removing the grass receiver
1.
Release the protrusions on the grass receiver
from the grooves on the tool while sliding the grass
receiver toward the front of the tool.
►
Fig.8:
1.
Grass receiver
2.
Release the hinge of the grass receiver from the
tool.
Installing the grass receiver
1.
Hook the hinge of the grass receiver on the groove
of the tool.
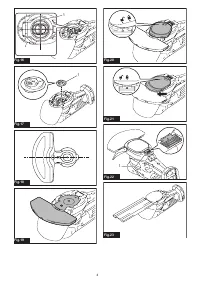
►
Fig.9:
1.
Hinge
2.
Grass receiver
2.
Align the protrusions on the grass receiver with
the grooves on the tool by sliding the grass receiver
toward the front of the tool and moving it in the direction
of the arrow.
►
Fig.10
NOTICE:
Do not attach the hinge of the grass
receiver to the tool forcibly after aligning the pro
-
trusions on the grass receiver with the grooves
on the tool.
Содержание
- 73 ТЕХНИЧЕСКИЕ ХАРАКТЕРИСТИКИ; Символы; Назначение
- 74 МЕРЫ БЕЗОПАСНОСТИ; Сохраните брошюру с инструк
- 75 СОХРАНИТЕ ДАННЫЕ; Правила техники безопасности
- 76 Важные правила техники
- 77 ОПИСАНИЕ РАБОТЫ
- 78 Система защиты инструмента/
- 79 СБОРКА; Снятие режущих ножей
- 80 Установка или снятие режущих; Снятие режущих ножниц
- 81 Установка или снятие сборника; ЭКСПЛУАТАЦИЯ; Стрижка (с помощью ножниц для
- 82 ОБСЛУЖИВАНИЕ; Очистка инструмента; ДОПОЛНИТЕЛЬНЫЕ
Характеристики

Остались вопросы?Не нашли свой ответ в руководстве или возникли другие проблемы? Задайте свой вопрос в форме ниже с подробным описанием вашей ситуации, чтобы другие люди и специалисты смогли дать на него ответ. Если вы знаете как решить проблему другого человека, пожалуйста, подскажите ему :)


