
Компрессоры ABAC Pole Position L25P 1129100042 - инструкция пользователя по применению, эксплуатации и установке на русском языке. Мы надеемся, она поможет вам решить возникшие у вас вопросы при эксплуатации техники.
Если остались вопросы, задайте их в комментариях после инструкции.
"Загружаем инструкцию", означает, что нужно подождать пока файл загрузится и можно будет его читать онлайн. Некоторые инструкции очень большие и время их появления зависит от вашей скорости интернета.


G
B
11
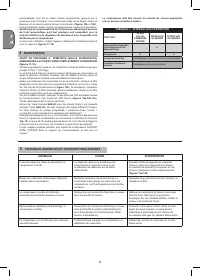
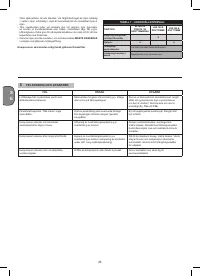
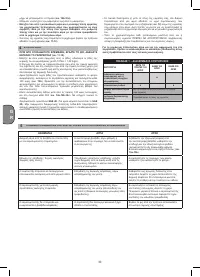
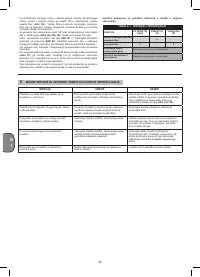
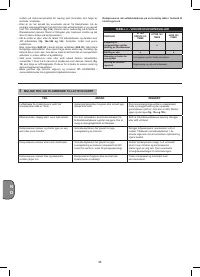
PRECAUTIONS
1
An ACOUSTIC PRESSURE value of 4 m. corresponds to the ACOUSTIC
POWER value stated on the yellow label located on the compressor,
minus 20 dB.
THINGS TO DO
•
The compressor must be used in a suitable environment (well
ventilated with an ambient temperature of between +5°C and +40°C)
and never in places affected by dust, acids, vapors, explosive or
flammable gases
.
•
Always maintain a safety distance of at least 4 meters between the
compressor and the work area.
•
Any coloring of the belt guards of the compressor during painting operations
indicates that the distance is too short.
•
Insert the plug of the electric cable in a socket of suitable shape, voltage
and frequency complying with current regulations.
•
Use extension cables with a maximum length of 5 meters and of suitable
cross-section.
• The use of extension cables of different length and also of adapters and
multiple sockets should be avoided.
•
Always use the switch of the pressure switch to switch off the compressor
• Always use the handle to move the compressor.
•
When operating, the compressor must be placed on a stable, horizontal
surface to guarantee correct lubrication.
THINGS
NOT
TO DO
• Never direct the jet of air towards persons, animals or your body. (Always
wear safety goggles to protect your eyes against flying objects that may be
lifted by the jet of air).
•
Never direct the jet of liquids sprayed by tools connected to the compressor
towards the compressor.
• Never use the appliance with bare feet or wet hands or feet.
•
Never pull the power cable to disconnect the plug from the socket or to
move the compressor.
• Never leave the appliance exposed to adverse weather conditions.
• Never transport the compressor with the receiver under pressure.
• Do not weld or machine the receiver. In the case of faults or rusting, replace
the entire receiver.
• Never allow inexpert persons to use the compressor. Keep children and
animals at a distance from the work area.
• This appliance is not intended for use by persons (including children) with
reduced physical, sensory or mental capabilities, or lack of experience
and knowledge, unless they have been given supervision or instruction
concerning the use of the appliance by a person responsible for their
safety.
• Children should be supervised to ensure that they do not play with the
appliance.
• Do not position flammable or nylon/fabric objects closed to and/or on the
compressor.
• Never clean the compressor with flammable liquids or solvents. Check that
you have unplugged the compressor and clean with a damp cloth only.
• The compressor must be used only for air compression. Do not use the
compressor for any other type of gas.
• The compressed air produced by the compressor cannot not be used
for pharmaceutical, food or medical purposes except after particular
treatments and cannot be used to fill the air bottles of scuba divers.
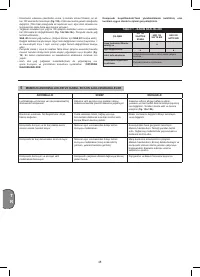
THINGS YOU SHOULD KNOW
•
To avoid overheating of the electric motor, this compressor is
designed for intermittent operation as indicated on the technical
dataplate (for example, S3-25 means 2.5 minutes ON, 7.5 minutes
OFF). In the case of overheating, the thermal cutout of the motor
trips, automatically cutting off the power when the temperature is
too high. The motor restarts automatically when normal temperature
conditions are restored
.
• To facilitate restart of the compressor, in addition to the operations
indicated, it is important to return the button of the pressure switch to the
OFF position and then to ON again (
figures 1-2
).
• Single-phase versions are fitted with a pressure switch equipped with a
delayed closing air discharge valve which facilitates start-up of the motor.
Therefore venting of air from this valve for a few seconds with the receiver
empty is normal.
•
All the compressors are fitted with a safety valve that is tripped in the case
of malfunctioning of the pressure switch in order to assure machine safety.
• The red notch on the pressure gauge refers to the maximum operating
pressure of the tank. It does not refer to the adjusted pressure.
• When fitting a tool, the flow of air in output must be switched off.
•
When using compressed air, you must know and comply with the safety
precautions to be adopted for each type of application (inflation, pneumatic
tools, painting, washing with water-based detergents only, etc.).
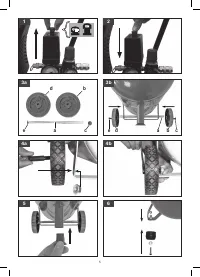
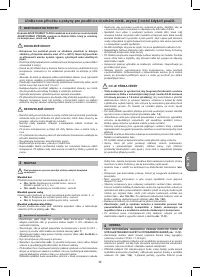
ASSEMBLY
2
You must fully assemble the appliance before using it for the first time.
Fitting the wheels
Fit the supplied wheels as shown in Fig. 3 and 4:
●
Fig. 3a & 3b
: Assembly of wheel kit - version A
Assembly by sequence: a, b, c, d, e
●
Fig. 4a & 4b
: Assembly of wheel kit - version B
Fitting the rubber foot
Fit the supplied rubber stopper as shown in Fig. 5 and 6.
●
Fig. 5
: fitting the rubber foot - version A
●
Fig. 6
: fitting the rubber foot - version B
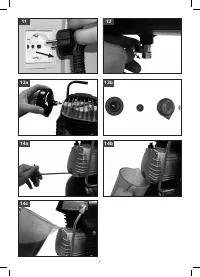
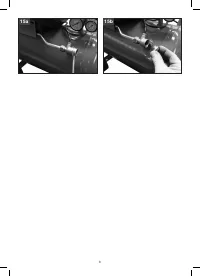
Fitting the air filter
Remove the transportation stop with a screwdriver or similar and screw the
air filter securely to the equipment (
Fig. 13a
).
START-UP AND USE
3
•
Check for correspondence between the compressor plate data with the
actual specifications of the electrical system. A variation of
±
10% with
respect of the rated value is allowed.
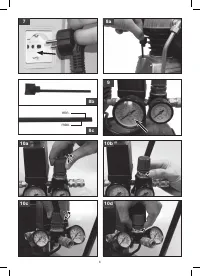
• Insert the plug of the power cable in a suitable socket (
fig. 7
) checking that
the button of the pressure switch located on the compressor is in the OFF
«O» position.
• Check the oil level using the rod included in the oil fuel plug (
figures
8a-8b-8c
), and if necessary top up.
• At this point, the compressor is ready for use.
• Operating on the switch of the pressure switch (
fig. 1
), the compressor
starts, pumping air into the receiver through the delivery pipe.
• When the upper calibration value (set by the manufacturer) has been
reached, the compressor stops, venting the excess air present in the
head and in the delivery pipe through a valve located under the pressure
switch.
This facilitates subsequent restart due to the absence of pressure in the
head. When air is used, the compressor restarts automatically when the
lower calibration value is reached (2 bar between upper and lower).
• The pressure in the receiver can be checked on the gauge provided (
fig.
9
).
• The compressor continues to operate according to this automatic cycle
until the switch of the pressure switch is turned.
• Always wait at least 10 seconds from when the compressor has been
switched off before restarting this.
• All compressors are fitted with a pressure reducer. Operating on the knob
with the tap open (turning it in a clockwise direction to increase the pressure
and in a counterclockwise direction to reduce this,
fig. 10a
and
fig. 10c
),
air pressure can be regulated so as to optimize use of pneumatic tools.
After setting the value required,
the ring-nut underneath must be tightened
to fasten the knob (
fig. 10b
and
fig. 10d
).
• The value set can be checked on the gauge.
•
Please check that the air consumption and the maximum working
pressure of the pneumatic tool to be used are compatible with the
pressure set on the pressure regulator and with the amount of air
supplied by the compressor.
•
Always pull out the plug and drain the receiver once you have completed
your work (
figures 11-12
).
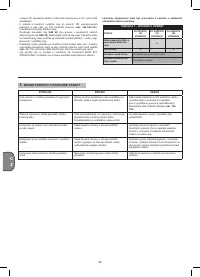
MAINTENANCE
4
•
BEFORE CARRYING OUT ANY OPERATION, ALWAYS PULL OUT THE
PLUG AND DRAIN THE RECEIVER COMPLETELY (figures 11-12).
• Check that all screws (in particular those of the head of the unit) are tightly
drawn up (torque 10 Nm = 1.02 Kgm).
The control must be performed before the first start-up of the compressor
and subsequently before the first intensive use in order to restore the
correct closing torque value modified as a result of heat expansion.
•
After loosening any safety screws, clean the intake filter according to the
Preserve this handbook for future reference


