
Кофеварка VITEK VT-1525 - инструкция пользователя по применению, эксплуатации и установке на русском языке. Мы надеемся, она поможет вам решить возникшие у вас вопросы при эксплуатации техники.
Если остались вопросы, задайте их в комментариях после инструкции.
"Загружаем инструкцию", означает, что нужно подождать пока файл загрузится и можно будет его читать онлайн. Некоторые инструкции очень большие и время их появления зависит от вашей скорости интернета.


9
ENGLISH
It is important that milk for making foam is fresh
and without additives, is not so-called long stor-
age milk.
Take usual whole milk with fat status from 4%
to 6%, cream fat status should be not less than
10%.
–
Prepare the coffee maker as described
above, it is not necessary to install the filter
holder (17).
–
Place a cup of suitable height and capacity on
the tray (1) grid (2).
–
Direct the cappuccinator pipe (14) into the
cup using the cappuccinator pipe angle
adjustment bar (12).
–
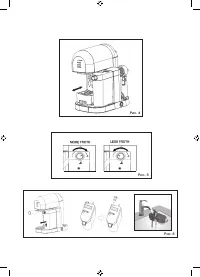
Turn the frothed milk supply (intensity) control
knob (13) to the right (in this position it pro-
duces more frothed milk).
–
Switch the coffee maker on by setting the
power switch (8) «0/I» to the position «I», the
operating mode buttons (5, 6, 7) indicators
will light up and start flashing.
–
When the coffee maker is ready for operation,
the light indicators of control buttons (5, 6, 7)
will glow constantly.
–
Press and hold the button (7) «Cappuccinо»
for 3 seconds, the indicators «
» and «
»
will light up.
–
After making the necessary amount of frothed
milk stop the milk frothing by pressing the but-
ton (7) «Cappuccinо» again.
–
Remove the cup with frothed milk and use the
frothed milk for the intended purpose.
–
After the coffee maker operation is finished,
switch the coffee maker off by setting the
switch (8) to the position «0».
–
If there is some milk or cream left in the con-
tainer (15) after the milk frothing, you can
remove the container (15) with the cappucci-
nator (11) and put it in the fridge.
–
If you used all the milk, it is recommended to
remove the container (15), the cappuccina-
tor (11) and wash it (see «Cleaning the cap-
puccinator»).
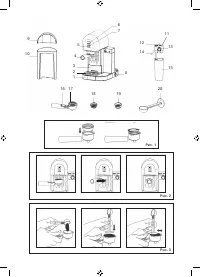
CLEANING THE CAPPUCCINATOR (11)
We recommend cleaning the cappuccinator (11)
after the milk container (15) is empty.
–
Take the container (15), pull it towards you
and remove, remove the cappuccinator (11)
from the container (15).
–
Wash the container (15) with a neutral deter-
gent, remove the intake pipe from the cap-
puccinator (11) and wash it, rinse all the parts,
dry them and install the pipe back to its place.
–
Turn the steam nozzle counterclockwise to
the position «
» and remove it from the cap-
puccinator (11) body (pic. 6), wash the nozzle.
–
Set the cappuccinator pipe angle adjust-
ment bar (12) in vertical position, take the bar
(12) and the pipe (14), slightly sway and pull
towards yourself, remove the cappuccinator
pipe (14) and wash it.
–
Lift the silicon gasket on the left, wash the
cappuccinator (11) under a warm water jet
(pic. 6), close the silicon gasket.
–
Install the cappuccinator pipe (14) back to
its place, install the steam nozzle back to its
place and turn it clockwise to the position
«
» (pic. 6).
–
Prepare the coffee maker as described in the
chapters above, but do not add ground coffee
into the filter (18 or 19).
–
Place a cup of suitable height and capacity on
the grid (2).
–
Fill the container (15) with water, do not
exceed the maximal level mark.
–
Install the cappuccinator (11) on the container
(15), install the container (15) on the installa-
tion place until the lock clicking.
–
Direct the cappuccinator pipe (14) into the
cup using the cappuccinator pipe angle
adjustment bar (12).
–
Turn the frothed milk supply (intensity) con-
trol knob (13) to the right until bumping « ».
–
Switch the coffee maker on by setting the
power switch (8) «0/I» to the position «I», the
operating mode buttons (5, 6, 7) indicators
will light up and start flashing.
–
When the coffee maker is ready for operation,
the light indicators of control buttons (5, 6, 7)
will glow constantly.
–
Press and hold the button (5) «Latte» for
3 seconds, the indicators «
» and «
» will
light up.
–
After the coffee maker operation is finished,
switch the coffee maker off by setting the
switch (8) to the position «0».
–
Wait until the coffee maker cools down, take
the container (15), pull it towards you and
remove, remove the cappuccinator (11) from
the container (15).
–
Drain the remaining water from the container
(15), wipe the container (15) with dry cloth,
dry the cappuccinator (11).
Содержание
- 13 ПЕРЕД ПЕРВЫМ ИСПОЛЬЗОВАНИЕМ
- 14 упора «; КАК ПРАВИЛЬНО ВЫБРАТЬ ОБЪЁМ ЧАШКИ
- 16 », после начала выхода пара, нажмите; » мигнут 5 раз, и кофеварка вернётся; Возврат к заводским настройкам:
- 17 вправо до упора «; ПРИГОТОВЛЕНИЕ МОЛОЧНОЙ ПЕНКИ
- 18 » и выньте его из кор-; УДАЛЕНИЕ НАКИПИ
- 19 ЧИСТК А КОФЕВАРКИ; Произведите чистку устройства.
- 20 Неисправности, их причины и методы устранения
- 48 RUS


