
Кофеварка VITEK VT-1525 - инструкция пользователя по применению, эксплуатации и установке на русском языке. Мы надеемся, она поможет вам решить возникшие у вас вопросы при эксплуатации техники.
Если остались вопросы, задайте их в комментариях после инструкции.
"Загружаем инструкцию", означает, что нужно подождать пока файл загрузится и можно будет его читать онлайн. Некоторые инструкции очень большие и время их появления зависит от вашей скорости интернета.


10
ENGLISH
–
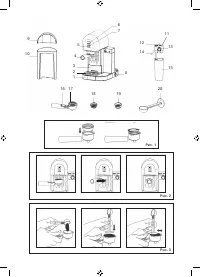
Before assembling make sure that the cap-
puccinator (11) and the container (15) are dry.
Install the cappuccinator (11) on the container
(15) and install the container (15) on the cof-
fee maker.
DESCALING
Scale inside the boiler affects the taste of ready
coffee, slows down the coffee making and
reduces the service life of the coffee maker.
Note that the thicker the scale, the more difficult it
is to remove, that’s why we recommend removing
scale every 2-3 months and when using «hard»
water – more often for effective operation of the
coffee maker.
–
The control buttons (5, 6, 7) light indicators
flashing by rotation will notify you about des-
caling.
–
You can use special descaling agents for
espresso coffee makers or coffee machines
to remove scale.
–
Follow the instructions on the usage of the des-
caling agent, pour it into the water tank (10).
–
Install one of the coffee filters (18 or 19) into
the filter holder (17) matching the ledge on the
filter (18 or 19) with the hole on the holder (17)
and turn the filter (18 or 19) counter/clock-
wise (pic. 1).
–
Place a cup of suitable height and capacity on
the grid (2).
–
Direct the cappuccinator pipe (14) into the cup
using the cappuccinator pipe angle adjust-
ment bar (12).
–
Insert the power plug into the mains socket.
–
Switch the coffee maker on by setting the
power switch (8) «0/I» to the position «I», the
operating mode buttons (5, 6, 7) indicators will
light up and start flashing.
–
When the coffee maker is ready for operation,
the light indicators of control buttons (5, 6, 7)
will glow constantly.
–
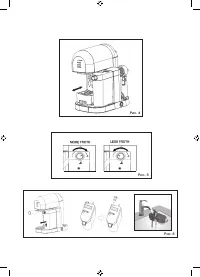
To switch the cleaning mode on press the but-
tons (5 and 6) «Latte» and «Espresso» simul-
taneously.
–
In the descaling mode the light indicators
slowly flash by rotation, after 30 minutes
the light indicators will start flashing faster.
Remove the container (10), drain the remain-
ing descaling solution and fill the container
(10) with clean water. Install the container (10)
back to its place.
–
Pour the descaling solution out from the cup,
place the cup on the grid (2).
–
Simultaneously press the buttons (5 and 6)
«Latte» and «Espresso» to continue cleaning of
the coffee maker. In approximately 30 minutes
the coffee maker cleaning will be finished, and
the coffee maker will switch to the standby
mode, all control buttons (5, 6, 7) light indica-
tors will be glowing.
Notes:
–
You can temporarily switch the descaling
notification off by pressing any button (5, 6,
7) and, for instance, make coffee. After the
coffee making the coffee maker will remind
you about descaling again with flashing light
indicators.
–
do not delay descaling for a long time and per-
form it as soon as possible.
CLEANING THE COFFEE MAKER
–
Switch the coffee maker off, unplug it and wait
until it cools down completely.
–
Clean the coffee maker body with a soft,
slightly damp cloth and then wipe it dry.
–
Do not use solvents, metal brushes or abra-
sives to clean the coffee maker.
–
You can wash the coffee filters (18, 19) in a
dishwashing machine.
–
If the openings are blocked with the rest of
ground coffee, you can clean them with a
small brush.
–
Do not immerse the coffee maker body, the
power cord and the power plug into water or
other liquids.
–
Wash the water and milk tanks with warm
water and soft detergent, then dry them.
–
Slightly lift the front part of the tray (1) and
remove it, pour the water out of it, remove the
grid (2) from the tray (1), wash the tray (1) and
the grid (2) with water and neutral detergent,
dry them and install back to their places.
STORAGE
–
Before taking the unit away for storage, unplug
it and let the unit cool down completely.
–
Clean the unit.
–
Do not leave, use and keep the coffee maker
in places with the temperature below 0°C.
–
For easy storing you can place the filter holder
(17) and one of the filters (18 or 19) on the rear
part of the coffee maker body (pic. 4).
–
Keep the unit in a dry cool place out of reach
of children and
–
disabled persons.
Содержание
- 13 ПЕРЕД ПЕРВЫМ ИСПОЛЬЗОВАНИЕМ
- 14 упора «; КАК ПРАВИЛЬНО ВЫБРАТЬ ОБЪЁМ ЧАШКИ
- 16 », после начала выхода пара, нажмите; » мигнут 5 раз, и кофеварка вернётся; Возврат к заводским настройкам:
- 17 вправо до упора «; ПРИГОТОВЛЕНИЕ МОЛОЧНОЙ ПЕНКИ
- 18 » и выньте его из кор-; УДАЛЕНИЕ НАКИПИ
- 19 ЧИСТК А КОФЕВАРКИ; Произведите чистку устройства.
- 20 Неисправности, их причины и методы устранения
- 48 RUS


