
Кофеварка VITEK VT-1525 - инструкция пользователя по применению, эксплуатации и установке на русском языке. Мы надеемся, она поможет вам решить возникшие у вас вопросы при эксплуатации техники.
Если остались вопросы, задайте их в комментариях после инструкции.
"Загружаем инструкцию", означает, что нужно подождать пока файл загрузится и можно будет его читать онлайн. Некоторые инструкции очень большие и время их появления зависит от вашей скорости интернета.


5
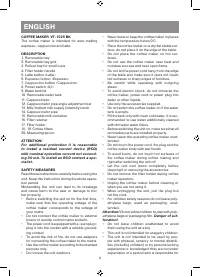
ENGLISH
their safety or if they are not instructed by this
person on the usage of the unit.
•
From time to time check the power cord and
the power plug integrity.
•
Do not use the unit if the coffee maker body,
the power cord or the power plug is damaged.
If the power cord is damaged, it should be
replaced by the manufacturer, a maintenance
service or similar qualified personnel to avoid
danger.
•
Do not attempt to repair the unit. Do not dis-
assemble the unit by yourself, if any malfunc-
tion is detected or after it was dropped, unplug
the unit and apply to any authorized service
center from the contact address list given in
the warranty certificate and on the website
www.vitek.ru.
•
Transport the unit in the original package only.
•
Keep the unit in a dry cool place out of reach of
children and disabled persons.
THIS UNIT IS INTENDED FOR HOUSEHOLD USE
ONLY. ITS COMMERCIAL USAGE AND USAGE
IN PRODUCTION AREAS AND WORK SPACES IS
PROHIBITED.
BEFORE THE FIRST USE
After unit transportation or storage at low
temperature keep it for at least three hours at
room temperature before switching on.
–
Unpack the coffee maker and remove any
advertising stickers that can prevent the unit
operation.
–
Make sure that operating voltage of the cof-
fee maker corresponds to the voltage of your
mains.
–
Before using the coffee maker for the first
time, wash all removable parts (1, 2, 9, 10, 11,
15, 17, 18, 19, 20) with warm water and neutral
detergent and dry them.
BEFORE USING THE UNIT
Note: - if you switch the coffee maker on and
don’t perform any actions, the coffee maker will
switch off in 15 minutes. To switch the coffee
maker on press any button (5, 6, 7).
–
The coffee maker should be placed out of
reach of small children.
–
Place the coffee maker on a steady flat heat-
resistant surface, the distance from the side
walls of the coffee maker should be at least
20 cm, and the gap above the coffee maker
should be at least 30 cm.
–
Do not place the coffee maker under kitchen
shelves or cupboards. They can be damaged
by the steam released during the coffee maker
operation.
Attention! Before making coffee we recommend
washing the boiler and the cappuccinator (11).
–
Make sure that the removable tray (1) and the
tray grid (2) are installed to their places.
–
Remove the lid (9), remove the water tank
(10).
–
Fill the tank (10) with cold water, do not exceed
the maximal level mark, install the tank (10)
back to its place.
Note: - the tank (10) is intended for water only,
do not fill the tank (10) with other liquids, such
as milk.
–
Take the container (15), pull it towards you and
remove, remove the cappuccinator (11) from
the container (15).
–
Fill the container (15) with water, do not
exceed the maximal level mark «MAX».
Note: - the cappuccinator container (15) is
intended for milk only, do not fill the container
(15) with other liquids, use water only in the cap-
puccinator (11) washing mode.
–
Install the cappuccinator (11) on the container
(15), install the container (15) on the installa-
tion place until the lock clicking.
Note: - after installing the container (15) back to
its place always check if it is installed and fixed
properly.
–
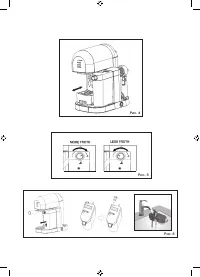
Set the milk supply intensity control knob (13)
to the middle position.
–
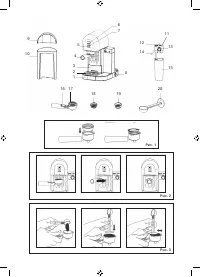
Install one of the coffee filters (18 or 19) into
the filter holder (17) matching the ledge on the
filter (18 or 19) with the hole on the holder (17)
and turn the filter (18 or 19) counter/clock-
wise (pic. 1). Do not add ground coffee into
the filter (18 or 19) when preparing the coffee
maker for work.
–
Install the filter holder (17) into the installation
place «
» and turn the knob (4) to the right
until bumping «
» (pic. 2).
–
Place a cup of suitable height (with capacity no
less than 300 ml) on the grid (2).
–
Direct the cappuccinator pipe (14) into the cup
using the cappuccinator pipe angle adjust-
ment bar (12).
–
Insert the power plug into the mains socket.
–
Switch the coffee maker on by setting the
power switch (8) «0/I» to the position «I», the
operating mode buttons (5, 6, 7) indicators will
light up and start flashing.
Содержание
- 13 ПЕРЕД ПЕРВЫМ ИСПОЛЬЗОВАНИЕМ
- 14 упора «; КАК ПРАВИЛЬНО ВЫБРАТЬ ОБЪЁМ ЧАШКИ
- 16 », после начала выхода пара, нажмите; » мигнут 5 раз, и кофеварка вернётся; Возврат к заводским настройкам:
- 17 вправо до упора «; ПРИГОТОВЛЕНИЕ МОЛОЧНОЙ ПЕНКИ
- 18 » и выньте его из кор-; УДАЛЕНИЕ НАКИПИ
- 19 ЧИСТК А КОФЕВАРКИ; Произведите чистку устройства.
- 20 Неисправности, их причины и методы устранения
- 48 RUS


