
Холодильник Liebherr CBN 3956 Premium - инструкция пользователя по применению, эксплуатации и установке на русском языке. Мы надеемся, она поможет вам решить возникшие у вас вопросы при эксплуатации техники.
Если остались вопросы, задайте их в комментариях после инструкции.
"Загружаем инструкцию", означает, что нужно подождать пока файл загрузится и можно будет его читать онлайн. Некоторые инструкции очень большие и время их появления зависит от вашей скорости интернета.
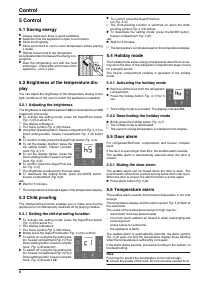
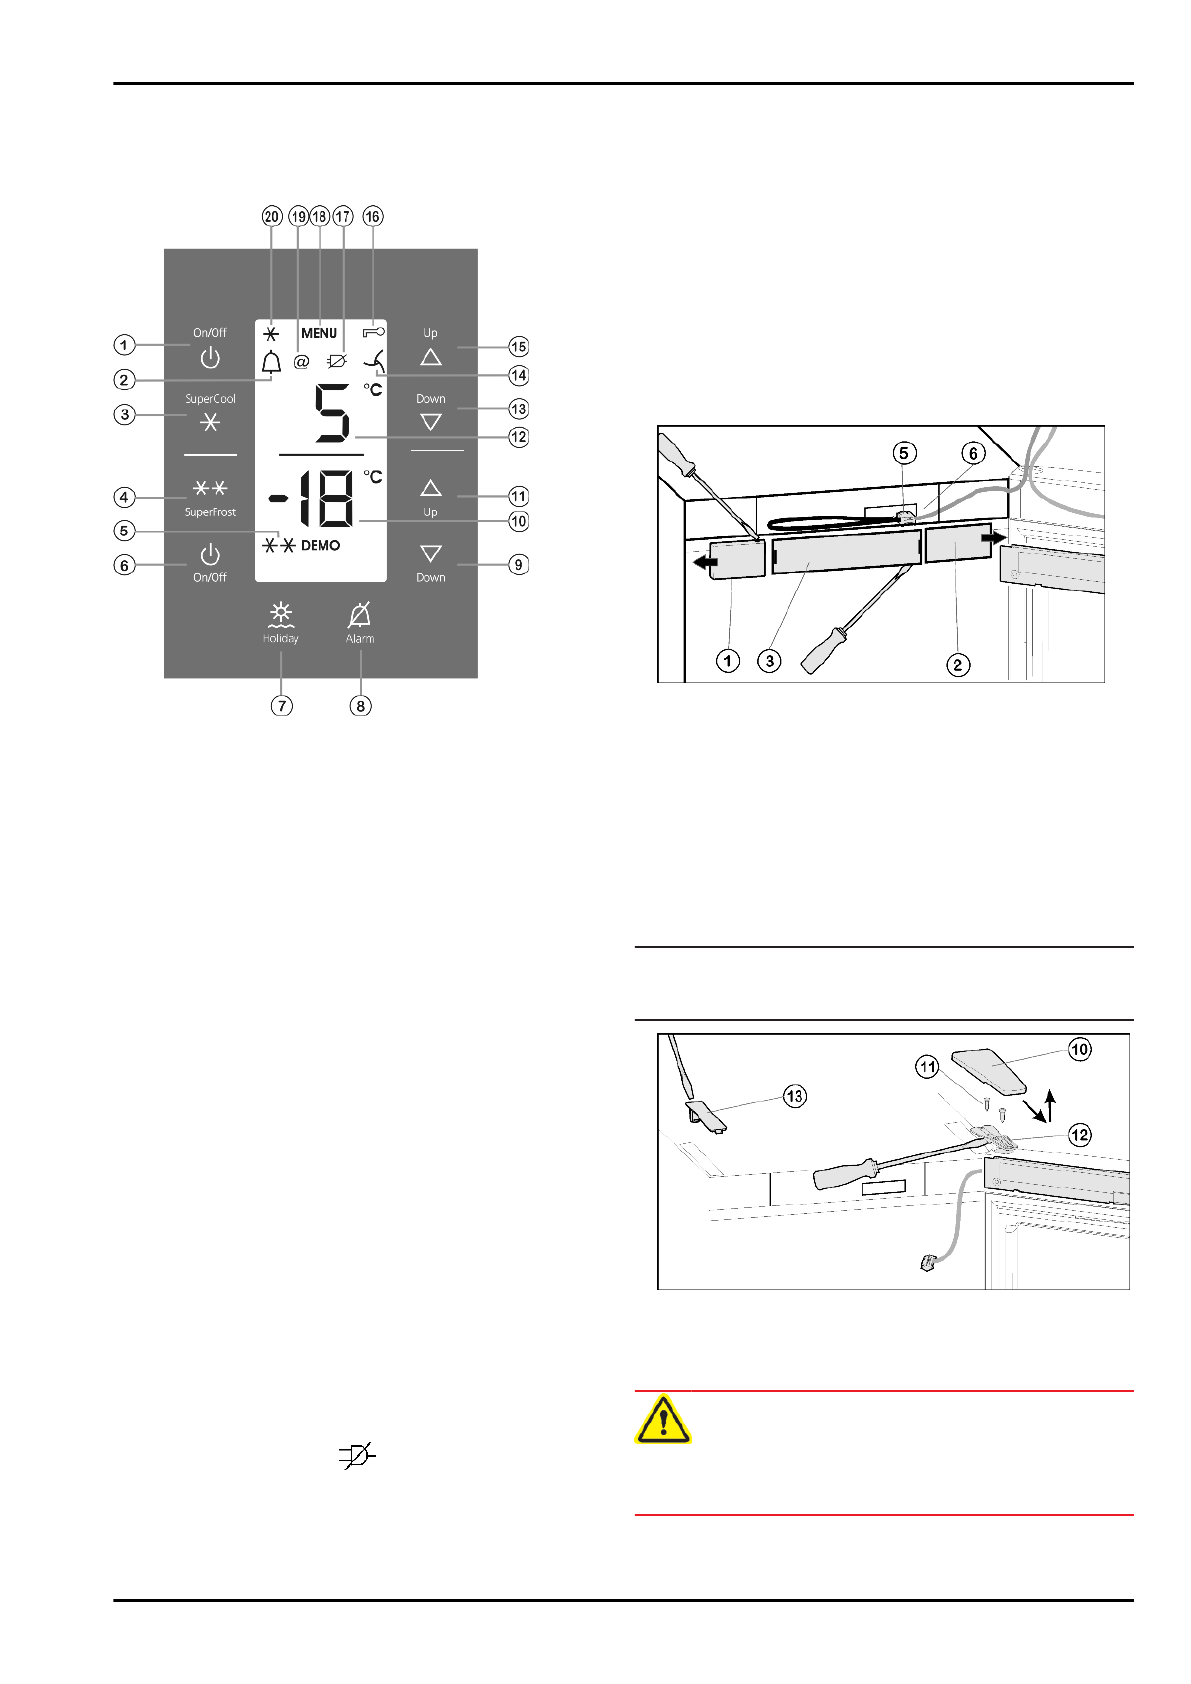
3 Controls and displays
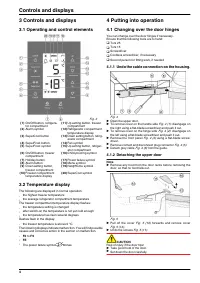
3.1 Operating and control elements
Fig. 3
(1) On/Off button, refrigera-
tor compartment
(11) Up setting button, freezer
compartment
(2) Alarm symbol
(12) Refrigerator compartment
temperature display
(3) SuperCool button
(13) Down setting button, refrig-
erator compartment
(4) SuperFrost button
(14) Fan symbol
(5) SuperFrost symbol
(15) Up setting button, refriger-
ator compartment
(6) On/Off button, freezer
compartment
(16) Child-proofing symbol
(7) Holiday button
(17) Power failure symbol
(8) Alarm button
(18) Menu symbol
(9) Down setting button,
freezer compartment
(19) Net@Home symbol
(10) Freezer compartment
temperature display
(20) SuperCool symbol
3.2 Temperature display
The following are displayed in normal operation:
-
the highest freezer temperature
-
the average refrigerator compartment temperature
The freezer compartment temperature display flashes:
-
the temperature setting is changed
-
after switch-on the temperature is not yet cold enough
-
the temperature has risen several degrees
Dashes flash in the display:
-
the freezer temperature is above 0 °C.
The following displays indicate malfunction. You will find possible
causes and corrective action in the section on malfunction.
-
F0 to F9
-
FE
-
The power failure symbol
shines.
4 Putting into operation
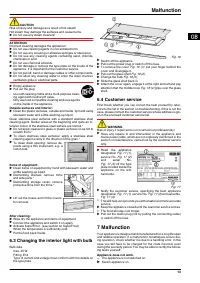
4.1 Changing over the door hinges
You can change over the door hinges if necessary.
Ensure that the following tools are to hand:
q
Torx 25
q
Torx 15
q
Screwdriver
q
Cordless screwdriver, if necessary
q
Second person for fitting work, if needed
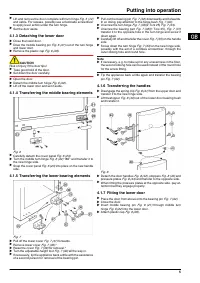
4.1.1 Undo the cable connection on the housing.
Fig. 4
u
Open the upper door.
u
To remove cover on the handle side
Fig. 4 (1): disengage on
the right using a flat-blade screwdriver and push it out.
u
To remove cover on the hinge side
Fig. 4 (2): disengage on
the left using a flat-blade screwdriver and push it out.
u
Remove the front panel
Fig. 4 (3) using a flat-blade screw-
driver.
u
Remove contact and disconnect plug connector
Fig. 4 (5).
u
Detach grey cable
Fig. 4 (6) from the guide.
4.1.2 Detaching the upper door
Note
u
Remove any food from the door racks before removing the
door, so that no food falls out.
Fig. 5
u
Pull off the cover
Fig. 5 (10) forwards and remove cover
Fig. 5 (13).
u
Undo the screws
Fig. 5 (11).
CAUTION
Risk of injury if the door tips!
u
Take good hold of the door.
u
Set down the door carefully.
Controls and displays
4
Характеристики

Остались вопросы?Не нашли свой ответ в руководстве или возникли другие проблемы? Задайте свой вопрос в форме ниже с подробным описанием вашей ситуации, чтобы другие люди и специалисты смогли дать на него ответ. Если вы знаете как решить проблему другого человека, пожалуйста, подскажите ему :)


