Хлебопечки Saturn ST-EC7773 Elara - инструкция пользователя по применению, эксплуатации и установке на русском языке. Мы надеемся, она поможет вам решить возникшие у вас вопросы при эксплуатации техники.
Если остались вопросы, задайте их в комментариях после инструкции.
"Загружаем инструкцию", означает, что нужно подождать пока файл загрузится и можно будет его читать онлайн. Некоторые инструкции очень большие и время их появления зависит от вашей скорости интернета.

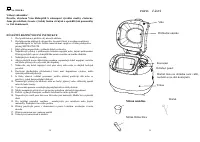

6
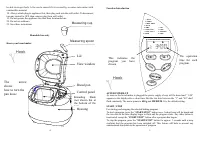
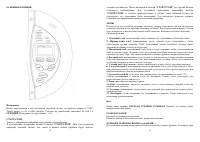
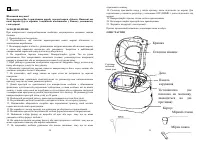
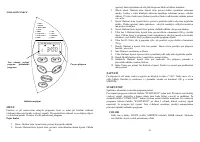
MENU
It is used to set different programs. Each time it is pressed (accompanied by a short beep)
that the program will vary. Press the button continuously the 12 menus will be cycled to
show on the LCD display. Select your desired program. The functions of 12 menus will be
explained below.
1.
Basic
: kneading, rise and baking normal bread. You may also add ingredients to add
flavor.
2.
French
: kneading, rise and baking with a longer rise time. The bread baked in this
menu usually will have a crisper crust and light texture.
3.
Whole wheat
: kneading, rise and baking of whole wheat bread. This setting has
longer preheat time to allow the grain to soak up the water and expand. It is not
advised to use the delay function as this can produce poor results.
4.
Quick
: kneading, rise and baking loaf with baking soda or baking powder. Bread
baked on this setting is usually smaller with a dense texture.
5.
Sweet
: kneading, rise and baking the sweat bread. For baking the crisp and sweet
bread.
6.
Ultra fast-I
: kneading, rise and baking 450 g loaf in a shortest time. Usually the
bread made is smaller and rougher than that made with
Quick
program.
7.
Ultra fast-II
: the same as above, but applicable for 750 g loaf.
8.
Dough
: kneading and rise, but without baking. Remove the dough and shaping it to
make bread rolls, pizza, steamed bread, etc.
9.
Jam
: boiling jams and marmalades.
10.
Cake
: kneading, rise and baking, rise with soda or baking powder.
11.
Sandwich
: kneading, rise and baking sandwich. For baking light texture bread with
a thinner crust.
12.
Bake
: only baking, no kneading and rise. Also used to increase the baking time on
selected settings
COLOR
With the button you can select a
LIGHT
,
MEDIUM
or
DARK
color for the crust. Press
this button to select your desired color.
LOAF SIZE
Press this button to select the Loaf size of the bread. Please note the total operation time
may vary with the different loaf size.
DELAY (TIME +
or
TIME -
)
If you want the appliance do not start working immediately you can use this button to set
the delay time.
You must decide how long it will be before your bread is ready by pressing the “
TIME
+
”or “
TIME -
”. Please note the delay time should include the baking time of program.
That is, at the completion of delay time, there is hot bread can be serviced. At first the
program and degree of browning must be selected, then pressing “
TIME+
” or “
TIME-
”
to increase or decrease the delay time at the increment of 10 minutes. The maximum delay
7
is 13 hours.
Example
: Now it is 8:30p.m,if you would like your bread to be ready in the next morning
at 7 o’clock, i.e. in 10 hours and 30 minutes. Select your menu, color, loaf size then press
the
TIME+
or
TIME -
to add the time until 10:30 appears on the
LCD
. Then press the
STOP/START
button to activate this delay program. You can see the dot flashed and
LCD
will count down to show the remaining time. You will get fresh bread at 7:00 in the
morning, If You don’t want to take out the bread immediately, the keeping warm time of
1hour starts.
Note: For time delayed baking, do not use any easily perishable ingredients such as eggs,
fresh milk, fruits, onions, etc.
KEEP WARM
Bread can be automatically kept warm for 60 minutes after baking. If you would like to
take the bread out, switch the program off with the
START/STOP
button.
MEMORY
If the power supply has been broken off during the course of bread making, the process of
bread making will be continued automatically within 15 minutes, even without pressing
Start/stop button. If the break time exceeds 15 minutes the memory cannot be kept and the
bread maker must be restarted
,
But if the dough is no further than the kneading phase
when the power supply breaks off, you can press the “
START/STOP”
straight to continue
the program from the beginning .
ENVIRONMENT
The machine may work well in a wide range of temperatures, but there could be a
difference in loaf size between a very warm room and a very cold room. We suggest the
room temperature should be between 15 and 34.
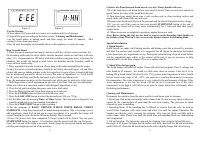
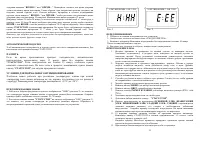
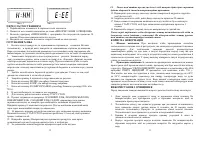
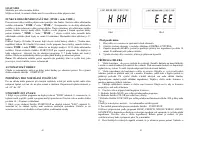
WARNING DISPLAY
:
1. If the display shows “
H:HH
” after the program has been started, (see below figure1) the
temperature inside is still too high. Then the program has to be stopped. Open the lid and
let the machine cool down for 10 to 20 minutes.
2. If the display shows “
E:EE
” after you have pressed
START/STOP
, (see below figure2)
the temperature sensor is disconnected please check the sensor carefully by Authorized
expert.

