
Газонокосилки Ryobi 4-in-1 RLM46175S 5133002553 - инструкция пользователя по применению, эксплуатации и установке на русском языке. Мы надеемся, она поможет вам решить возникшие у вас вопросы при эксплуатации техники.
Если остались вопросы, задайте их в комментариях после инструкции.
"Загружаем инструкцию", означает, что нужно подождать пока файл загрузится и можно будет его читать онлайн. Некоторые инструкции очень большие и время их появления зависит от вашей скорости интернета.


English
8
WARNING
When servicing, use only authorised replacement parts.
Use of any other parts may create a hazard or cause
product damage.
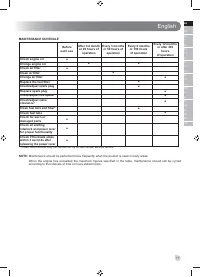
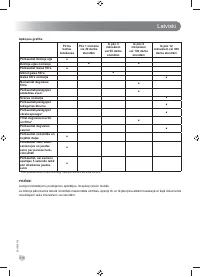
GENERAL MAINTENANCE
You may make adjustments and repairs described here.
For other repairs, contact the authorised service agent.
■
Avoid using solvents when cleaning plastic parts. Most
plastics are susceptible to damage from various types
of commercial solvents and may be damaged by their
use. Use clean cloths to remove dirt, dust, oil, grease,
etc.
■
Periodically check all nuts and bolts for proper tightness
to ensure safe operation of the product.
■
Remove any buildup of grass and leaves on or around
the engine and engine cover. Occasionally wipe the
mower clean with a dry cloth. Do not use water.
■
Frequently check the grass catcher for wear or
deterioration.
WARNING
Do not, at any time, let brake
fl
uids, gasoline, petroleum-
based products, penetrating oils, etc. come in contact
with plastic parts. Chemicals can damage, weaken, or
destroy plastic which may result in serious personal
injury.
CLEANING THE UNDERSIDE OF THE MOWER DECK
1. Raise the mower to full height.
2. Connect a female water hose connector (not supplied)
to the male hose connector on the mower deck.
3. Turn on the water supply.
4. Start the mower and run at full revolutions, but do not
engage the self-propel bail.
5. Run the engine in place for approximately 30 seconds.
6. Shut off the engine.
7. Turn off the water supply.
8. Inspect the underside of the mower deck for cleanliness,
and repeat the cleaning procedure if desired.
LUBRICATION
All of the bearings in the product are lubricated with a
suf
fi
cient amount of high grade lubricant for the life of the
product under normal operating conditions. Therefore, no
further bearing lubrication is required.
WARNING
Always protect hands by wearing heavy gloves or wrapping
the cutting edges of the blade with rags and other material,
or both, when performing blade maintenance. Contact
with the blade could result in serious personal injury.
REPLACING THE CUTTING BLADE
See figure 12.
When making adjustments, be careful not to entrap your
fi
ngers between moving blades and
fi
xed parts of the
product.
For best results, the mower blade must be kept sharp.
Immediately replace a bent or damaged blade.
WARNING
Only use replacement blades approved by the
manufacturer of the product. Using a blade not approved
by the manufacturer of the product is hazardous and
could result in serious injury, damage to the product, and
will void your warranty.
WARNING
Drain the fuel
fi
rst before tilting the product to replace
the blade.
1. Stop the engine and disconnect the spark plug wire.
Allow the blade to come to a complete stop.
2. Turn the product on its side (air
fi
lter facing up).
3. Wedge a block of wood between the blade and the
mower deck to prevent the blade from turning.
●
Installing: See figure 12a.
●
Removing: See figure 12b.
NOTE:
Do not wedge the block of wood between the
blade and the plastic cover.
4. Using a 16 mm wrench or socket (not provided), loosen
the blade bolt by turning the bolt in a counterclockwise
direction as viewed from the bottom of the product.
5. Remove the blade bolt, spring washer, and blade.
6. Place the new blade on the shaft. Make sure it is
installed with the curved ends pointing up toward the
mower deck and not down toward the ground.
7. Replace the spring washer, and blade bolt on the shaft.
Finger tighten the bolt by turning in a clockwise direction
as viewed from the bottom of the product.
NOTE:
Ensure all parts are replaced in the exact order
in which they were removed.
8. Torque the blade bolt down using a torque wrench (not
provided) to ensure the bolt is properly tightened.
9. The recommended torque for the blade bolt is 40–45
Nm.
NOTE:
Do not sharpen the blades; replace with new
item. Blades need to be properly balanced to avoid
damage and personal injury.
CLEANING THE AIR FILTER
See figure 13.
For proper performance and long life, keep the air
fi
lter
clean.
1. Remove the air
fi
lter cover by pushing down the latch
while gently pulling out the cover.
2. Remove the air
fi
lter and clean it in warm soapy water.
Rinse and let dry completely.


