
Гайковерты Makita TL065DZ - инструкция пользователя по применению, эксплуатации и установке на русском языке. Мы надеемся, она поможет вам решить возникшие у вас вопросы при эксплуатации техники.
Если остались вопросы, задайте их в комментариях после инструкции.
"Загружаем инструкцию", означает, что нужно подождать пока файл загрузится и можно будет его читать онлайн. Некоторые инструкции очень большие и время их появления зависит от вашей скорости интернета.


9 ENGLISH
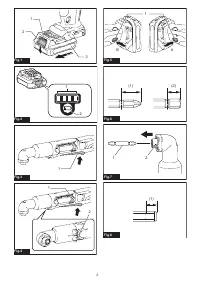
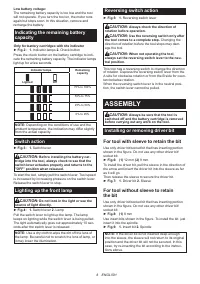
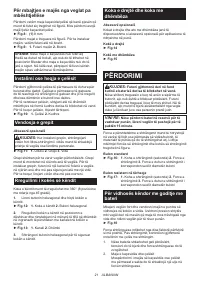
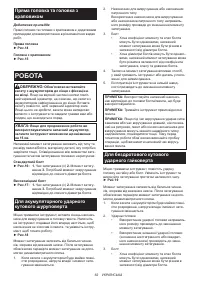
Installing or removing socket
Always use the correct size socket for bolts and nuts.
An incorrect size socket will result in inaccurate and
inconsistent fastening torque and/or damage to the bolt
or nut.
To install the socket, push it onto the anvil of the tool
until it locks into place. To remove the socket, simply
pull it off.
►
Fig.10:
1.
Socket
2.
Anvil
Installing hook
Optional accessory
CAUTION:
When installing the hook, tighten the
screw firmly. Failure to do so may cause the breakage
of the tool or personal injury.
►
Fig.11:
1.
Groove
2.
Hook
3.
Screw
The hook is convenient for temporarily hanging the tool.
This can be installed on either side of the tool. To install
the hook, insert it into a groove in the tool housing on
either side and then secure it with a screw. To remove,
loosen the screw and then take it out.
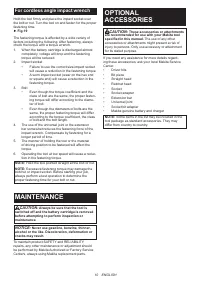
Adjusting the angle head
The angle head can be adjusted 360°(8 positions in
45-degree increments).
1.
Loosen the hex bolt and remove the angle head.
►
Fig.12:
1.
Angle head
2.
Hex bolt
2.
Adjust the angle head to the desired position and
reinstall it so that the teeth on the housing will match up
with the grooves in the angle head.
►
Fig.13:
1.
Groove
2.
Tooth
3.
Tighten the hex bolt to secure the angle head.
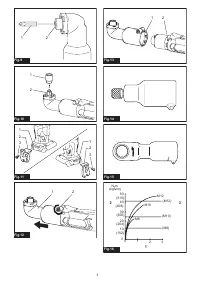
Straight head and ratchet head
Optional accessory
Straight heads and ratchet heads are available as
optional accessories for various applications on the job.
Straight head
►
Fig.14
Ratchet head
►
Fig.15
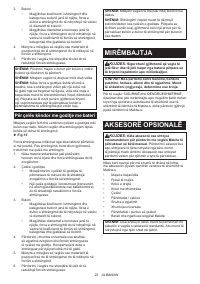
OPERATION
CAUTION:
Always insert the battery cartridge
all the way until it locks in place.
If you can see the
red indicator on the upper side of the button, it is not
locked completely. Insert it fully until the red indicator
cannot be seen. If not, it may accidentally fall out of
the tool, causing injury to you or someone around
you.
NOTICE:
If you use a spare battery to continue
the operation, rest the tool at least 15 min.
The proper fastening torque may differ depending upon
the kind or size of the screw/bolt, the material of the
workpiece to be fastened, etc. The relation between fas-
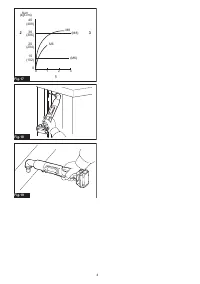
tening torque and fastening time is shown in the figures.
Standard bolt
►
Fig.16:
1.
Fastening time (second)
2.
Fastening
torque
3.
Proper fastening torque corre-
sponding to each bolt diameter
High tensile bolt
►
Fig.17:
1.
Fastening time (second)
2.
Fastening
torque
3.
Proper fastening torque corre-
sponding to each bolt diameter
For cordless angle impact driver
Hold the tool firmly and place the point of the driver bit
in the screw head. Apply forward pressure to the tool to
the extent that the bit will not slip off the screw and turn
the tool on to start operation.
►
Fig.18
The fastening torque is affected by a wide variety of
factors including the following. After fastening, always
check the torque with a torque wrench.
1.
When the battery cartridge is discharged almost
completely, voltage will drop and the fastening
torque will be reduced.
2.
Driver bit or socket bit
Failure to use the correct size driver bit or socket
bit will cause a reduction in the fastening torque.
3. Bolt
•
Even though the torque coefficient and the
class of bolt are the same, the proper fasten-
ing torque will differ according to the diame-
ter of bolt.
•
Even though the diameters of bolts are the
same, the proper fastening torque will differ
according to the torque coefficient, the class
of bolt and the bolt length.
4.
The manner of holding the tool or the material
of driving position to be fastened will affect the
torque.
5.
Operating the tool at low speed will cause a reduc-
tion in the fastening torque.
NOTE:
Use the proper bit for the head of the screw/
bolt that you wish to use.
NOTE:
Hold the tool pointed straight at the screw.
NOTE:
If the impact force is too strong or you tighten
the screw for a time longer than shown in the figures,
the screw or the point of the driver bit may be over-
stressed, stripped, damaged, etc. Before starting your
job, always perform a test operation to determine the
proper fastening time for your screw.
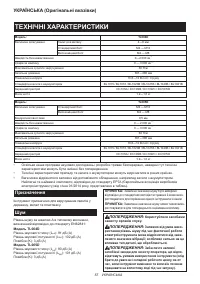
Характеристики

Остались вопросы?Не нашли свой ответ в руководстве или возникли другие проблемы? Задайте свой вопрос в форме ниже с подробным описанием вашей ситуации, чтобы другие люди и специалисты смогли дать на него ответ. Если вы знаете как решить проблему другого человека, пожалуйста, подскажите ему :)


