Фрезеры Einhell TP-RO 18 Li (4350410) - инструкция пользователя по применению, эксплуатации и установке на русском языке. Мы надеемся, она поможет вам решить возникшие у вас вопросы при эксплуатации техники.
Если остались вопросы, задайте их в комментариях после инструкции.
"Загружаем инструкцию", означает, что нужно подождать пока файл загрузится и можно будет его читать онлайн. Некоторые инструкции очень большие и время их появления зависит от вашей скорости интернета.


GB
- 27 -
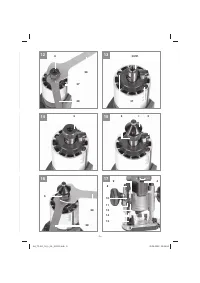
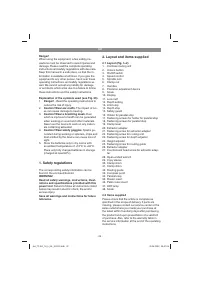
device (8) to the required dimension.
Turn the precise adjustment device (8) counter-
clockwise:
The routing depth is raised
Turn the precision adjustment device (8) clock-
wise:
The routing depth is lowered
Turning the precision adjustment device (8) by
one increment is equivalent to changing the rou-
ting depth by 0.1mm; one full turn is equivalent to
1mm.
6.4 Routing
Cordless router
•
To avoid damage to the router, make sure
there are no foreign objects attached to the
workpiece.
•
Hold both of the router’s handles (7).
•
Place the cordless router on the workpiece.
•
Set the routing depth as explained in section
6.3.
•
Select the speed as explained in section 6.2
and switch on the equipment (see section
6.1)
•
Test the equipment’s settings on a scrap pie-
ce of material.
•
Let the equipment reach full speed. Only then
should you lower the cutter to its working
height and lock the equipment with the clamp
lever (19).
Cordless palm router
•
To avoid damage to the router, make sure
there are no foreign objects attached to the
workpiece.
•
Hold the router’s handle.
•
Place the cordless palm router on the workpi-
ece.
•
Set the routing depth as explained in section
5.6.
•
Select the speed as explained in section 6.2
and switch on the equipment (see section
6.1)
•
Test the equipment’s settings on a scrap pie-
ce of material.
•
Let the equipment reach full speed.
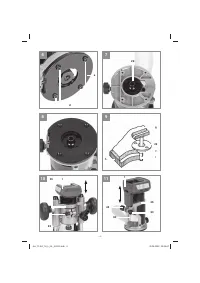
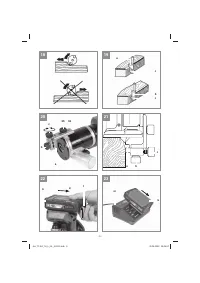
Cutting direction:
The cutting tool turns clock-
wise. To avoid accidents you must always cut
against the direction in which the tool turns (Fig.
18).
Feed speed:
It is very important to machine the
workpiece at the correct feed speed. We recom-
mend that before you machine the actual workpi-
ece, you carry out several trial cuts on a scrapped
piece of the same material. This is the easiest way
to
fi
nd the best working speed for the workpiece.
Feed speed too low:
The cutter might overheat. If you are cutting in-
fl
ammable material such as wood, the workpiece
might ignite.
Feed speed too high:
The cutter might become damaged. Cutting quali-
ty: Rough and uneven.
Allow the cutter to come to a complete standstill
before removing the workpiece or putting down
the router.
6.5 Step-by-step routing
Step-by-step routing makes sense when proces-
sing hard material and performing deep cuts.
•
Adjust the end stops as explained in section
5.8.
•
To carry out a routing job in several steps you
must then set the routing depth as explained
in section 6.3 before turning the end stop
(13) so that the depth stop (14) lies above the
highest end stop (13).
•
Now perform a cut in this setting. When the
first cut is completed, set the end stop (13) so
that the depth stop (14) lies above the middle
end stop. Now perform a cut in this setting as
well.
•
Finally, set the lowest end stop and complete
the cutting.
6.6 Cutting circles with the compass point
(33)
Proceed as follows to cut circles around a center-
point:
•
Fit and adjust the compass point (33) as exp-
lained in section 5.4.
•
Place the compass point (33) on the center-
point of the circle you want to cut and press it
in place.
•
Perform the cut as described in section 6.4.
6.7 Making cuts with the parallel stop (34)
Proceed as follows to cut along a straight outer
edge of a workpiece:
•
Fit the parallel stop (34) as explained in sec-
tion 5.3.
•
Move the parallel stop (34) along the outer
Anl_TP-RO_18_Li_BL_SPK13.indb 27
30.06.2022 09:07:26
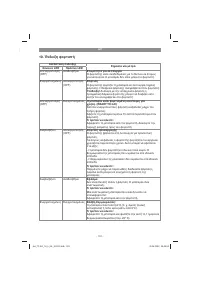
Характеристики

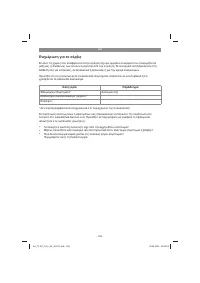
Остались вопросы?Не нашли свой ответ в руководстве или возникли другие проблемы? Задайте свой вопрос в форме ниже с подробным описанием вашей ситуации, чтобы другие люди и специалисты смогли дать на него ответ. Если вы знаете как решить проблему другого человека, пожалуйста, подскажите ему :)


