Фрезеры Einhell TP-RO 18 Li (4350410) - инструкция пользователя по применению, эксплуатации и установке на русском языке. Мы надеемся, она поможет вам решить возникшие у вас вопросы при эксплуатации техники.
Если остались вопросы, задайте их в комментариях после инструкции.
"Загружаем инструкцию", означает, что нужно подождать пока файл загрузится и можно будет его читать онлайн. Некоторые инструкции очень большие и время их появления зависит от вашей скорости интернета.


GB
- 24 -
•
Do not overload the appliance.
•
Have the appliance serviced whenever ne-
cessary.
•
Switch the appliance off when it is not in use.
Limit the operating time!
All stages of the operating cycle must be conside-
red (for example, times in which the electric tools
are switched o
ff
and times in which the tool is
switched on but operates without load).
Caution!
Residual risks
Even if you use this electric power tool in
accordance with instructions, certain resi-
dual risks cannot be rules out. The following
hazards may arise in connection with the
equipment’s construction and layout:
1. Lung damage if no suitable protective dust
mask is used.
2. Damage to hearing if no suitable ear protec-
tion is used.
3. Health damage caused by hand-arm vib-
rations if the equipment is used over a pro-
longed period or is not properly guided and
maintained.
5. Before starting the equipment
Warning!
Always pull out the battery before making ad-
justments to the equipment.
All covers and safety devices must be properly
fi
tted before the equipment is switched on.
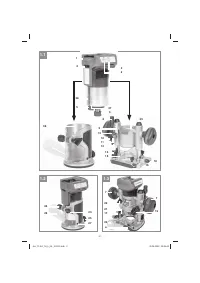
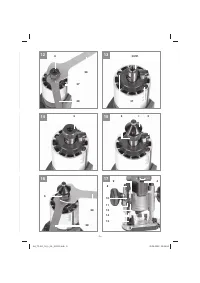
5.1 Fitting the extraction socket
(Fig. 1.2+1.3/Item 20/26)
Caution! For health and safety reasons it is
imperative that you use a dust extractor.
•
Connect your cordless tool to a domestic
vacuum cleaner or a dust extractor using the
extraction socket (20/26). This will ensure
optimum dust extraction from the workpiece.
The benefits are that you will protect both the
equipment and your own health. Your work
area will also be cleaner and safer.
•
Dust created when working may be dange-
rous. Refer to the section entitled “Safety inst-
ructions”.
•
The vacuum cleaner you use for the vacuum
extraction must be suitable for the material
you are machining. Use a special vacuum
cleaner if you are handling harmful materials.
Cordless router (Fig. 1.3/Item 20)
•
Use the retaining hook to attach the extractor
adapter (20) to the routing shoe (a) and secu-
re it with the fastening screw for the extractor
adapter (21).
•
The extractor adapter (20) can be connected
to extractor units (vacuum cleaners) with a
suction hose.
•
The internal diameter of the extractor adapter
is 36 mm. Now fit a suction hose of matching
size to the extractor adapter.
Cordless palm router (Fig. 1.2/Item 26)
•
Secure the extractor adapter (26) to the
palm router insert (36) using the countersunk
screw (27).
•
The extractor adapter can be connected to
extractor units (vacuum cleaners) with a suc-
tion hose.
•
The internal diameter of the extractor adapter
is 36 mm. Now fit a suction hose of matching
size to the extractor adapter.
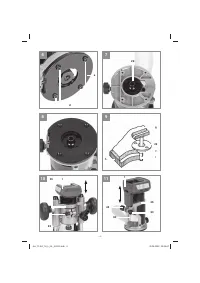
5.2 Fitting the safety guard
(Only for the cordless router!)
(Fig. 3/Item 15)
Fit the safety guard (15) as shown in Fig. 1.
To remove the safety guard (15), pull it to the
front.
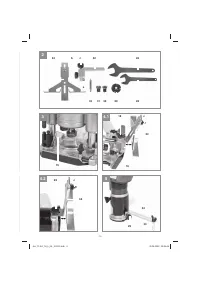
5.3 Fitting the parallel stop (Fig. 4/ Item 34)
Cordless router
•
Insert the holder for the parallel stop (16) in
the guides provided on the routing shoe (a)
as shown in Fig. 1.1 and secure with the two
fastening screws for the holder for the parallel
stop (17).
•
Undo the fastening screw for the parallel stop
(18) on the holder for the parallel stop (16).
•
Insert the parallel stop (34) in the holder for
the parallel stop (16) as shown in Fig. 4.1 and
retighten the fastening screw for the parallel
stop (18).
•
Set the parallel stop (34) to the required di-
mension and secure it in place with the wing
screw (c).
Cordless palm router
•
Undo the fastening screw for the routing gui-
de (25).
•
Insert the parallel stop (34) in the holder for
the routing guide (25) as shown in Fig. 4.2
Anl_TP-RO_18_Li_BL_SPK13.indb 24
30.06.2022 09:07:25
Характеристики

Остались вопросы?Не нашли свой ответ в руководстве или возникли другие проблемы? Задайте свой вопрос в форме ниже с подробным описанием вашей ситуации, чтобы другие люди и специалисты смогли дать на него ответ. Если вы знаете как решить проблему другого человека, пожалуйста, подскажите ему :)


