Фрезеры Einhell TP-RO 18 Li (4350410) - инструкция пользователя по применению, эксплуатации и установке на русском языке. Мы надеемся, она поможет вам решить возникшие у вас вопросы при эксплуатации техники.
Если остались вопросы, задайте их в комментариях после инструкции.
"Загружаем инструкцию", означает, что нужно подождать пока файл загрузится и можно будет его читать онлайн. Некоторые инструкции очень большие и время их появления зависит от вашей скорости интернета.


GB
- 26 -
•
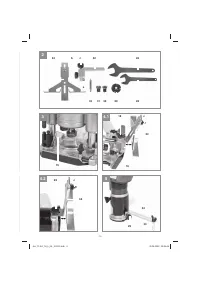
Notice!
The spindle lock is not allowed to be used for
tightening with the open-ended wrench (28)!
•
Tighten the clamp nut (6) using the two open-
ended wrenches (28).
•
The cutter must be inserted into the clamp
(30/31) by at least 20mm.
•
Before you use the equipment, check that the
cutting tool is secure and runs true.
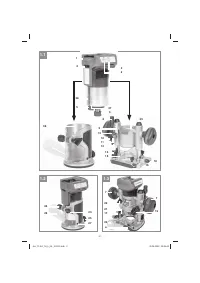
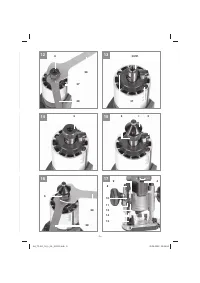
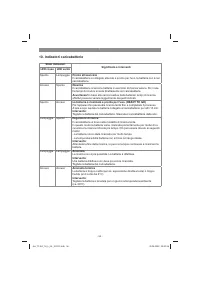
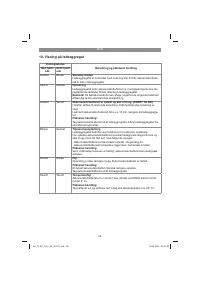
5.8 Adjusting the end stops (Fig. 17/Item 13)
The end stops (13) can be adjusted in height
according to requirements. To do so, use a hex
key to turn the screw on the end stop (13) to the
required stop height.
Warning! Remove the setting and assembly
tools again before starting the machine.
5.9 Fitting/removing the routing guide
(Fig. 20/Item 32)
•
Undo the fastening screw for the routing
guide (25), insert the routing guide (32) as
shown in Fig. 20, and establish the appropria-
te height.
•
Retighten the fastening screw for the routing
guide (25).
•
Now use the adjustment screw (c) to set the
required lateral feed and use the retaining
screw (b) to secure the routing guide.
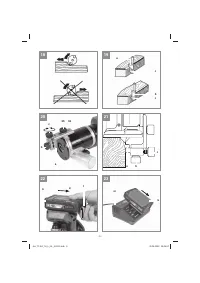
6. Operation
•
Never use a low-quality or damaged cutter.
Use only cutting tools with a shaft diameter of
6 mm or 8 mm. The cutters must also be desi-
gned for the respective idling speed.
•
Secure the workpiece so that it cannot be
thrown through the air as you work on it. Use
clamps or a vise.
•
Never cut over metal parts, screws, nails etc.
6.1 On/O
ff
switch (Fig. 1/Item 3)
For safety reasons, the cordless router/palm
router is equipped with a safety lock-o
ff
.
•
To switch on, press the unlock/lock button (2).
The LED lamp (37) will begin to shine by way
of confirmation.
•
Now press the On/Off switch (3) within the
next 10 seconds.
•
If the On/Off switch is not pressed for longer
than 10 seconds, the LED lamp (37) will go
out and the equipment cannot be switched
on.
•
To switch off, press either the unlock/lock but-
ton (2) or the On/Off switch (3).
6.2 Speed control (Fig. 17/Item 4)
The most suitable speed depends on the material
you want to cut and on the diameter of the cut-
ter. Use the speed control switch (4) to select a
speed between 10,000 and 30,000 min
-1
. You can
choose from 6 di
ff
erent switch positions.
The speeds in the various switch positions
are as follows:
Switch position 1: approx. 10,000 min
-1
(minimum
speed)
Switch position 2: approx. 14,000 min
-1
Switch position 3: approx. 19,000 min
-1
Switch position 4: approx. 22,000 min
-1
Switch position 5: approx. 25,000 min
-1
Switch position 6: approx. 30,000 min
-1
(maximum speed)
To increase the speed:
Move the speed controller (4) in the plus direction.
To decrease the speed:
Move the speed controller (4) in the minus direc-
tion.
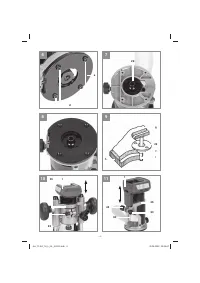
6.3 Adjusting the routing depth
(Only for the cordless router!) (Fig. 17)
•
Place the machine on the workpiece.
•
Undo the lock nut (11) and the clamp lever
(19).
•
Slowly move the machine downwards and
press the depth adjuster (12) until the cutter
makes contact with the workpiece.
•
Tighten the clamp lever (19).
•
Set the precision adjustment device (8) ac-
cordingly to 0.
•
Set the end stop (13) so that the depth stop
(14) lies above the lowest set end stop (13).
•
Press the depth adjuster (12) to lower the
depth stop (14) until it touches the end stop
(13). Then tighten the lock nut (11) and re-
lease the clamp lever (19).
•
Set the pointer (10) to the zero point on the
scale (9).
•
Undo the lock nut (11). Push up the depth
stop (14) until the pointer (10) shows the re-
quired routing depth on the scale (9). Retigh-
ten the lock nut (11).
•
Test the setting by performing a test cut on a
piece of scrap material.
•
Now the routing depth can be finely adjusted.
Begin by turning the precision adjustment
Anl_TP-RO_18_Li_BL_SPK13.indb 26
30.06.2022 09:07:25
Характеристики

Остались вопросы?Не нашли свой ответ в руководстве или возникли другие проблемы? Задайте свой вопрос в форме ниже с подробным описанием вашей ситуации, чтобы другие люди и специалисты смогли дать на него ответ. Если вы знаете как решить проблему другого человека, пожалуйста, подскажите ему :)


