Фильтры для воды Ecosoft P’URE Balance - инструкция пользователя по применению, эксплуатации и установке на русском языке. Мы надеемся, она поможет вам решить возникшие у вас вопросы при эксплуатации техники.
Если остались вопросы, задайте их в комментариях после инструкции.
"Загружаем инструкцию", означает, что нужно подождать пока файл загрузится и можно будет его читать онлайн. Некоторые инструкции очень большие и время их появления зависит от вашей скорости интернета.

26
27
This manual is the intellectual property of Ecosoft. Copying and reprinting is prohibited. © 2021
ENG
REVERSE OSMOSIS SYSTEM INSTALLER AND USER GUIDE
4.
STEPS FOR INSTALLING REVERSE OSMOSIS SYSTEM
7.
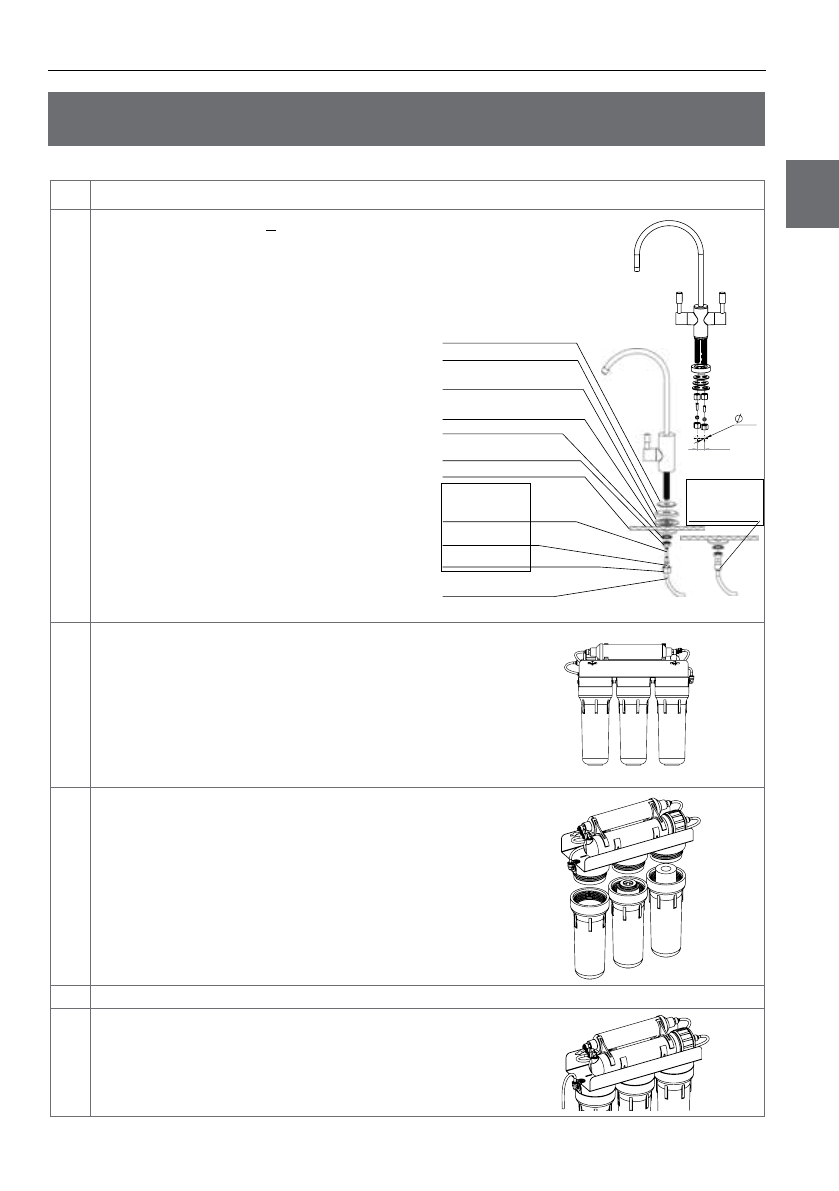
Installation of the faucet.
7.1
7.2
7.3
7.4
7.5
To install drinking water faucet
3
drill 12.5 mm (1/2”) diameter hole for
single way tap or 17 mm (2/3”) diameter hole for two way tap in a conve-
nient location at the sink or countertop.
Caution! metal shavings can damage your unit, remove them carefully
as soon as you have drilled the hole. If the mounting surface is ceramic
or stone, you may need a special carbide drill.
Mount the faucet on the sink or countertop as shown on the
figure. Nut, lock washer and plastic washer on the faucet
shank must fix the faucet firmly on the surface.
Take the blue tube, put on compression nut, ferrule, and put
plastic insert inside, in that order.
Push the blue tube as deeply as possible into the bottom of
the faucet’s shank, ensuring the compression ring is in the
joint. Screw on the compression nut in order to join the tube
to the faucet.
Installation of the double lever faucet (for a system with
mineralizing post-filter) is done similarly.
8.
Select spot where you are going to install the filter and
make two holes. The distance between the holes in the wall
must precisely correspond to that between the holes in
the bracket. Allow for at least 100 mm (3.9”) gap between
the bottom of the filter and floor. Install screw anchors if
necessary and screw in two screws (not included).
The distance between the holes is 272 mm (10.7”).
9.
Insert cartridges into the first and the second housings in
the direction of water flow (leftwards).
10.
Tighten all the three sumps by hand.
11.
Unplug the tube that connects the third housing (in the
direction of water flow) with the auto shut-off valve from
the valve.
12,5 mm
(1/2”)
17 mm
(2/3”)
272 mm (10.7”)
small rubber gasket
chrome-plated cover
blue tube
large rubber gasket
large plastic gasket
lock washer
nut
counter
1/4 ferrule
1/4 compression nut
plastic insert
Choose your option of the facet connection complete set
Option1
straight adapter
1/4”
Option 2
Характеристики
Остались вопросы?Не нашли свой ответ в руководстве или возникли другие проблемы? Задайте свой вопрос в форме ниже с подробным описанием вашей ситуации, чтобы другие люди и специалисты смогли дать на него ответ. Если вы знаете как решить проблему другого человека, пожалуйста, подскажите ему :)


