Акустика Yamaha NS-PA150_NS-P150 - инструкция пользователя по применению, эксплуатации и установке на русском языке. Мы надеемся, она поможет вам решить возникшие у вас вопросы при эксплуатации техники.
Если остались вопросы, задайте их в комментариях после инструкции.
"Загружаем инструкцию", означает, что нужно подождать пока файл загрузится и можно будет его читать онлайн. Некоторые инструкции очень большие и время их появления зависит от вашей скорости интернета.


3
En
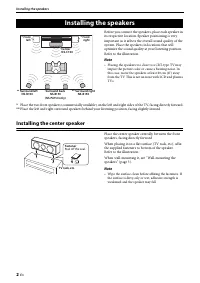
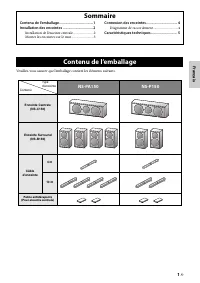
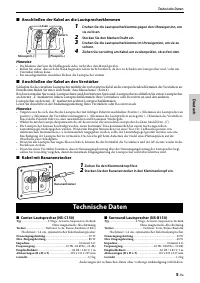
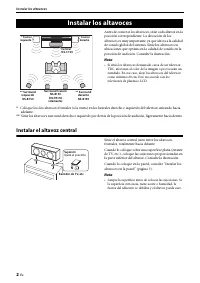
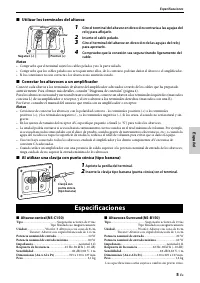
Installing the speakers
English
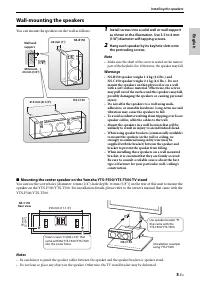
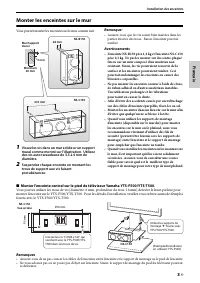
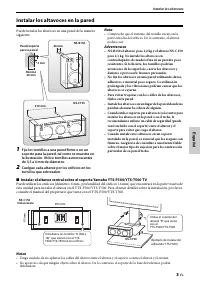
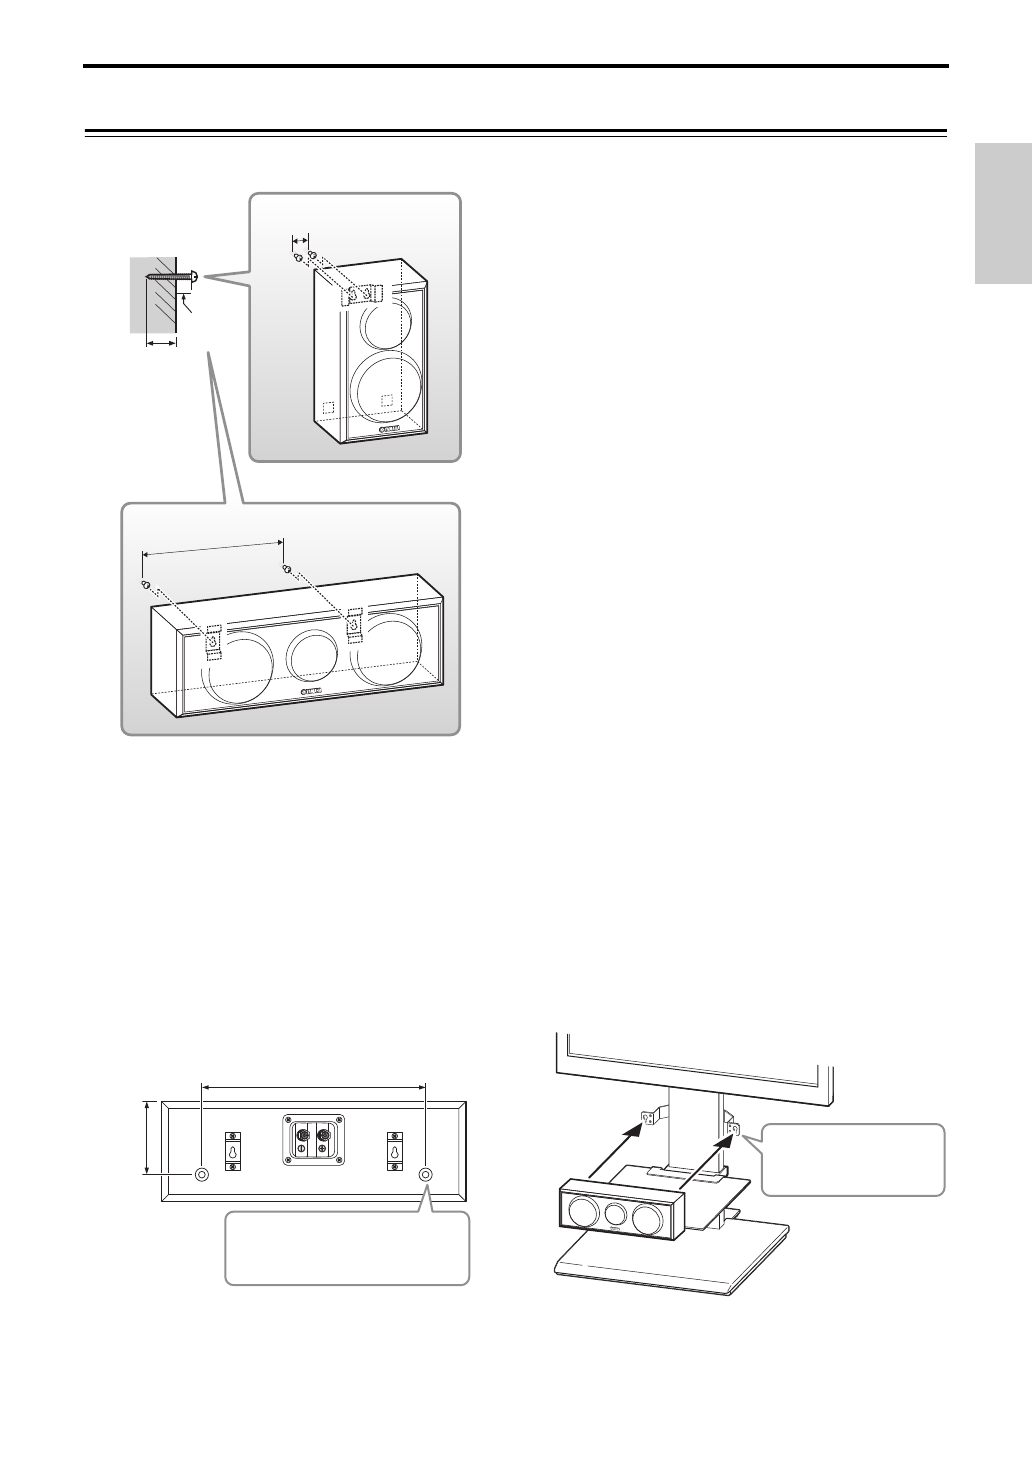
Wall-mounting the speakers
You can mount the speakers on the wall as follows.
1
Install screws into a solid wall or wall support
as shown in the illustration. Use 3.5 to 4 mm
(1/8") diameter self-tapping screws.
2
Hang each speaker by its keyhole slots onto
the protruding screws.
Note
• Make sure the shaft of the screw is seated in the narrow
part of the keyhole slot. Otherwise, the speaker may fall.
Warnings
• NS-B150 speaker weighs 1.2 kg (2.6 lbs.) and
NS-C150 speaker weighs 2.1 kg (4.6 lbs.). Do not
mount the speakers on thin plywood or on a wall
with a soft surface material. Otherwise, the screws
may pull out of the surface and the speakers may fall,
possibly damaging the speakers or causing personal
injury.
• Do not affix the speakers to a wall using nails,
adhesives, or unstable hardware. Long-term use and
vibration may cause the speakers to fall.
• To avoid accidents resulting from tripping over loose
speaker cables, affix the cables to the wall.
• Mount the speakers in a wall location that will be
unlikely to result in injury to an individual’s head.
• When using speaker brackets (commercially available)
to mount the speakers on the wall or ceiling, we
strongly recommend using safety wire (may be
supplied with the bracket) between the speaker and
bracket to prevent the speaker from falling.
• When installing these speakers on a wall mounted
bracket, it is essential that they are firmly secured.
Be sure to consult a reliable source about the best
type of fastener for your particular wall / ceiling’s
construction.
■
Mounting the center speaker on the Yamaha YTS-F500/YTS-T500 TV stand
You can use the screw holes [diameter: 6 mm (1/4"), hole depth: 16 mm (5/8")] on the rear of this unit to mount the
speaker on the YTS-F500/YTS-T500. For installation details, please refer to the owner’s manual that came with the
YTS-F500/YTS-T500.
Notes
• Be careful not to pinch the speaker cables between the speaker and the speaker bracket or speaker stand.
• Do not lean or place any object on the speaker. Otherwise, the TV stand bracket may be deformed.
26 mm (1")
Wall/wall
support
3 mm
(1/8")
Minimum
20 mm (3/4")
NS-B150
NS-C150
210 mm (8-1/4")
290 mm (11-1/2")
95
mm
(3-3/4")
Insert screws “D (M6 x 16)” that
came with the YTS-F500/YTS-T500
into the screw holes.
Rear view
NS-C150
Use speaker bracket “B”
that came with the
YTS-F500/YTS-T500.
NS-C150
(Installation example
using YTS-F500)
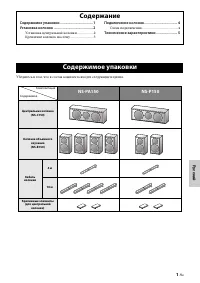
Содержание
- 26 Меры предосторожности; Уход за колонкой
- 27 Русский; Содержание
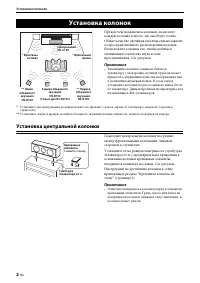
- 28 Примечание; Установка центральной колонки; Примечание; Установка колонок
- 29 Крепление колонок на стену; Предупреждения
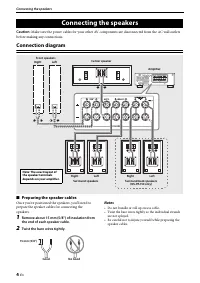
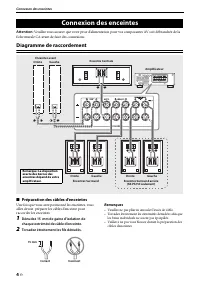
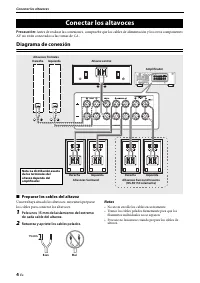
- 30 Схема подключения; Подготовка кабелей колонок; Плотно скрутите оголенные провода.; Примечания; Подключение колонок
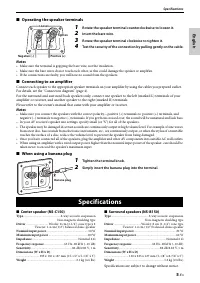
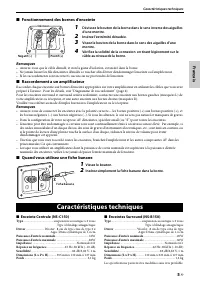
- 31 Работа с клеммами колонок; Ослабьте зажим клеммы, вращая ее против часовой стрелки.; Подключение к усилителю; Затяните головку клеммы.; Технические характеристики


