Вытяжки DeLonghi KD-AE60IX - инструкция пользователя по применению, эксплуатации и установке на русском языке. Мы надеемся, она поможет вам решить возникшие у вас вопросы при эксплуатации техники.
Если остались вопросы, задайте их в комментариях после инструкции.
"Загружаем инструкцию", означает, что нужно подождать пока файл загрузится и можно будет его читать онлайн. Некоторые инструкции очень большие и время их появления зависит от вашей скорости интернета.

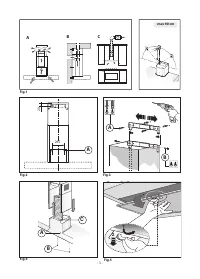


in Fig.2. Connect the lange
C to the air exhaust hole using a
connection pipe (Fig.4). Insert the upper lue into the lower
lue. Fix the lower lue to the hood using the screws
B provided
(Fig.4), extract the upper lue up to the bracket and ix it with
the screws
B (Fig.3). To transform the hood from a ducting
version into a iltering version, ask your dealer for the charcoal
ilters and follow the installation instructions.
• Filtering version
Install the hood and the two lues as described in the para-
graph for installation of the hood in ducting version. To as-
semble the iltering lue refer to the instructions contained
in the kit. If the kit is not provided, order it from your dealer
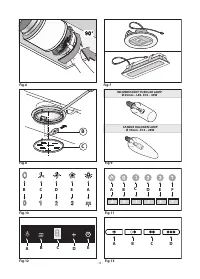
as accessory. The ilters must be applied to the suction unit
positioned inside the hood. They must be centred by turning
them 90 degrees until the stop catch is tripped (Fig.6).
USE AND MAINTENANCE
•
We recommend that the cooker hood is switched on before
any food is cooked. We also recommend that the appliance is
left running for 15 minutes after the food is cooked, in order
to thoroughly eliminate all contaminated air.
The efective performance of the cooker hood depends on
constant maintenance; the anti-grease ilter and the active
carbon ilter both require special attention.
• The anti-grease ilter
is responsible retaining the grease
particles suspended in the air, therefore it is subject to clog-
ging with variable frequency according to the use of the
appliance.
- To prevent the danger of possible ires, at least every 2
months one must wash the anti-grease ilters by hand using
non-abrasive neutral liquid detergents or in the dishwasher
at low temperatures and on short cycles.
- After a few washes, colour alterations may occur. This does
not give the right to claim their replacement.
• The active carbon ilters
are used to purify the air that is
sent back into the room and its function s to mitigate the
unpleasant odours produced by cooking.
- The non-regenerable active carbon ilters must be replaced
at least every 4 months. The saturation of the active charcoal
depends on the more or less prolonged use of the appliance,
on the type of kitchen and on the frequency with which anti-
grease ilter is cleaned.
- Regenerable active charcoal ilters must be washed by hand,
with non abrasive neutral detergents, or in the dishwasher at
a maximum temperature of 65°C (the washing cycle must be
complete without dishware). Remove excess water without
damaging the ilter, remove the plastic parts, and let the mat
dry in the oven for at least 15 minutes approximately at a
maximum temperature of 100°C. To keep the regenerable
charcoal ilter functioning eicient this operation must be
repeated every 2 months. These must be replaced at least
every 3 years or when the mat is damaged.
• Before remounting the anti-grease ilters and the regen
-
erable active charcoal ilters it is important that they are
completely dry.
• Clean the hood frequently, both internally and exter
-
nally, using a cloth dampened with denatured alcohol or
neutral liquid detergents that are non abrasive.
•
The lighting .system is designed for use during cooking
and not for the prolonged general lighting of the room. The
prolonged use of the lighting system signiicantly decreases
the average duration of the bulbs.
•
If the appliance is equipped with courtesy lights it is possible
to use them for general room lighting for a prolonged amount
of time.
• Attention:
the non compliance with the hood cleaning
warnings and with the replacement and cleaning of the ilters
entails risk of ires. One therefore recommends keeping to the
suggested instructions.
• Replacing LED lamps (Fig.7):
If the appliance version is with LED lamps, the intervention of
a specialised technician is necessary to replace them.
• Replacing halogen light bulbs (Fig.8):
To replace the halogen light bulbs
B, remove the glass pane
C using a lever action on the relevant cracks.
Replace the bulbs with new ones of the same type.
Caution: do not touch the light bulb with bare hands.
• Replacing the halogen/incandescent lamps (Fig.9):
Only use lamps of the same type and wattage installed on
the device.
• Commands (Fig.10) mechanical
the key symbols are
explained below:
A = LIGHT
B = OFF
C = SPEED I
D = SPEED II
E = SPEED III.
• Commands luminous
(Fig.11)
the key symbols are ex-
plained below:
A = LIGHT
B = OFF
C = SPEED I
D = SPEED II
E = SPEED III
F = AUTOMATIC STOP TIMER - 15 minutes
(*)
If your appliance has the
INTENSIVE speed function, from
speed THREE, press key
E for 2 seconds and it will be activated
for 10 minutes after which it will return to the previously
set speed.
When the function is active the LED flashes.
To interrupt it before the 10 minutes have elapsed, press
key
E again.
Some models allow activating this function even with speed
one and two.
By pressing key
F for two seconds (with the hood switched
off ) the “
clean air” function is activated. This function switches
the appliance on for ten minutes every hour at the first speed.
As soon as this function is activated the motor starts up at the
first speed for ten minutes. During this time key
F and key
C must flash at the same time. After ten minutes the motor
switches off and the LED of key
F remains switched on with
a fixed light until the motor starts up again at the first speed
after fifty minutes and keys
F and C start to flash again for ten
minutes and so on. By pressing any key for the exclusion of
the hood light the hood will return immediately to its normal
functioning (e.g. if key
D is pressed the “clean air” function is
deactivated and the motor moves to the 2nd speed straight
away. By pressing key
B the function is deactivated).
(*)
The “
AUTOMATIC STOP TIMER” delays stopping of the
hood, which will continue functioning for 15 minutes at the
operating speed set at the time this function is activated.
• Anti-grease/active charcoal filters saturation:
- When the
A key flashes with a 2 second frequency the anti-
- 6 -


