
Водонагреватели Timberk SWH RE11 100 V - инструкция пользователя по применению, эксплуатации и установке на русском языке. Мы надеемся, она поможет вам решить возникшие у вас вопросы при эксплуатации техники.
Если остались вопросы, задайте их в комментариях после инструкции.
"Загружаем инструкцию", означает, что нужно подождать пока файл загрузится и можно будет его читать онлайн. Некоторые инструкции очень большие и время их появления зависит от вашей скорости интернета.


www.timberk.com • electrical storage water heater
8
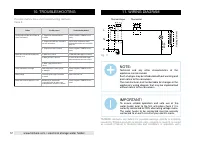
NOTE:
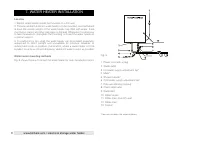
In places or on the wall, where there may be a water
contact, the power outlet installation height must be
not less than 1.8 m.
NOTE:
The water heater is an appliance, operating in such
a manner that pressure of water in the water heater
corresponds to the pressure of water in water main.
If pressure in the main exceeds 0.8 MPa, then it is
necessary to mount a pressure reducer before the water
heater so that pressure doesn’t exceed 0.8 MPa.
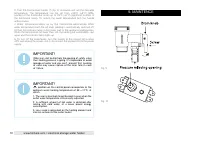
NOTE:
Do not mount additional accessories, such as a shut-off
valve, between the relief valve and the inlet nozzle.
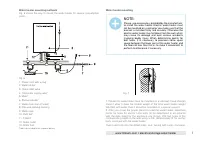
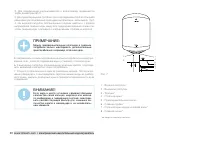
Connection to water main
1. The heater must be connected to water main with at least 0.1 MPa
pressure; maximum pressure is 0.75 MPa.
2. G1/2 diameter pipes are used to connect the water heater to the water
pipeline.
3. To prevent a leakage when connecting pipes, use rubber sealing gaskets
on the threaded pipe ends.
4. Screw a relief valve to the inlet nozzle, marked blue and embossed arrow
of the water flow direction, so that the water flow direction coincides with
direction of the arrow on the valve’s case.
5. Water heater with the mounted valve must be connected to the water
main – install a shut-off valve at the water inlet point. You need to connect
a drain pipe to the opening of the pressure relief of safety valve. Next you
should put a drain pipe to the sewer.
6. Connect the desired number of consumption points to the outlet nozzle,
marked red.
7. Open the shut-off tap and one of the tap assemblies. After the tank is
filled with water, as evidenced by issue of water from the cock assembly,
shut the cock assembly and check the leak integrity of all joints.
Connection to electric main
IMPORTANT!
If water in the installation location contains a large
amount of calcium, manganese or iron salts, then
necessary to mount a respective filter in the delivery
system to reduce the amount of scale generated in
the tank and on the heating element.
IMPORTANT!
Prior to connecting the tank water heater, make sure
that the water heater is properly grounded. Proper
grounding is important to minimize electric shocks
and risk of fire. The power cord is equipped with a plug
with a grounding pin. The appliance must be used
with a properly grounded power outlet. If the outlet,
you are intending to use, is not properly grounded or
grounded by a time-delay fuse or a circuit breaker,
contact a qualified electrician to install a proper outlet.
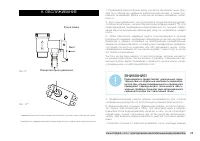
securely tighten bolt nuts, then hang the water heater on these anchor bolt
hooks (see Fig. 7).
3. Fix a power outlet to the wall. Requirements to the outlet are as follows:
220V/10A, single-phase, three-wired. It is recommended to place the outlet
on the right side above the water heater.
Содержание
- 14 Уважаемый покупатель!; мация, касающаяся Вашей безопасности, а также рекомендации по; Важные меры предосторожности и инструкции, со-; СОДЕРЖАНИЕ
- 15 МЕРЫ ПРЕДОСТОРОЖНОСТИ
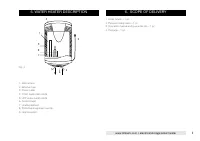
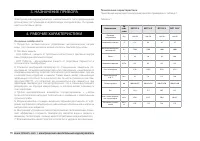
- 16 РАБОЧИЕ ХАРАКТЕРИСТИКИ; Основные особенности; НАЗНАЧЕНИЕ ПРИБОРА; Технические характеристики
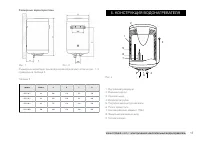
- 17 приведены в таблице 2.; КОНСТРУКЦИЯ ВОДОНАГРЕВАТЕЛЯ
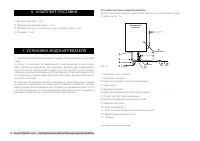
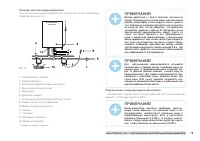
- 18 КОМПЛЕКТ ПОСТАВКИ; трещины и другие повреждения. В противном случае необходимо при-; Способы монтажа водонагревателя
- 19 Подключение к водопроводной магистрали; Нагреватель подключается к водопроводной сети с давлением ми-
- 20 Нагреватель со смонтированным клапаном подключить к водопро-
- 21 ЭКСПЛУАТАЦИЯ ВОДОНАГРЕВАТЕЛЯ
- 22 индикаторная лампочка в нижней части прибора, а температура воды
- 23 Производитель предоставляет увеличенный гаран-; Ручка слива
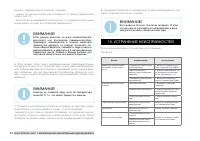
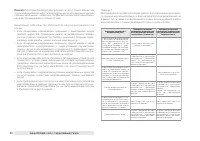
- 24 УСТРАНЕНИЕ НЕИСПРАВНОСТЕЙ
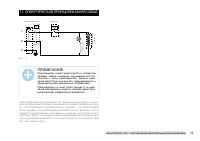
- 25 ЭЛЕКТРИЧЕСКАЯ ПРИНЦИПИАЛЬНАЯ СХЕМА
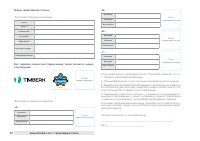
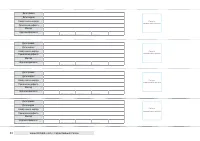
- 26 ГАРАНТИЙНЫЙ ТАЛОН
- 27 Гарантийные обязательства; Если при эксплуатации изделия Вы столкнулись с неполадками в его
- 29 Изготовитель не несет гарантийных обязательств за изделие в
- 31 ным письмом Производителя.
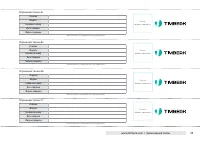
- 32 Бланк гарантийного талона.; Заполняется фирмой-продавцом; Без подписи покупателя Гарантийный талон является недей-; ности (если прибор провер ялся в его присутствии при продаже) приоб-
- 39 сообщите нам об этом, связавшись с нами по электронной почте,


