Видеорегистратор Saturn ST-VDR0001 - инструкция пользователя по применению, эксплуатации и установке на русском языке. Мы надеемся, она поможет вам решить возникшие у вас вопросы при эксплуатации техники.
Если остались вопросы, задайте их в комментариях после инструкции.
"Загружаем инструкцию", означает, что нужно подождать пока файл загрузится и можно будет его читать онлайн. Некоторые инструкции очень большие и время их появления зависит от вашей скорости интернета.


4
ly enter the video re-
cording, then the product
will charge while records.
After the car power off,
the product will work
continually for 15 sec-
onds then automatically
close-down and save
previous files.
Note
: This machine can
only use the car charger
of output 5V!
Features
DVR with record / cam-
era / playback functions,
you can choose the
modes you need.
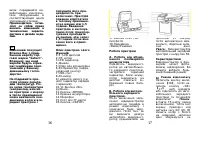
A) Recording mode
Press the power button
【
18
】
, then press the
OK button
【
17
】
to open
or connect car charger
into the video mode and
start recording (note:
please insert TF card
before use), then the
screen bottom right of
the hour figures 00: 00:
00 becomes red from
white, recorded files are
stored into the card,
press the OK button
【
17
】
to stop recording,
then red digital time
becomes white.
B) Camera mode
Power on and press
MODE button
【
18
】
to
enter the camera mode,
press OK button to take
pictures.
C) Preview mode
Power on and press
MODE button
【
18
】
twice to enter the pre-
view mode
Press Up/Down button
【
10.11
】
to select the
folder preview, press the
OK button into menu,
and then press OK but-
ton to play/pause.
Delete function
Under the preview mode,
press the MENU button
【
12
】
to enter delete
interface, and then press
OK button
【
17
】
into
"single/ all / selection
"interface (use up /
down buttons to select
the listed settings), final-
ly press OK button to
confirm, you can also
choose "Thumbnail Dis-
play" and "preview play-
back volume" feature,
and finally press OK but-
ton to confirm.
PC camera mode:
Press
MENU
button
【
12
】
to enter the USB
mode, then press OK
button
【
17
】
to enter
the confirmation mode, it
appears “network cam-
era” “the disk driver”.
Through Up/ Down but-
ton
【
10.11
】
chooses
“network camera”, and
5
press OK button
【
17
】
to confirm and enters
network camera mode,
this product has special-
purpose actuation soft-
ware, it needs install the
driver before connecting
USB cable with comput-
er.
Focus
function
In camera mode or video
mode, press the Up/
Down
button
【
10.11
】
,the screen will
display the focus multi-
ples icon, then press
“ UP/ DOWN” button
【
10.11
】
to select the
focus multiples (1 times
to 8 times)
USB Mode
Connect your DVR with
computer by USB cable,
[My computer] occurs
removable disk, and the
files are stored at Re-
movable Disk/DCIM/100
DSCIM. At the moment,
the file of the product
can be downloaded to
the computer.
Setting the functions:
Turn on the product and
press “Mode Switching”
【
18
】
to enter Camera
mode, then press MENU”
【
12
】
to enter into Cam-
era setting interface.
Select by “ UP/ DOWN”
button
【
10.11
】
for the
following setting and
confirm by “OK”
【
17
】
.
Then press “OK” button
【
17
】
again to exit after
finished.
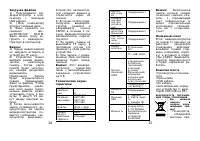
1. Resolution:
VGA
1.3M 2M 3M 5M 8M
12M
2. Picture quality: fine,
standard, economy
3. Scene mode: Auto,
Sport, Night, Portrait,
Landscape, Backlight
4. EV
:
+1/3 +0.0
-
1/3 -2/3 -1.0 -4/3 -
5/3 -2.0 +2.0 +5/3
+4/3 +1.0 + 2/3
5. White balance
:
Auto,
Daylight, Cloudy, Tung-
sten, Fluorescent
6. ISO
:
Auto 100 200
7. Color
:
Standard
Vivid Sepia Mono-
chrome
8. Saturation
:
High
Normal Low
9. Sharpness:
Hard
Normal Soft
10. Preview: on/off
11. Time Stamp: Off,
Date & Time, Date only
12. Burst: on, off
Turn on the DVR and
press
MENU
button
【
12
】
to enter into Vid-
eo mode and select by
Up/Down
button
【
10.11
】
, press OK but-
ton
【
17
】
enter into set-

